As a WooCommerce user myself, I've experienced the benefits that come alongwith this handy e-commerce tool. Among the varied WooCommerce features, the WooCommerce Variations utility is a must-try. So, if too have been planning to implement the same for your WooCommerce retail store lately, then this is a tutorial meant for you.
Assuming that you're already familiar with the highly effective WooCommerce benefits, in this tutorial, we'll be highlighting some interesting details about the 'Product Variations' feature which has been making grounds in the world of WooCommerce enabled e-commerce websites.
What is WooCommerce Variations?
WooCommerce variable products are basically the variations available for a specific product. For example, T-shirt is a variable product. That means, a t-shirt is available in a variety of colors and sizes.
How to enable WooCommerce variations?
So, let's start with explaining different steps associated with leveraging Product Variations feature for your WooCommerce-based store.
Step 1 - Set a product type to 'Variable' for the product you want to offer variations for
For this, just go to your WordPress admin dashboard-> Products--> Add a Product and select the value for Product Data as 'Variable'. Once you're done with making the selection, you'll notice a change in user interface as shown in below screen-shot:

Read the post to find out how to add a variable product in WooCommerce
Watch the video from the ThemeIsle to find out more about WooCommerce variables:
Step 2 - Define attributes for the variable product
Now, you'll be required to define the attributes for the variable product. For this, simply go to WP admin dashboard-> Products-> Attributes tab. A page similar to this one would be displayed:

Looking for a change in the eCommerce business? Move your online store to a new and more scalable cart. Try the free demo now!
On clicking the 'Add' button displayed on the above screen, you'll be redirected to a new page as shown below:
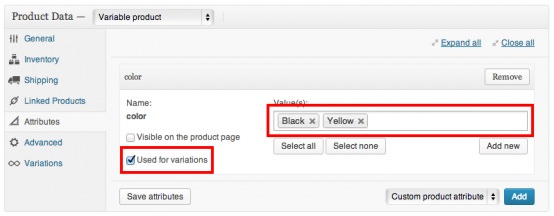
Here, please note that the values assigned to attributes will appear as options for the respective variable product. Once you're done with defining the attributes, select the 'Variation' checkbox for each attribute. This will inform WordPress that the attributes belong to the variable product.
WordPress Migration Checklist for you to use after WooCommerce transfer
Step 3 - Start adding variations
Now that you've saved the variable product, you can proceed ahead with adding variations for the same. For this, simply go to WP admin dashboard-> Products-> Variations tab and finally click on 'Add Variation' button. Here is the screen-shot for the same:
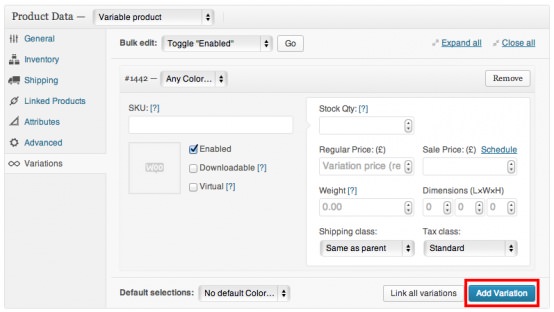
Have a look at the information that can be provided for each product variation:
- Image - You can click on image icon to use an image uploader for choosing a suitable image for the variable product.
- SKU(Stock Keeping Unit) - Allot a value to this attribute or choose to leave it blank wherein it would take up the value of the variable product.
- Weight - Use this to enter the weight for the variation or else leave it blank wherein the field will get auto-populated with the weight of the variable product.
- Dimensions - Use it to specify the dimensions for variations or else leave it blank to use the variable product's dimensions.
- Price - User this to specify a basic price for the product.
- Sale Price - Use this to specify the sales price for the product.
- Downloadable checkbox- Select it if you want to specify that the variation is a downloaded product. Further, you can enter the downloadable file's URL as well as the permissible download limits.
- Virtual checkbox - Use this to specify that the variation is virtual.
- Enabled checkbox - Just de-select it for making the product variation un-available for users.
- Shipping Class - Set a new value for the shipping price of variation in case the same differs from the one applicable to the variable product.
- Tax class - Use this to set the tax class as 'standard' or a custom tax band.
After specifying values for each product variation, click on 'Add Variation' button. With that you're done with displaying variations for the variable product in the front-end.
Choose your eCommerce platform with the comprehensive Magento vs WooCommerce vs Shopify vs OpenCart vs PrestaShop review
Bulk Editing- An effective 'Add-On'
If at some point of time, you feel the need for editing different values assigned to product variations, you don't have to feel jittery because WooCommerce has a utility for that as well. The 'Bulk Editing' dropdown provided above the 'Add Variations' form allows you to edit everything ranging from product prices, stock quantity and weight to dimensions and a lot more. Here is the screen-shot for the 'Bulk Editing' utility:
Variable Product- How does it come out in the front-end?
When it comes to viewing a variable product in the front-end, your users will be able to see a dropdown list for each one. He/she can then select the options(the ones added in step 2) available for the variable product and click on 'Add To Cart' button to make a purchase.
If you wish to try out the Shopify platform, this Shopify migration checklist is exactly what you need
WooCommerce Variations FAQs
What are variations in WooCommerce?
Once you build a WooCommerce store, get ready to deal with different aspects of its management. Product variations is one of them. So, a variation is a different variant of the same product to which you can assign price, availability, color, size, etc.
How do I show variations on WooCommerce shop?
Open the needed product variation and click the Edit button. Next, fill in all the needed information (including the display options) and update the variation.
How many variants can you have on WooCommerce?
The WooCommerce platform allows you to add up to 50 product variations. Therefore, you have to consider this when creating a product that has over 50 varables.
.Wrapping Up
Product Variations are excellent tools to provoke your visitors for purchasing a product they're interested in. I hope the above coverage would aid you in wooing the group of customers which wants to buy a particular product but tends to drive away due to lack of permutations.
Not sure which platform to choose for your eCommerce retail? Run a free demo with Cart2Cart now to see the desired solution in action!


 March 31, 2025
