How can we help you?
WooCommerce-related questions28
If there are lots of products and redirects on the Source store that need to be transferred to the WooCommerce platforms, Cart2Cart transfers 301 redirects like 301 redirects, and 302 redirects like 307 redirects. In this way, Cart2Cart makes the URLs of your new WooCommerce store the same as on your current Source store.
In order to install WorPress WooCommerce plugin for your existing site, follow the instructions below.
First of all, open the link and click on the Download button.
The plugin will be saved as a zip archive.
After this, go to your WP Admin and follow these steps:
- Go to Plugins -> Add New .
- Click Upload Plugin to display the WordPress Plugin upload field.
- Click Choose File to navigate your local file directory.
- Select the WordPress Plugin zip archive you wish to upload and install.
- Click Install Now to install the WordPress Plugin.
- The resulting installation screen will list the installation as successful or note any problems during the install.
- If successful, click Activate Plugin to activate it, or Return to Plugin Installer for further actions.
Yes, transfer of the Product Cost is supported by Cart2Cart. However, to migrate the Cost of the Product to WooCommerce it is recommended to previously install the following plugins:
To initiate the store data importing to WooCommerce, a Cart2Cart plugin needs to be installed. In case, the plugin cannot be installed in an automated manner (due to technical reasons), you may need to provide FTP credentials to connect the two stores. Below is a step-by-step instruction for you to go through:
- Go to the wp-config.php file of your WordPress installation folder -> copy below code and paste it at the end of the wp-config.php file: define('FS_METHOD','direct');
- Once done, open your droplet access console and enter root as username and its password.
Copy below command and paste it into the access console where you have to specify your plugin directory path. When ready hit enter chmod 777 /yourwebsitename/public/wp-content/plugins/
If you’re set to replatform to WooCommerce with the help of the Cart2Cart module, the instructions below will come in handy for you:
Source & Target Cart Setup
Choose from the drop-down menu your current shopping cart platform and provide the store’s URL address (if migrating from an open-source cart) or the store’s API details (if migrating from a hosted solution). Once ready, specify WooCommerce as your Target cart and enter the required store’s details (WooCommerce admin URL, admin login and admin password). Once done, click the Choose Entities button.
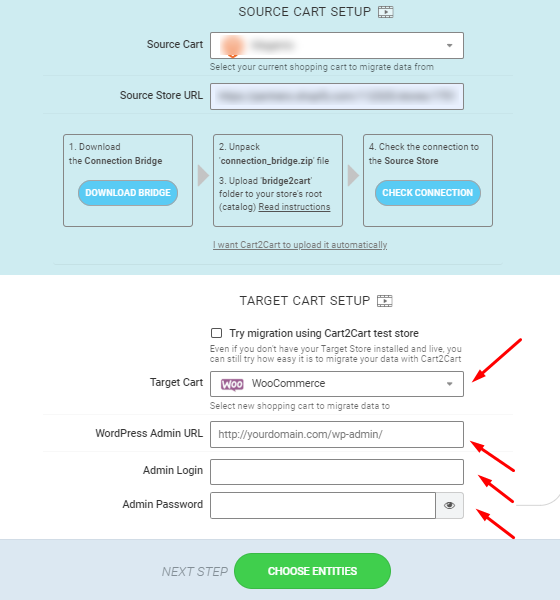
Note: The access details are required to establish the connection between the stores automatedly. The provided information is totally secure and protected according to the Cart2Cart Privacy Policy.
Choose the data to migrate
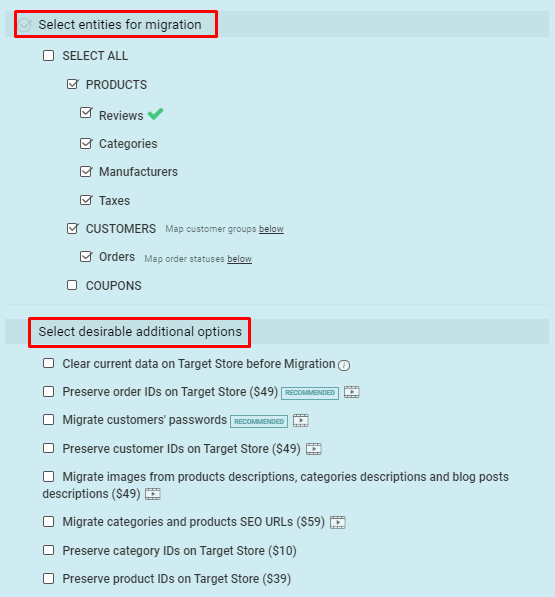
Decide what data entities will be moved to WooCommerce. Just click on the corresponding checkboxes or click on the Select All option to migrate all the store data. Besides, choose some of the additional migration options to broaden the WooCommerce migration.
Perform Data Mapping
Match Order Statuses, Customer Groups of your current shopping cart to the corresponding ones on your WooCommerce. Data will migrate accordingly to the set relations.

Launch demo migration
Take advantage of the demo migration and move a limited number of store entities from your current store to WooCommerce in just 15min.
Start full migration
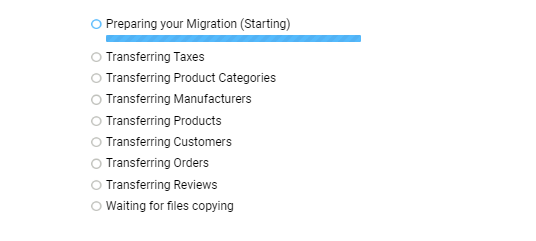
By activating the Start Full Migration button you’ll launch all the existing store data transfer to WooCommerce in a fully automated manner.
During the Volusion to WooCommerce migration, only those customers can be transferred that have the “Customer” status (they’re indicated with the “C” symbol in the “accesskey” file exported from Volusion). All other users are not migrated in the default migration.

No, automated migrations to multistores are impossible by default.
This is due to the fact that multisites have only 1 common database and a table with the users. The rest of the tables on each store have a separate prefix.
Thus, WordPress multisite is a set of different WordPress sites, united by one common user database table.
Cart2Cart doesn’t have the necessary software to support this kind of migration. Its development is rather complicated and requires a lot of time and resources. There’s a limited number of clients, requesting migration to multistore. Therefore, we can carry out custom migrations only based on specific client requests.
Data migration to multistore requires additional research and store access credentials. So, it is possible only within our Service Packages.
To get further information, please book a consultation.
The Preserve order IDs option is available within Recent Data Migration if no new entities have been added to your Target store after the Full migration.
But: if the Target platform is Shopify or WooCommerce - the Preserve Orders IDs option is available.
To be more specific, if no new orders have appeared on the Target store after the Full migration, it is possible to select the option "Preserve order IDs on Target Store". If at least one order has been created on the Target after the Full migration, the option "Preserve order IDs on Target Store" is not available within Recent Data Migration.
However, if WooCommerce or Shopify is your Target platform, and you've created some new orders on it after the Full migration, you can still take a full advantage of the option "Preserve order IDs on Target Store" within your Recent Data Migration.
Note: For both examples, the "Preserve order IDs on Target Store" option is available within Recent Data Migration only if it has been chosen before Full Migration.
Yes, Cart2Cart supports migration of multiple languages to or from WooCommerce providing the paid WPML module is purchased & installed on your WordPress before the data transfer (Multilingual CMS). Afterwards, you will additionally have to install the following WooCommerce modules (should be installed automatically):
What you should know about WPML:
1. During migration to WooCommerce with module installed, WPML creates translated “copies” of products and categories for each of the supported languages, i.e. if there are 2 languages (EN and GE), there’ll be 2 localized copies of the very same product.

2. WPML supports translation of the following entities:
- Translating product categories (Description, Name)
- Translating products (Title, Slug, Description, Custom Product Attribute(Name, Value(s)))
- Translating product variations (Variation description)
- Translating Image Texts
- Translating URLs
3. WPML is a paid module provided by a 3rd party company. Cart2Cart does not take responsibility for its performance.
When migrating to or from WooCommerce with Cart2Cart, WPML module should be installed and configured beforehand the data transfer. If any of the multiple languages are not added in WPML module, they won’t be migrated.
Please, read the official instructions on installing the WPML plugin and adding/editing multiple languages.
Check the full list of eCommerce platforms where migration of data in different languages is supported by visiting this Multilanguages Migration page.
Yes, there is an opportunity to export users with passwords from and to WooCommerce, providing that the store has default settings and no custom code modifications are included.
Note: If your shopping cart has any modifications in password settings, we can not guarantee its accurate transfer.
For some pairs of shopping carts you will need to install Cart2Cart WooCommerce Passwords Migration Plugin.
What is Cart2Cart WooCommerce Passwords Migration Plugin?
Cart2Cart WooCommerce Passwords Migration Plugin allows to migrate customer passwords from PrestaShop, Magento and OpenCart to WooCommerce. It’s free to download and can be activated in a few simple steps before or after the migration.
How to Install a Plugin using Upload Method in WordPress Admin Panel
-
- Get Cart2Cart WooCommerce Passwords Migration Plugin.
- Go to your WordPress admin panel.
- Click on Plugin » Add New. Then click on the Upload tab.
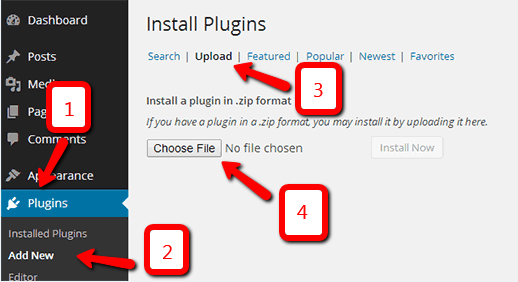
-
- Click on “Choose File” to browse the plugin and upload it (.zip file only). You will be taken to the activate a plugin page, as illustrated below.
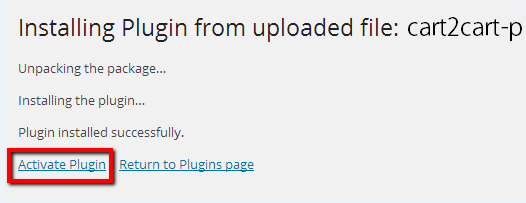
- When the plugin is installed, make sure to click on “Activate Plugin”.
How to Install a Plugin using Upload Method in WordPress Admin Panel
- Get Cart2Cart WooCommerce Passwords Migration Plugin.
- Go to your store’s directory using FTP Manager (/wp-content/plugins/) and unzip the plugin folder there.
- Enter your WordPress admin panel » Plugins.
- Find Cart2Cart: Passwords Migration plugin on the list.
- Click “Activate”.
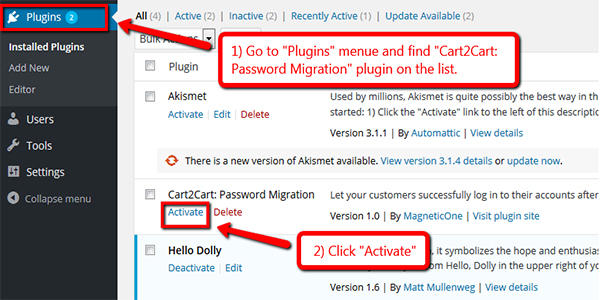
Please note! We highly recommend to keep Cart2Cart WooCommerce Passwords Migration Plugin activated until all of your customers log in at least once. Afterwards, it can be disabled or deleted.
However, Cart2Cart does not migrate passwords from or to hosted shopping carts, like 3dcart, Bigcommerce, Volusion, Shopify, etc. Instead, your clients should use Password Recovery tool on your Target shopping cart to access their accounts. For more detailed information about password recovery read this article.
In case you have any questions, feel free to contact our Support Team.
Also, visit our dedicated landing page for a detailed table with migration pairs available for password transfer.
During migration to WooCommerce (with the “Migrate SEO URLs” option picked), Cart2Cart moves SEO keys, thus, URL structure may be a little different. Also, notice that WP has its peculiarity of URL building by default.
For instance, your Magento store’s URL before migration:
http://your-store.com/index.php/macbook-silver-13
After transfer it may look like this one:
http://your-store.coml/product/category/macbook-silver-13
Here, /product/ is added by default. Optionally, you can alter the URLs structure by logging into your WordPress admin panel and going to Settings -> Permalinks.
For example, you can enter /shop in Custom Base field, and your product URLs will look like: http://your-store.coml/shop/category/macbook-silver-13

Pay attention to the fact, that if the SEO URL you’re migrating already exists in the base of your WooCommerce store, a prefix or index number can be added.
For example, if SEO URL = 'macbook-silver-13' already exists, it’ll be altered to 'macbook-silver-13-2’ and so on, until the SEO URL name is unique.
Due to WooCommerce peculiarities, Cart2Cart migrates product options to WooCommerce as product variants. However, by installing a paid Product Add-Ons on your WooCommerce store prior to data transfer, your product options will be moved directly into the plugin without converting to variants.
We recommend using Product Add-Ons to avoid excessive creation of product variants on WooCommerce.
Important. During the migration to Add-Ons plugin, products will not have variants in your admin section, ONLY options. Technically it's not possible to migrate both product variants and options to WooCommerce, so it'll be either options or variants, but not both.
Note: Cart2Cart is not responsible for Product Add-Ons performance and not affiliated with its creators.
Cart2Cart creates product redirects to the new products and categories during migration from or to WooCommerce as an additional option. Before the data transfer, however, you need to install a free “Redirection” plugin.
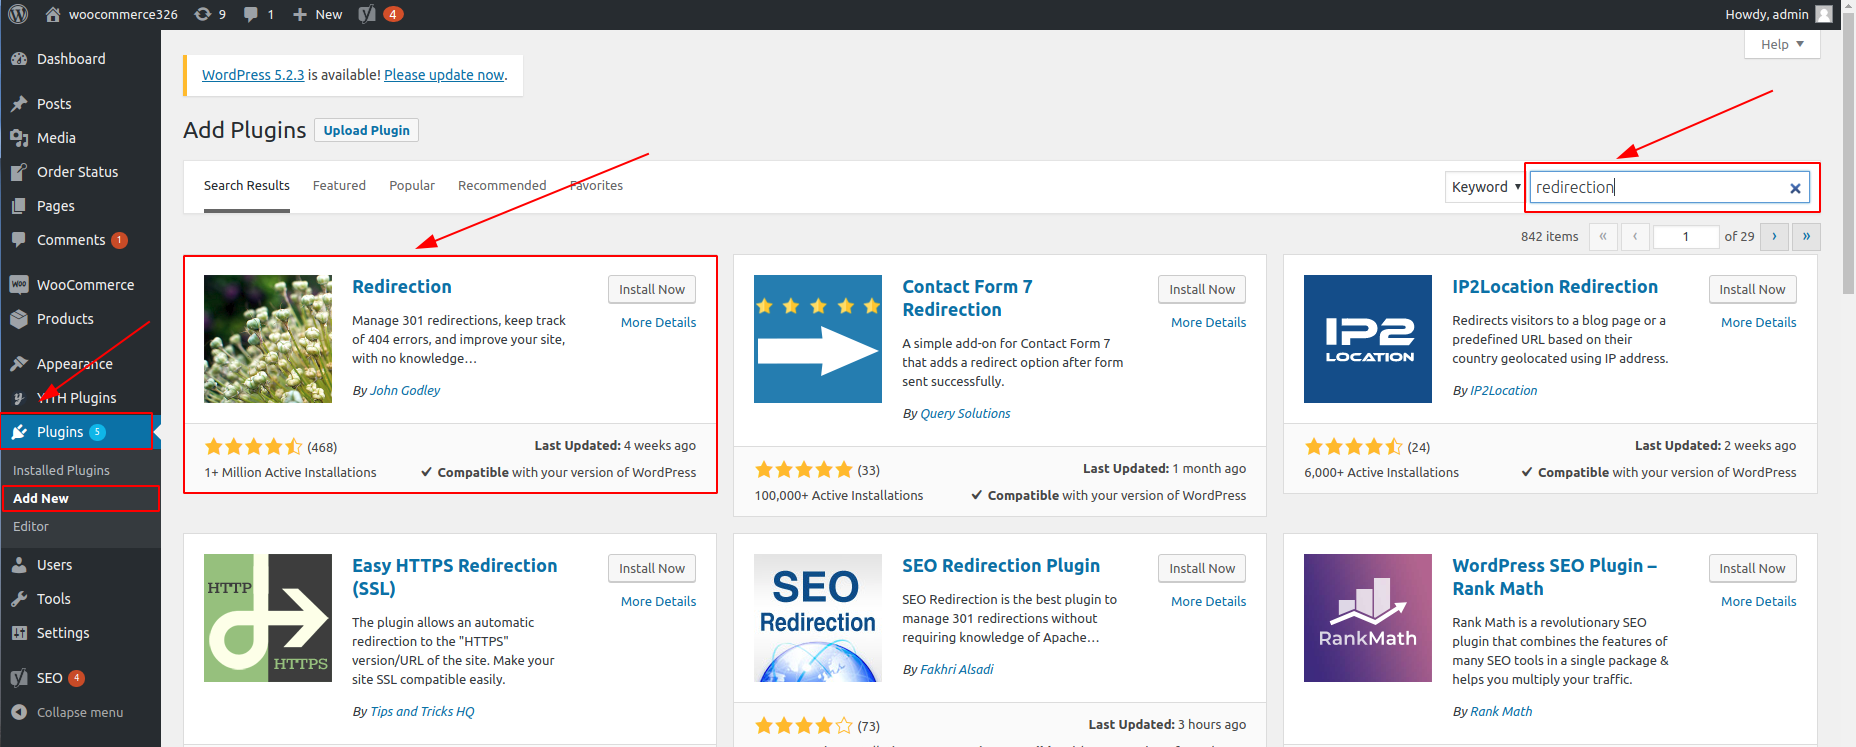
- Install the plugin:
- Enter your WooCommerce Admin Panel
- Hold the mouse over Plugins in the Left Nav menu and choose Add New
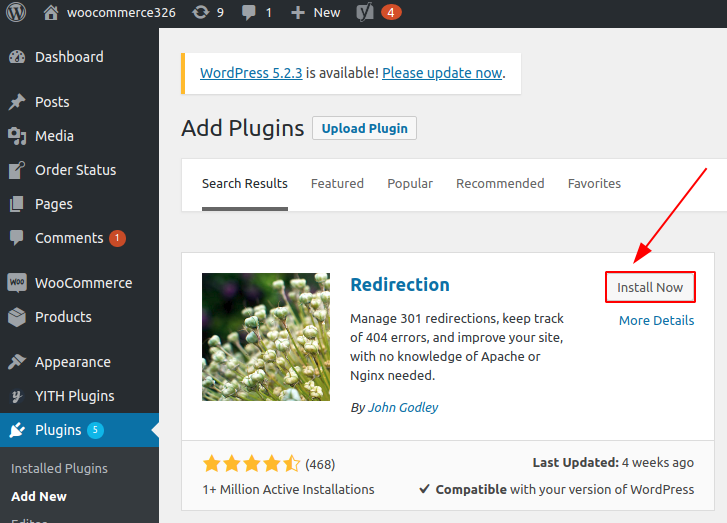
- Enter "Redirection" in the search field
- Tap on Install Now button
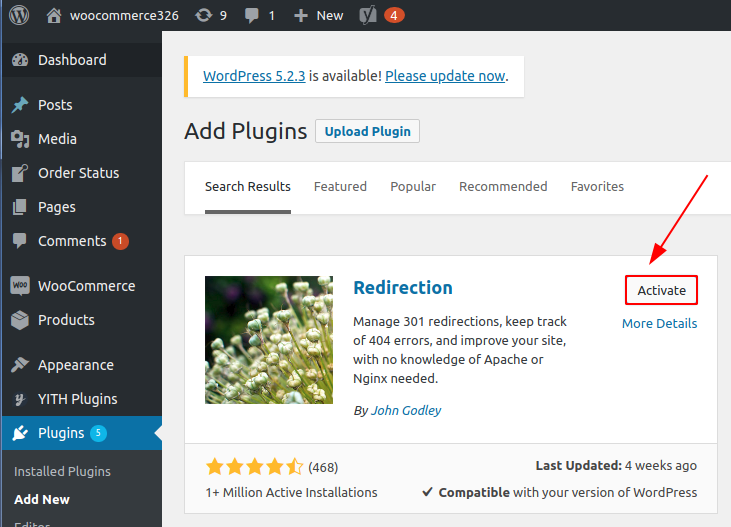
- Once the installation is finished, click on Activate
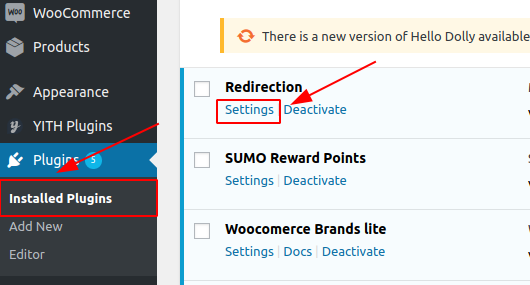
- Choose Installed Plugins from the Plugins tab
- Find "Redirection" and click on Settings
- Press Start Setup button
- Check "Monitor permalink changes in WordPress posts and pages" and "Keep a log of all redirects and 404 errors". Click on Continue Setup
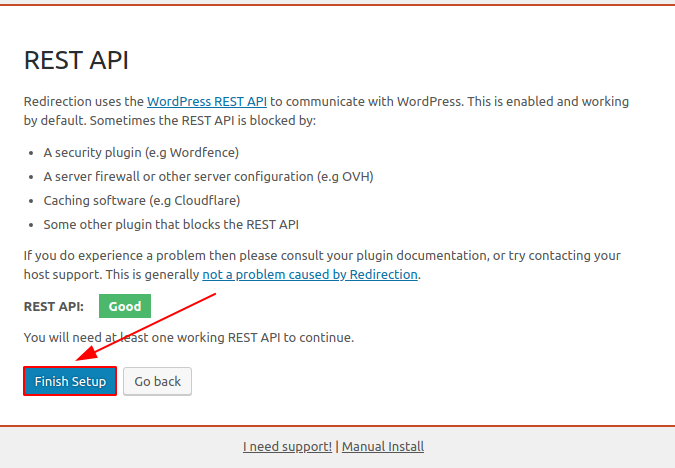
- Click on Finish Setup
- Tap on Finished and your plugin is ready to use!


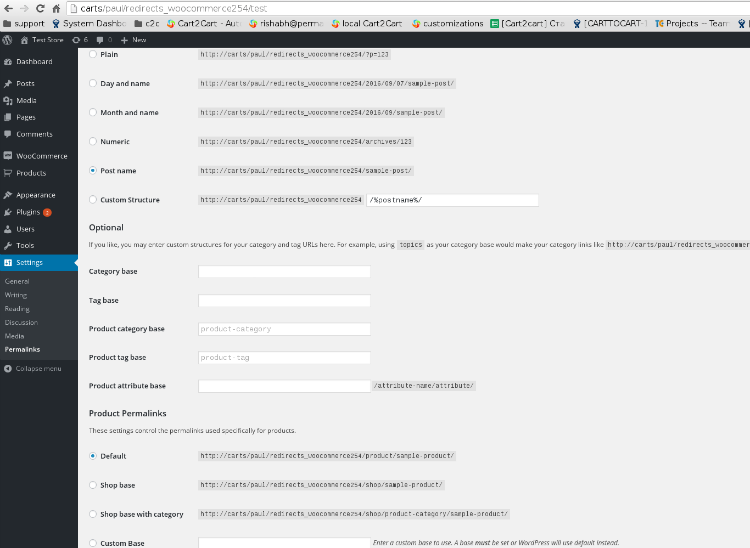
Additionally, we suggest implementing such settings in Permalinks menu in your WooCommerce admin panel:
- go to Settings->Permalinks, choose Post Name in the Common Settings section and Default in the Product Permalinks.
Yes, you can map custom Order Statuses when migrating to/from WooCommerce, providing you created them before the data transfer with the help of a YITH WooCommerce Custom Order Status plugin.
How to create custom order status in 3 steps
To create custom order statuses in your Target or Source WooCommerce store, you need to:
- Purchase, download and unzip the plugin file;
- Upload the plugin folder and upload it into the directory wp-content/plugins/ in your WordPress site (with WooCommerce installed);
- Activate YITH WooCommerce Custom Order Status from the Plugins page.
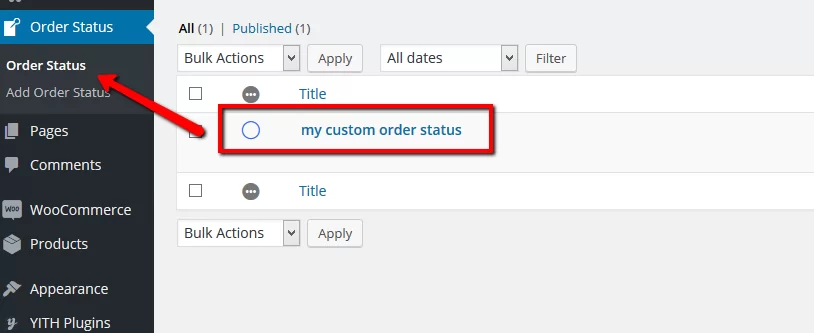
Then, you'll be able to create custom order statuses in Order Status tab that will appear after installing the plugin:
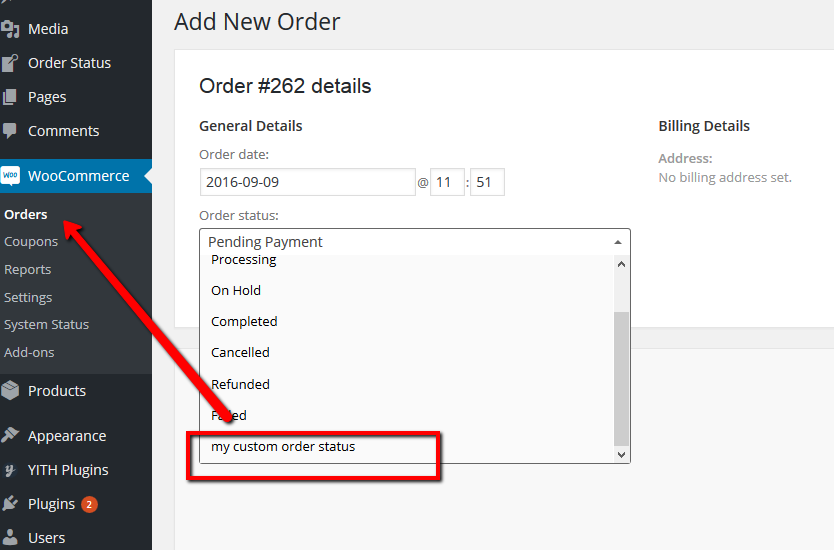
The created custom order status will appear in WooCommerce -> Orders tab:
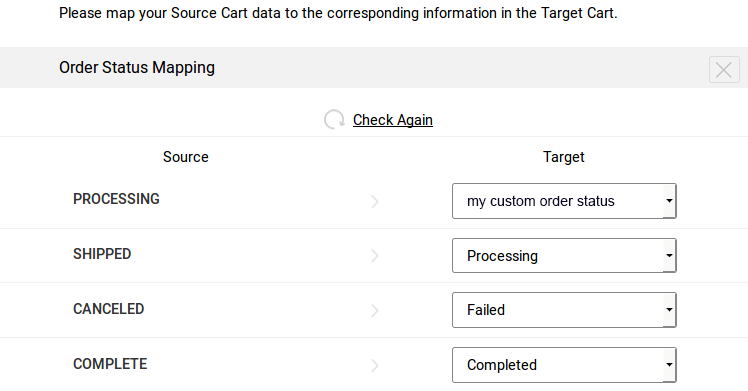
After creating custom order statues, you’ll be able to map them on the Migration Wizard.
Please note: the YITH WooCommerce Custom Order Status plugin is paid. The price depends on the subscription plan and ranges between $59.99 and $139.99. A subscription license entitles you to 1 year of updates and support. Each installation of the plugin will require a license key.
Migration of product variants to WooCommerce has some limitations due to the platform’s architecture. If during WooCommerce import the number of combinations for a variable product exceeds 1000, Cart2Cart will migrate this product as simple and skip all related options.
As an alternative, you can move your product options to WooCommerce Add-Ons plugin. To set up migration to this plugin you need only to install it and then activate it in WooCommerce.
Important. During the migration to Add-Ons plugin, products will not have variants in your admin section, ONLY options. Technically it's not possible to migrate both product variants and options to WooCommerce, so it'll be either WooCommerce product options or variants, but not both.
To extend the possibilities of variable products migration to WooCommerce, contact Cart2Cart Team and request customizations within Support Packages.
In order to delete Cart2Cart migration module from WooCommerce perform the following steps:
1. Log in to admin panel.
2. Step to Plugins menu and choose Installed Plugins.
3. Find the necessary module and click on Deactivate.
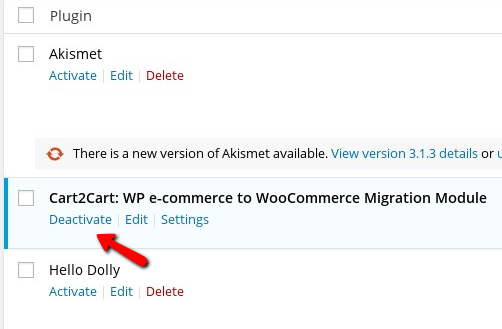
4. After deactivation, find the module again and press Delete.
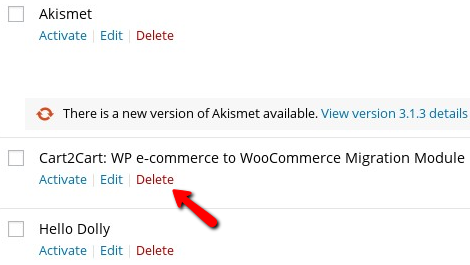
5. Confirm the module removal.
Yes, Cart2Cart service allows merchants to preserve order IDs while migrating to or from WooCommerce stores. However, in order to do that, users will have to choose the Preserve order IDs on the Target Store option on the appropriate Migration Wizard step. Note,this function is only available if you install the free WooCommerce Sequential Order Number module.
Keep in mind that after the transfer each of your order IDs will be given a unique order number additionally, to avoid any conflicts between post’s IDs on WooCommerce store. This number will be visible to you in WooCommerce admin panel, and won’t affect your system order ID, that’s included in order’s URL.
Note, if you forgot to install the module before the data import but have chosen the option while launching the migration, you can install the plugin afterward and get the order IDs preserved.
(more…)Cart2Cart supports the migration of 301 SEO URLs from or to WooCommerce as an additional option. But before that, you need to install free “Redirection” plugin.
- Install the plugin (look for detailed instructions on plugin page)
- Go to Cart2Cart Migration Wizard
- Choose “Migrate 301 SEO URLs of categories and products” additional option
- Launch Full migration
Please note: To migrate redirects from WooCommerce, the “Redirection” plugin should be installed and configured on your Source Cart (WooCommerce) prior the data transfer.
The same concerns migrations to/from JigoShop.
(more…)Yes, these is an opportunity of Reward points migration to WooCommerce. Note, you'll need to buy and install “SUMO Reward Points” plugin before the migration to ensure the accurate transfer.
Namely, the following types of Reward points are supported:
- Reward points customers can use to make a purchase
- Reward points that are given to customers after the purchase
- Reward points customers already possess
Among all the WooCommerce offered features, Product Variation utility is one of the most important. Basically, if a T-shirt is a variable product, it means it’s available in a certain number of alternating colors and sizes. In this tutorial, we’ll get through the steps of its implementation and take a precise look at some interesting details of this feature.
Steps

Step 1 - Set a product type to 'Variable' for the target product. Go to your WordPress admin dashboard -> Products -> Add a Product and select the value for Product Data as 'Variable'. Once you're done with the selection, you'll notice a change in user interface as on the screenshot above.

Step 2 - Get to the Attributes Tab. At this point, you'll be required to define the attributes of the variable product. For this, go to WP admin dashboard-> Products-> Attributes tab. On clicking the 'Add' button displayed on the screen above, you'll be redirected to a new page.
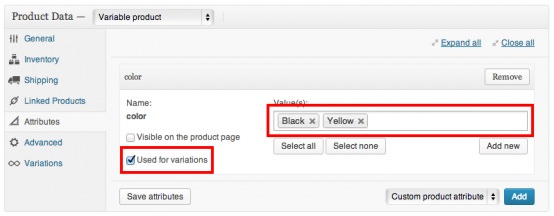
Step 3 - Define Attributes for the Variable Products. The values assigned to attributes will appear as options for the respective variable product.When you're finished with attributes defining, select the 'Variation' checkbox for each attribute. This will inform WordPress that the attributes belong to the variable product.
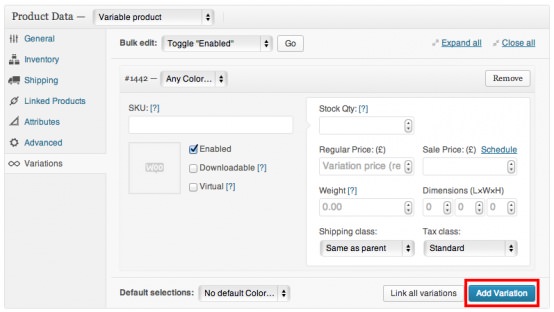
Step 4 - Start Adding Variations. After saving the variable product, you can continue with adding variations for the same. Get to WP admin dashboard-> Products-> Variations tab and finally click on 'Add Variation' button. When the values for each product are specified, click on 'Add Variation' button. With that, you're finished with displaying variations for the variable product.
(more…)WordPress saves all posts to the appropriate “Posts” spreadsheet and divides them by several post types. If some your posts are included to the “Product”, “Customer” or “Order” post types, they will be deleted during migration and, thus, not available on your Target Store.
Note: this issue might occur only after migrations with the “Clear current data on Target Store before Migration” option selected.
Yes, Cart2Cart supports metadata migrations. Online shop owners can transfer their meta titles, keywords and descriptions from and to WooCommerce store. In order to do that, you will have to install a free WordPress SEO Plugin before migration.
(more…)Cart2Cart supports migration of manufacturers to and from WooCommerce shopping cart. However, to enable the migration of manufacturers on your store you should install either Perfect Brands for WooCommerce plugin (it's free) or the WooCommerce Brands plugin (it's paid).
So, if you wish to migrate manufacturers to/from WooCommerce, follow the steps below:
- Download and install the module.
- Activate installed plugin in your WordPress admin panel.
- Choose manufacturers on the step of entities selection on Migration Wizard.
- Proceed through the Full Migration.
Note. If you didn’t manage to install the module before the migration but have chosen the category “Manufacturers” during the migration to WooCommerce, you can activate the module afterward and get the required entities on your new store.
If there are any questions, please feel free to contact our Support Team for help.
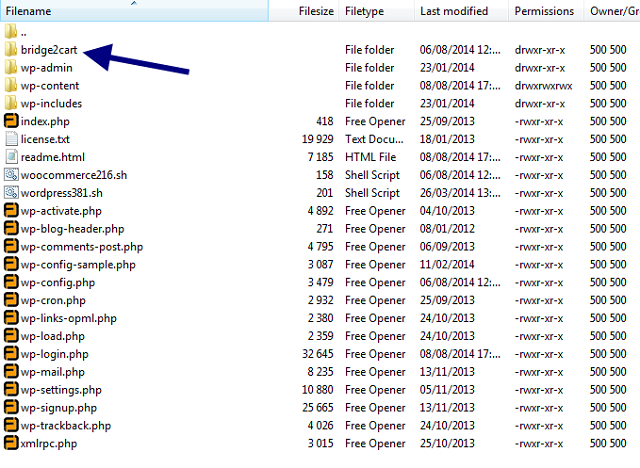
Since WooCommerce is a WordPress plugin you have to upload the Connection Bridge to your WordPress root directory e.g. http://[yourstoreurl]/ during your WooCommerce migration
Yes, it is a common situation that shopping cart functionality limits migration opportunities. The following shopping cart doesn’t allow to create extra fields: Shopify, BigCommerce, osCommerce, CRE Loaded, Loaded 7, Zen Cart, WP e-Commerce. So that, Cart2Cart can’t import extra fields to those platforms.
You can choose only default order statuses and can’t create new on: Shopify, Yahoo Store, Volusion, 3dcart. That’s why merchants will be able to map order statuses on Source store only with default ones on mentioned carts.
As for migrations to WooCommerce - keep in mind, that you’ll be able to map all order statuses from your Source Cart with only the default ones on WooCommerce stores.
Shopify
When migrating to Shopify be aware of such limitations - you can transfer no more than 100 000 redirects from your Source Cart and no more than 65 000 orders per one customer.
Each product description should contain less than 65 000 symbols on the source store, otherwise the product will be skipped during migration.
Note: If your customers and/or orders contain invalid data in shipping, billing addresses etc., our service will replace them with default details suitable for to Shopify. The original info won’t get lost, however - it’ll be moved to Additional details -> Note of each appropriate customer and order.
Also, Shopify’s product Type field is limited to 255 symbols.
The platform takes product types from your Source Cart categories, so if some product on your old store is in a few categories simultaneously - it can be skipped during migration.
Yes, Cart2Cart supports migration of reviews while moving to and from WooCommerce. Moreover, review ratings will be moved together with reviews.
(more…)Cart2Cart supports migration of Custom fields to WooCommerce 2.x.
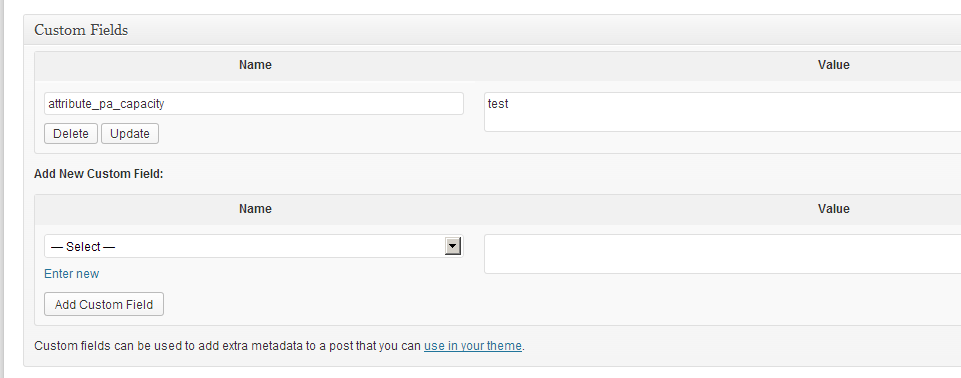
However, WooCommerce doesn’t display Custom fields by default.
To enable this option you have to:
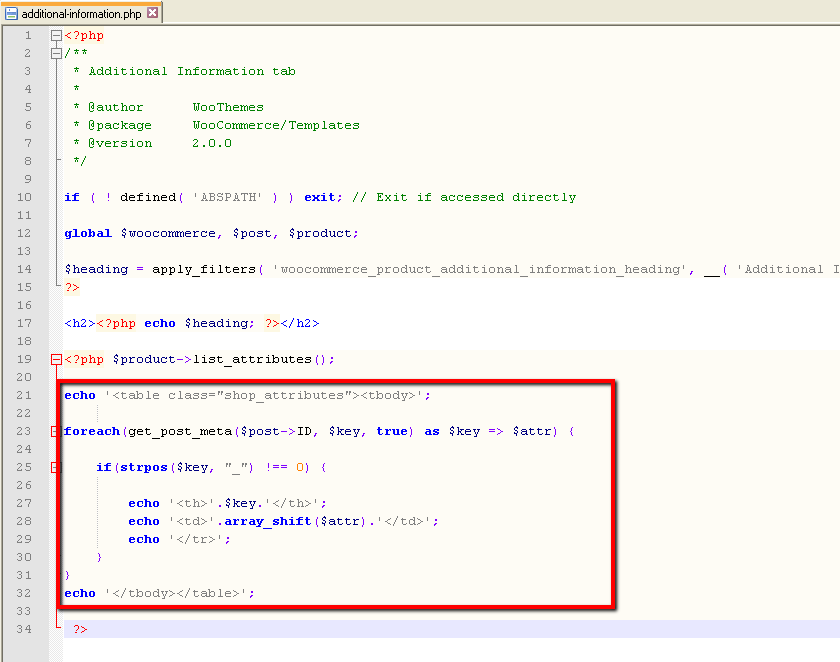
- go to "store/wp-content/plugins/woocommerce/templates/single-product/tabs"
- find file "additional-information.php"
- add the following code:
echo '';
foreach(get_post_meta($post->ID, $key, true) as $key => $attr) {
if(strpos($key, "_") !== 0) {
echo ''.$key.' ';
echo ''.array_shift($attr).' ';
echo '';
}
}
echo '
';
 (more…)
Yes, Cart2Cart supports migrations of Customer Groups to WooCommerce (and other WordPress e-Commerce plugins), or, rather, we provide a chance to map your source store Customer Groups with the corresponding ones on target cart.
However, there is a peculiarity of such transfers - WooCommerce supports only a few basic Customer Groups (Roles - on WooCommerce) by default. So, in order to preserve a wide range of Customer Groups you might have on the source cart, you’ll have to create them on WooCommerce before the migration. We recommend using a free plugin User Role Editor for such a purpose.
Just set up the migration and choose the entities to move – the service will do the rest.
Try It FreeDelegate the job to the highly-skilled migration experts and get the job done.
Choose Package
