When choosing a migration method, one of the things you need to think about is the risk of data loss. You also need to consider how hands-on you intend to be, which will largely be determined by whether you have a web development background or plan to customize a Shopify theme. If you want to learn how to migrate your WooCommerce store efficiently, it’s crucial to choose a method that ensures a smooth transfer of all your essential data, including customer information and orders to Shopify.
Watch our video tutorial to see how easy it is to automatically migrate from WooCommerce to Shopify with the help of the Cart2Cart migration tool and start working with your ideal Shopify theme. Learn how to migrate your entire store seamlessly and keep track of all your orders as they transition smoothly to Shopify. If you're looking to migrate products from Shopify to WooCommerce, the Cart2Cart tool also offers a reliable and efficient solution for transferring your store data in the opposite direction.
Using automated data migration tools like Cart2Cart is a no-brainer since it automates the end-to-end process while eliminating the risk of data loss. Here’s how to transfer website from WooCommerce to Shopify in four easy steps:
- Connect your source cart (WooCommerce) to your target cart (Shopify)
- Select the data entities you wish to transfer and any other relevant migration options
- Run the free demo to get a feel for the migration process
- Launch Full Migration to transfer all your existing data to your new Shopify store
How Do I Convert WooCommerce to Shopify?
Now that you’ve sufficiently prepared your old store and what is about to become your new one, you’re now ready to proceed with the migration. For the purposes of this guide, we will focus on the steps to migration from WooCommerce to Shopify using Cart2Cart, an automated data migration tool. By following these steps, you can ensure a seamless transfer of your store data, including products, customers, orders, and more.
Step 1. Connect Your Shopping Carts
First off, to migrate WooCommerce to Shopify, you’ll need to connect your shopping carts.
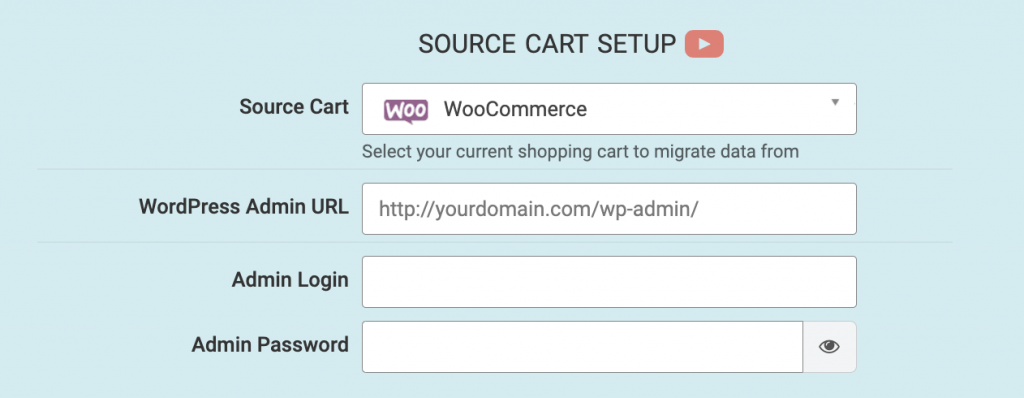
Go to Source Cart Setup, click on the drop-down menu in the Source Cart field to display the list of eCommerce platforms, and select WooCommerce.
Next, download and install the Connection Bridge. This plugin will facilitate communication between the WooCommerce and Shopify platforms.
Once you do, proceed as follows:
- Unpack the downloaded file labeled connection_bridge.zip
- Extract the folder labeled bridge2cart
- Use an FTP client to import it to the root catalog of your WooCommerce store
- Confirm that a link to your Source cart has been established
Next, you’ll need to set up your Shopify cart.
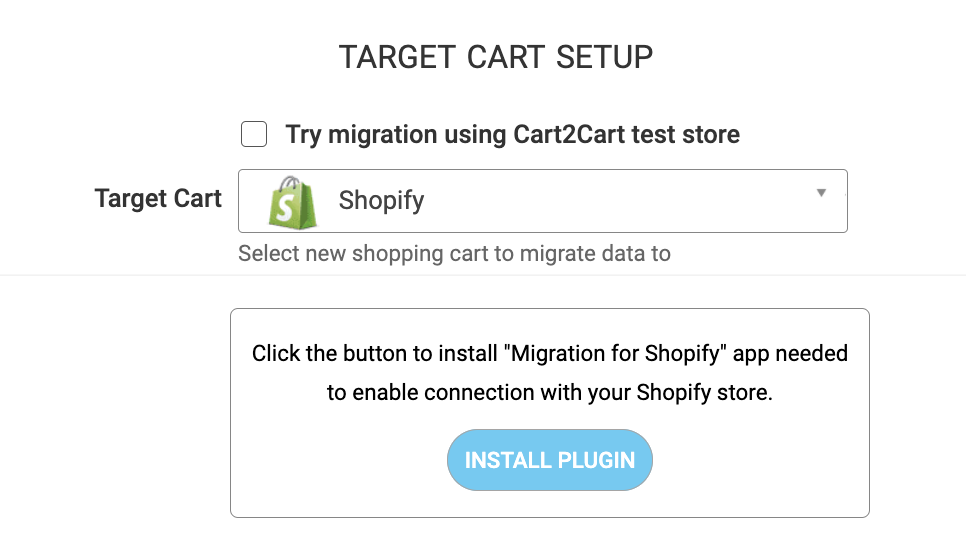
Go to Target Cart Setup, click on the drop-down menu in the Target Cart field to display the list of eCommerce platforms, and select Shopify.
Click on the button labeled Install Plugin to download the Migration for Shopify integration. Once you do, install it to enable your Shopify store connection.
Step 2. Select Data for Migration
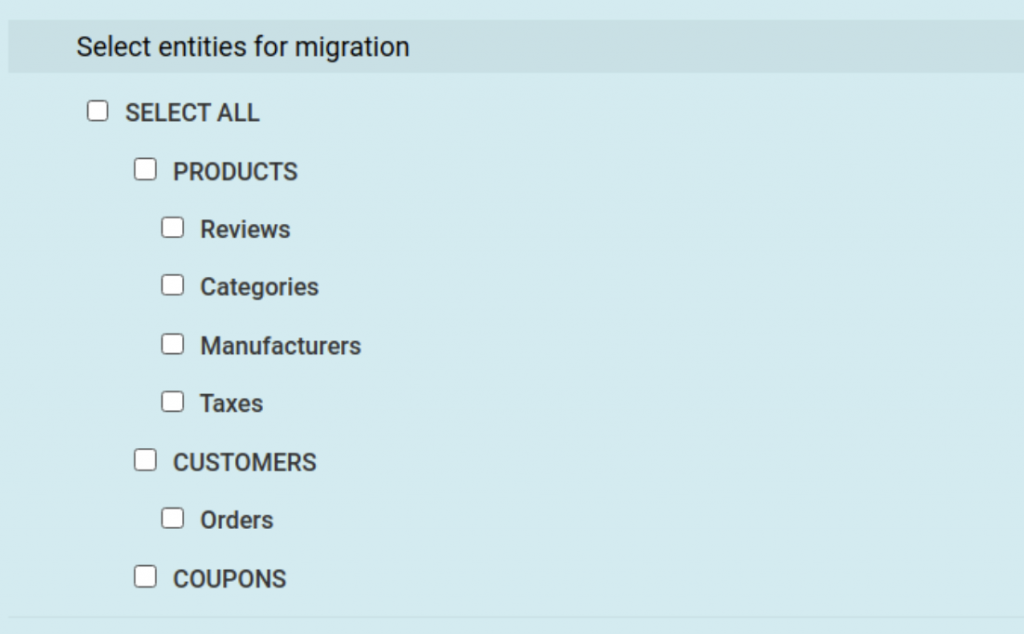
Next, you’ll need to choose the data entities you want to migrate when switching from WooCommerce to Shopify. Click on Choose Entities to pick the data classes you want to migrate. You can choose Select All to migrate everything or check the individual classes to pick specific entities to transfer.
Some of the data classes you can migrate when switching from WooCommerce to Shopify using Cart2Cart include:
- Product data such as name, images, description, and price
- Product visuals such as size, shape, and color
- Integrations
- List of purchased items, price, and payment information
- SEO settings and page redirects
- Static site pages such as About Us, Contact Us, etc.
Step 3. Specify Additional Migration Options
This third step involves choosing specific migration options you might want to integrate. Some of these include:
- Migrating your WooCommerce categories to Shopify’s Automated Collections
- Creating 301 redirects in Shopify to maintain the functionality of old category URLs
- Maintaining migration SEO URLs and their respective link structure to preserve your online store’s ranking on Google
Step 4. Map Customer Groups and Order Statuses
The next step involves mapping the customer classes and order statutes you had in your old WooCommerce store to your new Shopify website. These will not automatically be transferred during the migration process. As a result, you’ll need to match the old classes and statuses with the new ones you create on the Shopify platform. Here’s how to go about it.
- Open Cart2Cart’s Stores Mapping window and select the data groups in WooCommerce that you want to be mapped onto the new store.
- Select the corresponding groups in your newly created Shopify site.
- If you don’t find the required groups in the target store, click on the relevant buttons to create them.
Keep in mind that when migrating your existing customers from WooCommerce to Shopify, Cart2Cart will automatically create default email addresses for them if they don’t have valid ones at the time of transfer. This usually happens when guest users who haven’t registered on your site place orders.
Step 5. Run Free Demo / Launch Full Migration
The final step involves launching the actual migration. You can either run the free demo to get a feel for how the Cart2Cart tool works or launch the Full Migration if you’re on a paid plan.
When running the free demo, keep in mind that only a limited number of entities will be transferred. Be sure to keep the browser window open until process completion.
To confirm whether the migration process went off without a hitch, check if you can see the newly migrated data on Shopify’s frontend.
If not, check for the results on the backend. Here’s how:
- Go to the Demo Results page
- Download the file labeled Product IDs
- Check them against the newly migrated entries on Shopify’s backend
To transfer products from WooCommerce to Shopify, you’ll need to select the relevant options displayed on the Cart2Cart wizard before launching the migration. Some of the available options include:
- Name, Image Description, Product Description, SKU, Manufacturer
- Base Image, Additional Images
- Meta Title, Meta Description
- Price, Discounted Price
- Quantity, Manage Stock, Status
- Variants (Images, SKU, Weight, Discounted Price, etc.)
- URL
Additionally, you can use two other methods to migrate WooCommerce products. On the one hand, you could download a WordPress product migration plugin from the WP app marketplace.
On the other hand, you could export the products into a CSV file and upload them to your newly launched Shopify store.
With that in mind, using an automated data transfer tool like Cart2Cart is the easiest and most convenient way to migrate your store products.
Do you want to migrate from WooCommerce to Shopify?
Switching to Shopify is the perfect step for growing your online business! Gain access to the best tools for store management, enhanced security, and scalability. Our experts at Cart2Cart will help you seamlessly transfer all your data. Contact us today, and we’ll make your migration from WooCommerce to Shopify as easy as possible!
TRY IT FREE
How to Export Orders From WooCommerce to Shopify
Exporting orders using Cart2Cart is as simple as checking the Order box at the point of configuration before launching the migration. It’s quick and easy, with no risk of data loss once the migration process completes.
Some of the order data you can export using the tool includes:
- Product details such as the ID, Price, Quantity, and Status
- Shipping address details such as the First Name, Last Name, Physical Address, City, State, and Zip Code
- Customer details such as the First, Middle, and Last name, Billing Address, and Phone Number
Unfortunately, WooCommerce does not offer any other way to do this manually. You could always search online for an app to help you do it, but it’s not a foolproof guarantee that all your order data will be migrated. Cart2Cart is your best bet.
The Cost of Migrating From WooCommerce to Shopify
Migrating from WooCommerce to Shopify involves several potential costs, which depend on the method you choose and the complexity of your store. If you opt for a manual migration, your primary expense will be time, as transferring data manually can be labor-intensive and prone to errors. However, using automated migration tools or hiring a professional migration service can save time and minimize errors but typically comes with a fee ranging from $100 to $1000 or more.
Key potential costs to consider:
- Migration tools: Automated services like Cart2Cart or LitExtension
- Professional services: Hiring developers or migration specialists
- Shopify subscription plans: Basic ($29/month), Shopify ($79/month), Advanced ($299/month)
- Themes: Free themes or premium options starting from $150
- Apps and plugins: Third-party apps for added functionality
- Custom development: Tailored features or integrations
Beyond the migration itself, you should consider Shopify’s subscription costs. While Shopify offers several pricing tiers, the most popular plans range between $29 and $299 per month. Additionally, there might be expenses for premium themes, apps, or custom development to ensure your new store meets your specific needs and provides an optimal user experience.
Testing and Troubleshooting Your New Store
Once the migration is complete, testing your Shopify store is a critical step to ensure everything functions correctly. Start by checking your product listings to verify that all information, such as titles, descriptions, prices, and images, transferred accurately. Similarly, ensure that customer data and order histories are intact if you migrated them.
Steps to test your store:
- Review product listings: Check titles, descriptions, and images
- Test payment gateways: Ensure all payment options are functional
- Verify shipping settings: Test different shipping regions and rates
- Simulate the checkout process: Place test orders to identify issues
- Assess mobile and desktop responsiveness: Ensure a seamless experience across devices
- Examine third-party apps: Confirm proper integration and functionality
Next, simulate the customer journey by placing test orders. This will help identify any issues with payment gateways, shipping settings, or checkout processes. Don’t forget to review your store's mobile and desktop responsiveness, as well as the performance of third-party apps. If you encounter errors, use Shopify's support resources or consult a professional to troubleshoot and resolve them efficiently.
Optimizing Your Shopify Store After Migration
After completing the migration, it’s essential to optimize your Shopify store to maximize its performance and usability. Start by selecting a responsive theme that aligns with your brand identity and enhances the user experience. Shopify offers a variety of themes, both free and paid, that you can customize to meet your needs.
Tips for optimizing your store:
- Choose a responsive and visually appealing theme
- Install Shopify apps to extend store functionality
- Email marketing apps (e.g., Klaviyo)
- Inventory management tools (e.g., Stocky)
- Customer support solutions (e.g., Zendesk)
- Optimize SEO settings: Update meta tags, alt texts, and URLs
- Improve page load speed: Compress images and minimize code
- Enable analytics: Use Shopify Analytics and Google Analytics
Additionally, consider integrating Shopify apps to extend your store's functionality. From email marketing to inventory management, the Shopify App Store has solutions for nearly every aspect of e-commerce. Finally, optimize your store's SEO by updating meta tags, alt texts, and URLs, ensuring your site ranks well in search engines and continues to attract organic traffic.


 March 31, 2025


