How can we help you?
General Questions126
eCommerce Data Import via Cart2Cart becomes even more beneficial with Password Migration functionality. Your clients’ passwords will be accurately transferred to the Target Store. The customers will be able to create new orders the minute your enhanced e-shop goes live instead of spending time recovering and confirming their old passwords.
The Data Import via Cart2Cart is not only automatic, brisk and error-free, the service constantly offers the new possibilities for the online retailers. To be more specific, the service supports multiple languages transfer and accurately migrates them to the future online store. The clients get an opportunity to surf the eCommerce website on their appropriate language and make the orders more efficiently.
Check the table below to find out whether Multiple Language Migration is possible within your shopping carts pair:
| Multiple languages | Target | ||||||
| WooCommerce | Magento | PrestaShop | OpenCart | Shopware | VirtueMart | ||
| Source | |||||||
| Magento | YES | YES | YES | YES | YES | YES | |
|---|---|---|---|---|---|---|---|
| OpenCart | YES | YES | YES | YES | YES | YES | |
| osCommerce | YES | YES | YES | YES | YES | YES | |
| Prestashop | YES | YES | YES | YES | YES | YES | |
| ThirtyBees | YES | YES | YES | YES | YES | YES | |
| VirtueMart | YES | YES | YES | YES | YES | YES | |
| WooCommerce | YES | YES | YES | YES | YES | YES | |
| WP eCommerce | NO | NO | NO | NO | NO | NO | |
| X-Cart | YES | YES | YES | YES | YES | YES | |
| xt:Commerce | YES | NO | YES | YES | YES | YES | |
| Zen Cart | YES | YES | YES | YES | YES | YES | |
Cart2Cart provides a Demo migration (transfer of 10 products and customers and orders related to them to the Target store) to try the service in action. The number of Demo migrations from one customer account is unlimited and totally free.
However, each new Demo migration overwrites the data migrated during the previous Demo on the Target store. Therefore, the content migrated during the previous Demo migration will be missing after a new Demo is completed.
The Source (current) Store data isn't affected by the migration at all. In layman's terms, the data (products, customers, orders, etc.) is simply copied and pasted into your Target Store.
So, the migration process is totally safe for the store that is migrated and there is no risk of losing any of the data. We guarantee 100% uptime and data security during the migration with Cart2Cart. In other words, you can keep selling while your Source Store data is being migrated to the new platform.
Because of technical peculiarities, Cart2Cart doesn’t support migration of currencies. All products and order totals will have prices set in the default currency established in your Target cart, regardless of what currency is set in the Source Cart.
To establish the connection with our clients’ stores, we usually make use of the following ports - 80 and 443. To be more specific, for HTTP protocol we use port 80, and for HTTPS - port 443. Make sure that you have the ports open for the Cart2Cart.
The list of supported entities that can be transferred from one platform to another is indicated at the corresponding page of the website. The migration of entities that are not included in the list of supported data should be checked before the migration and possibly will require additional costs.
Due to the technical peculiarities of Shopify, it is impossible to create a temporary test store. However, you can transfer your database to Shopify using its free trial plan.
Cart2Cart accepts complaints concerning the accuracy of the transferred data only for 30 days upon the Full Migration completion. Therefore, we’ll not be liable for any changes (e.g., database modifications, data deletion, corruption, loss, etc.) that may distort the migration results after the above-mentioned period.
Yes, absolutely. We do not transfer your access details anywhere and use it exclusively for the research and quick resolution of the problem.
To enhance the data security even more, we recommend you to go through two simple steps:
Create access only with restriction by IP. The list of IPs you need to add:
- 5.58.76.130
- 148.251.79.211
- 116.202.82.183
- 154.38.131.10
- 23.19.115.248
- 23.19.116.221
- 31.186.34.167
- 188.116.5.34
- 154.30.33.133
- 31.186.37.115
- 154.3.253.49
- 168.81.41.61
- 168.81.16.90
- 154.13.147.141
- 86.125.93.44
- 5.101.148.187
Once the issue is resolved, do not forget to delete the granted access.
When migrating to Visualsoft, you need the following API access details:
- API Client ID
- Username
- Password
Since it is impossible to find the API access details right from the admin, we recommend contacting Visualsoft Support to get them.
It's up to you, as you can install it before or after the data migration.
If you are looking for a suggestion - it's better to complete a data migration first, so you will be able to set up, design the new store, and fit the theme based on the real data.
According to the Target cart requirements, Cart2Cart creates a directory structure for all the images that have been imported during the migration process. Therefore, these directories, as well as images, are being automatically assigned the 777 rights.
It is possible to change the rights for the directories or files right after the migration is finished.
It isn't currently possible to merge separate Cart2Cart accounts. However, if you want to transfer migrations from one account to another, please contact the Support Manager and get the job done by the Cart2Cart admin.

Cart2Cart Blog is a fast-growing, credible source with over 200,000 visitors annually. We try our best to bring the latest and the greatest from the eCommerce industry to our readers and publish informative and valuable content. Therefore we’re always looking for experienced contributors who are ready to provide interesting and well-researched articles to our readers for free.
Interested in becoming our Guest Writer? Take time to review this entire page and get all your questions about guest blogging and related items answered.
Who can become a Guest Writer?
- The author should be an eCommerce industry expert with writing experience on other reputed online resources;
- The writer should write in the voice and tone of Cart2Cart and attract readers with his/her creative and original content;
- The person should have an account on social media networks like Facebook/Linkedin.
What are the content quality expectations?
- Our Focus: The content should be useful for our target audience (e-merchants willing to constantly enhance their online presence).
- Creativity: We’re interested in new ideas that no one has discussed or even thought of yet.
- Length: Articles typically range from 1000 to 3000 words. Preferably, we aim for about 1200 - 1700 words.
- Trustworthy resources: We don’t approve overly self-promotional posts and sales pitches. Acceptable links include relevant articles or reputable researches with DA of 50+.
- Republishing: Cart2Cart only accepts original content. Contributors can republish their posts 5-6 weeks after they go live, having previously changed the headline and used a rel=“canonical” tag.
Apply to become a Cart2Cart Guest Writer
If you’re still with us, please submit the form below and we’ll contact you shortly.
Valid coupon codes are displayed exclusively on the Cart2Cart website and our social media accounts (Facebook, LinkedIn, Twitter). You can use vouchers provided by our certified industry partners and affiliates as well, but they will not work in case they have been issued without the prior agreement with Cart2Cart.
Any other promo codes you find on the web are fake. We don’t offer coupons through deal sites.
Important note: if you try to activate a discount with fake vouchers from any other website that doesn’t officially partner with Cart2Cart, it will return an error message.
Cart2Cart issues coupon codes to please our loyal customers. However, if you try to use a coupon code from a deal website, it won't work.
Store migration with Cart2Cart consists of transferring data entities between the Source and Target platforms’ databases. Since our automated tool does not interact with these carts directly, a Connection Bridge is necessary to establish the connection between the databases.
A Connection Bridge is a file that links to the database and requests to delete, import, or retrieve data. In other words, Cart2Cart interacts with its Bridges and, therefore, makes them follow a set of instructions that affect the data. Thus, these Bridges have to be active during the whole store migration process.
To execute a bridge request (i.e., instructions to work with data), we use regular HTTP queries. The request ports depend on the type of protocol (HTTP or HTTPS) the source and target carts use. These are ports 80 and 443, respectively. Most requests use an HTTP POST request, and it is more secure than the GET request. Moreover, it can send and receive a larger volume of data.
The Bridge usage frequency depends on how long it takes to establish the Internet connection with the store and the complexity of the request (the more complicated it is, the longer the automated tool waits for a response, and processes the result).
The most common reason for hosting blocking is the number of requests per time unit from a single PC (IP address). Also, the blocking may occur due to the HTTP POST method usage (since the browser applies the GET method even for a standard web surfing or cart’s web-page navigation). Sometimes the hosting may be blocked because all the requests are being sent to the same address - i.e., the Bridge (bridge2cart/bridge.php).
How Cart2Cart deals with hosting blocking:
- Make requests from a different IP address.
How to unblock the migration requests:
- Allow more requests to the server per time unit.
- Make sure that the store is accessible in all the countries (check, if it doesn’t block any IP addresses).
- Permit additional inbound/outbound Internet traffic.
- Remove all the restrictions on the database requests’ execution and the number of connections to it.
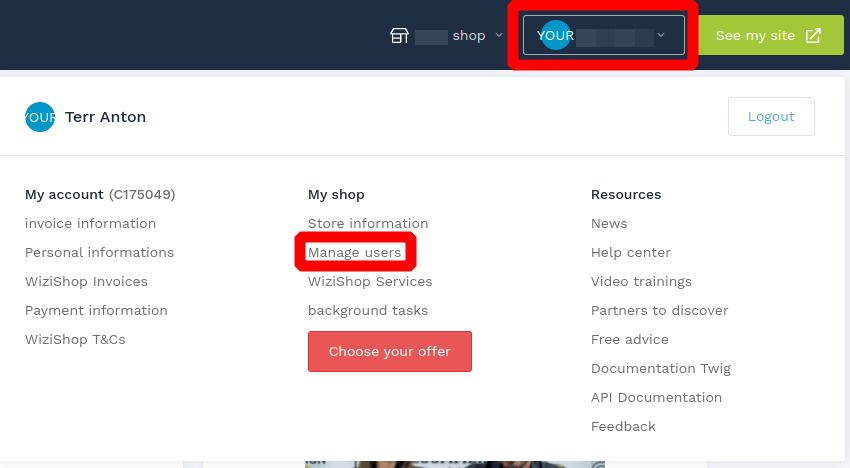
In your WiziShop admin panel, navigate to Manage users -> Add user.
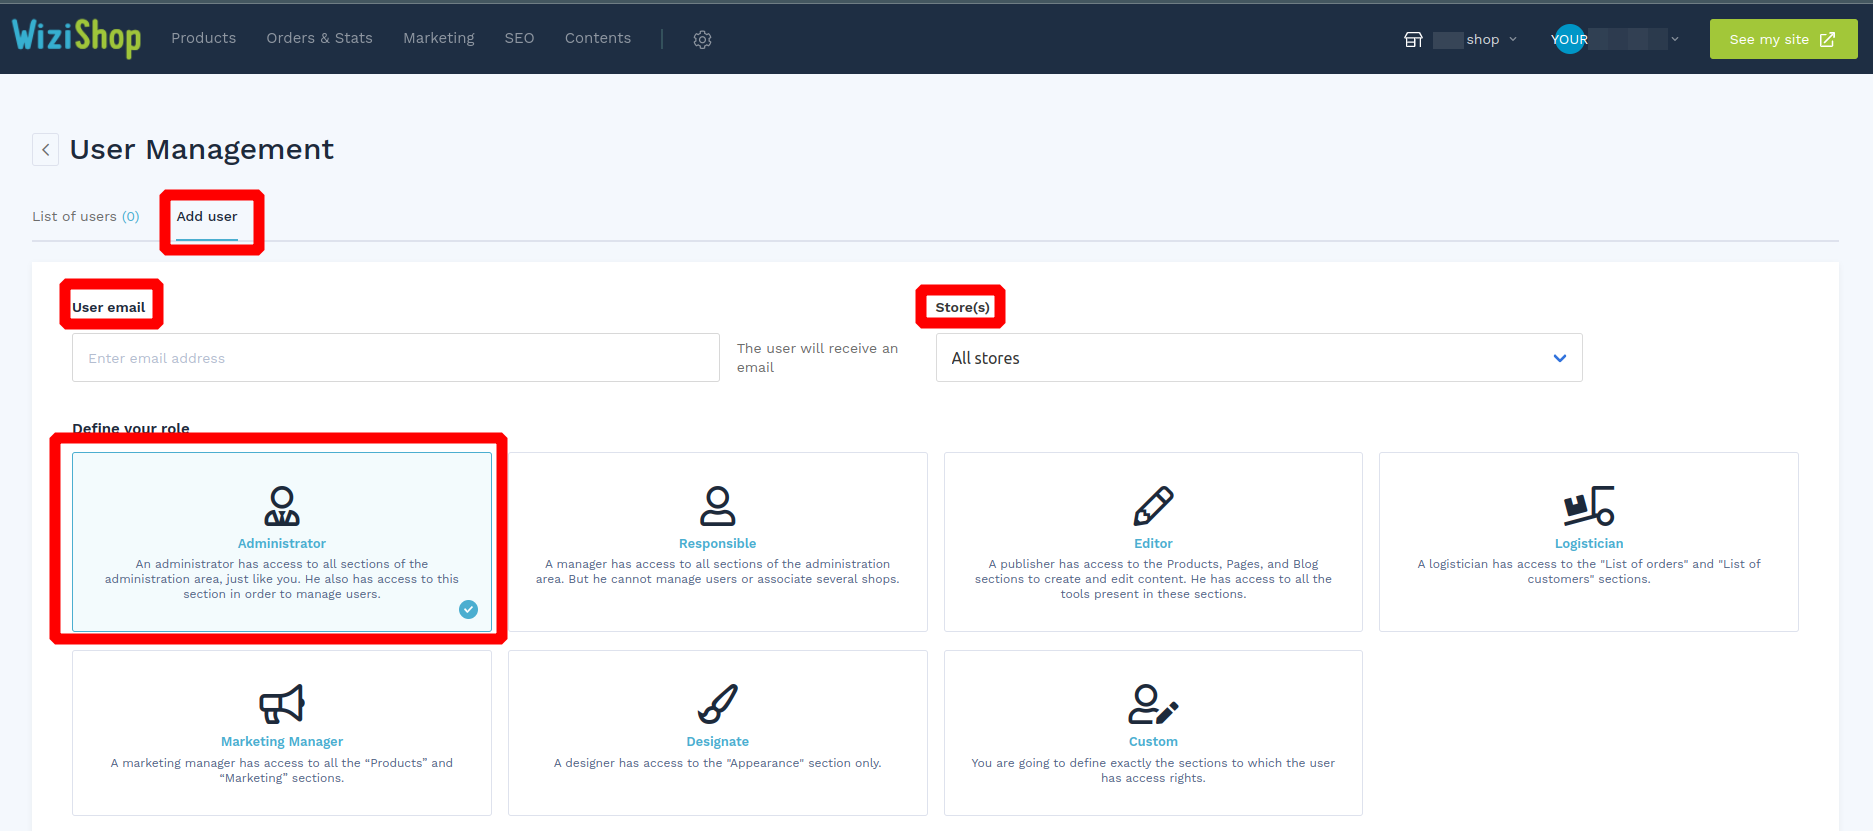
Type in your email address, choose the required store, and grant user admin rights (users possessing the admin/owner rights can go through the Migration Wizard). When done, press the Record button.
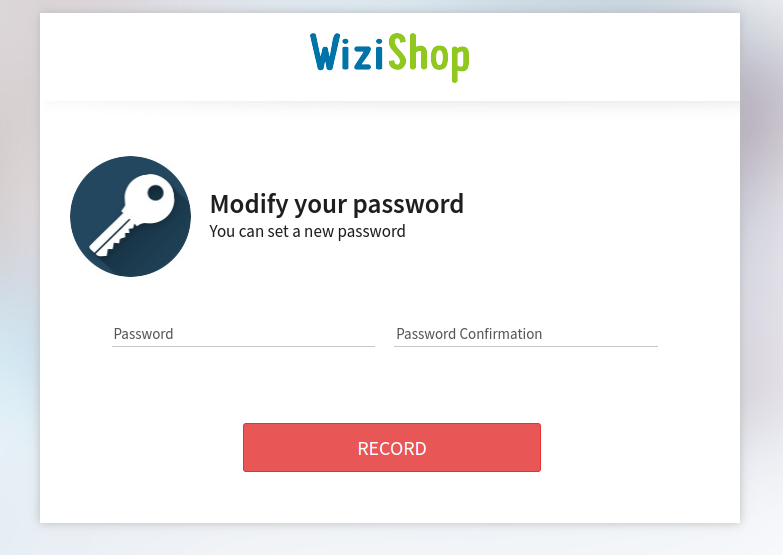
Once you’ve received the letter to the provided email address, follow the link and enter a password.
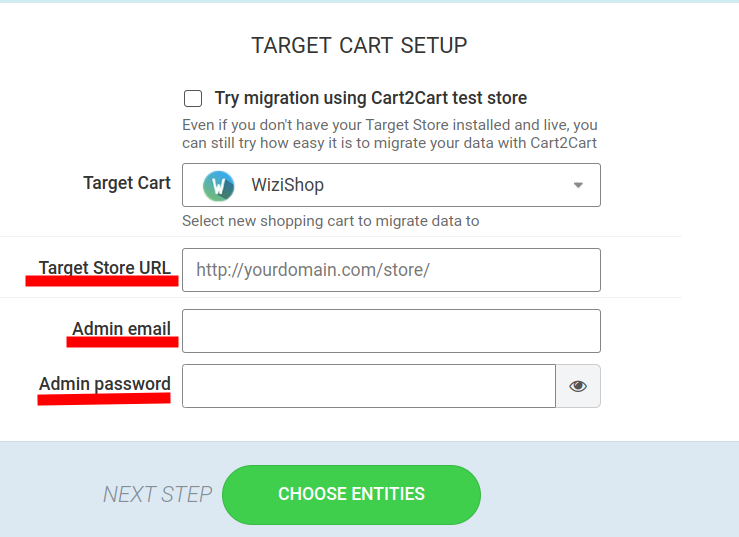
Type in all the required information in the appropriate fields of the Migration Wizard - your Target store URL, admin email, and admin password of the newly-created user.
To cancel a 2-step verification (2-SV) for your current GoDaddy store, follow the instructions below:
- Navigate to your GoDaddy Login & PIN page -> enter the codefrom your phone or authenticator app, or insert your security key.
- Under 2-Step Verification, select Edit. When done, specify the authentication method you want to remove and activate the Delete button.
- Select Remove. You’ll get a success message and your 2-SV will be turned off immediately.
If you face any issue while cancelling the 2-SV, please contact the GoDaddy Support Team.
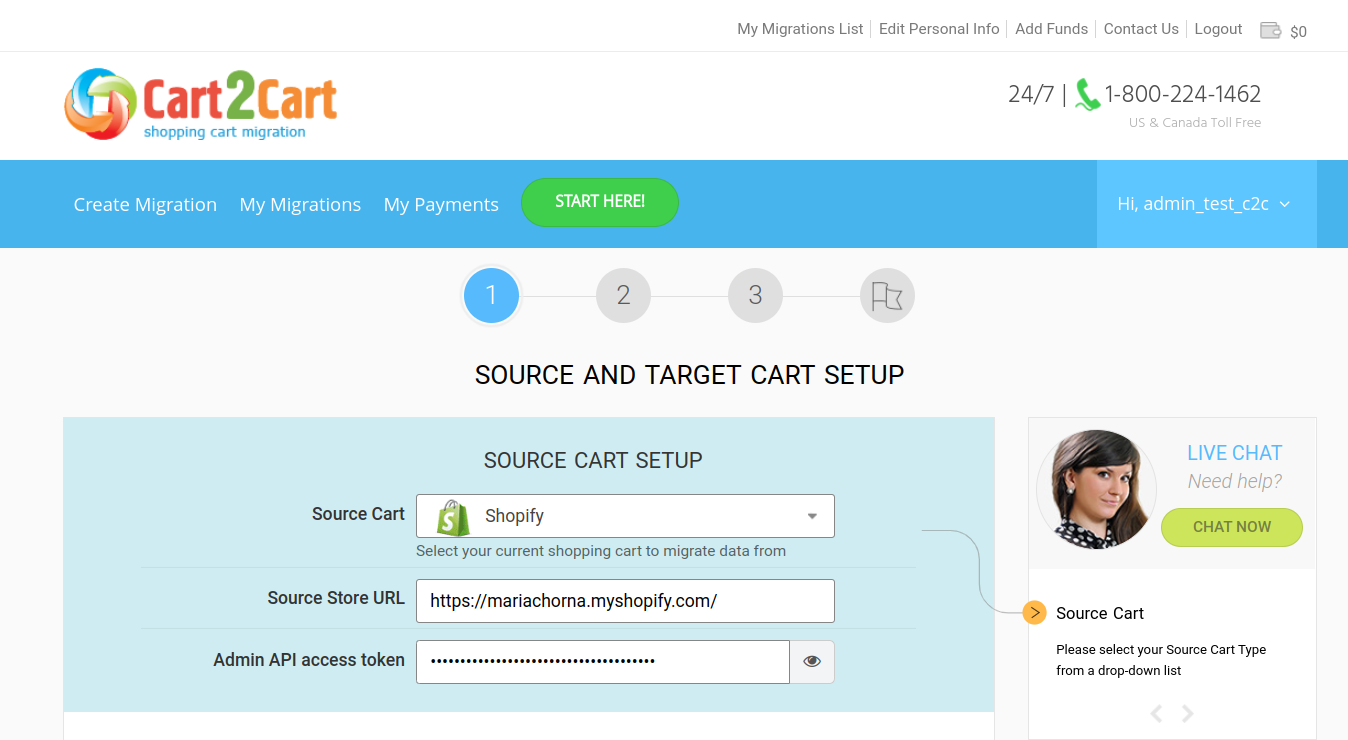
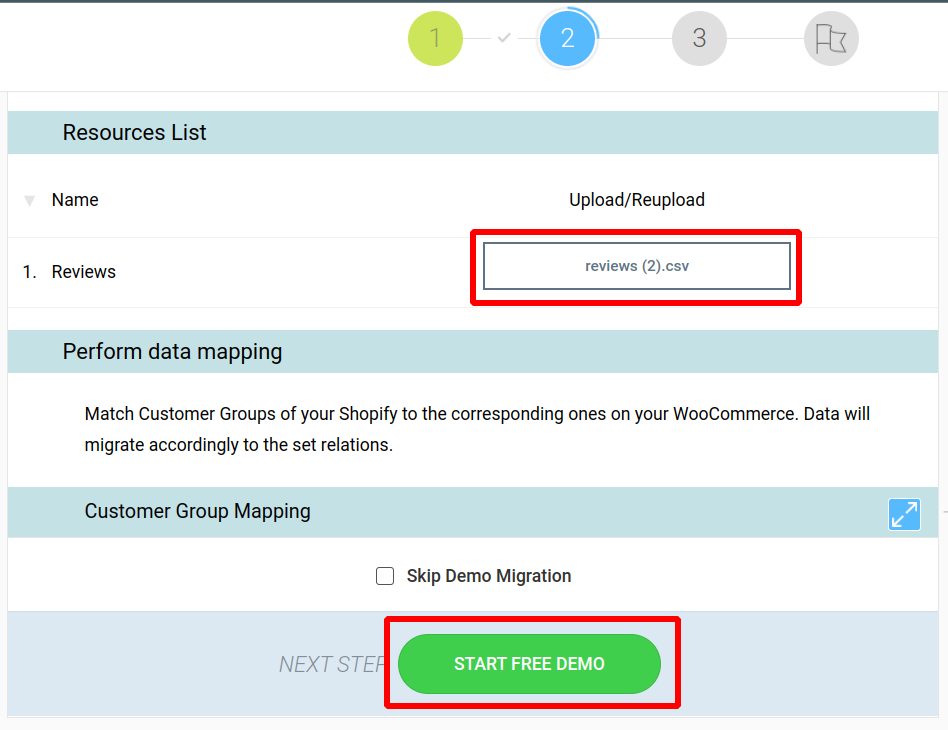
1. Start by filling in the wizard fields, such as Source Store URL, Admin API access token.
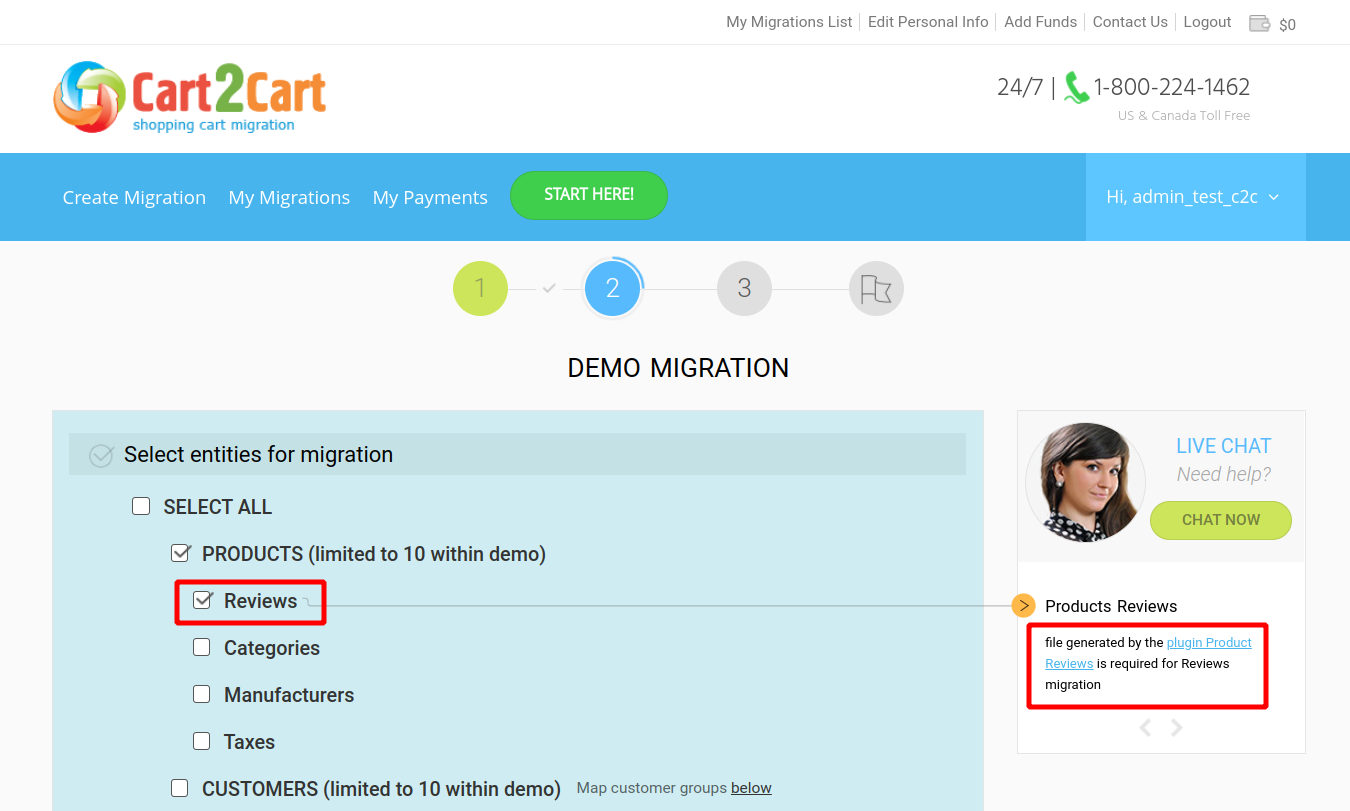
2. On the Choose entities step of the Migration Wizard, select Reviews. If you haven’t installed the Product Reviews plugin yet, do it now.
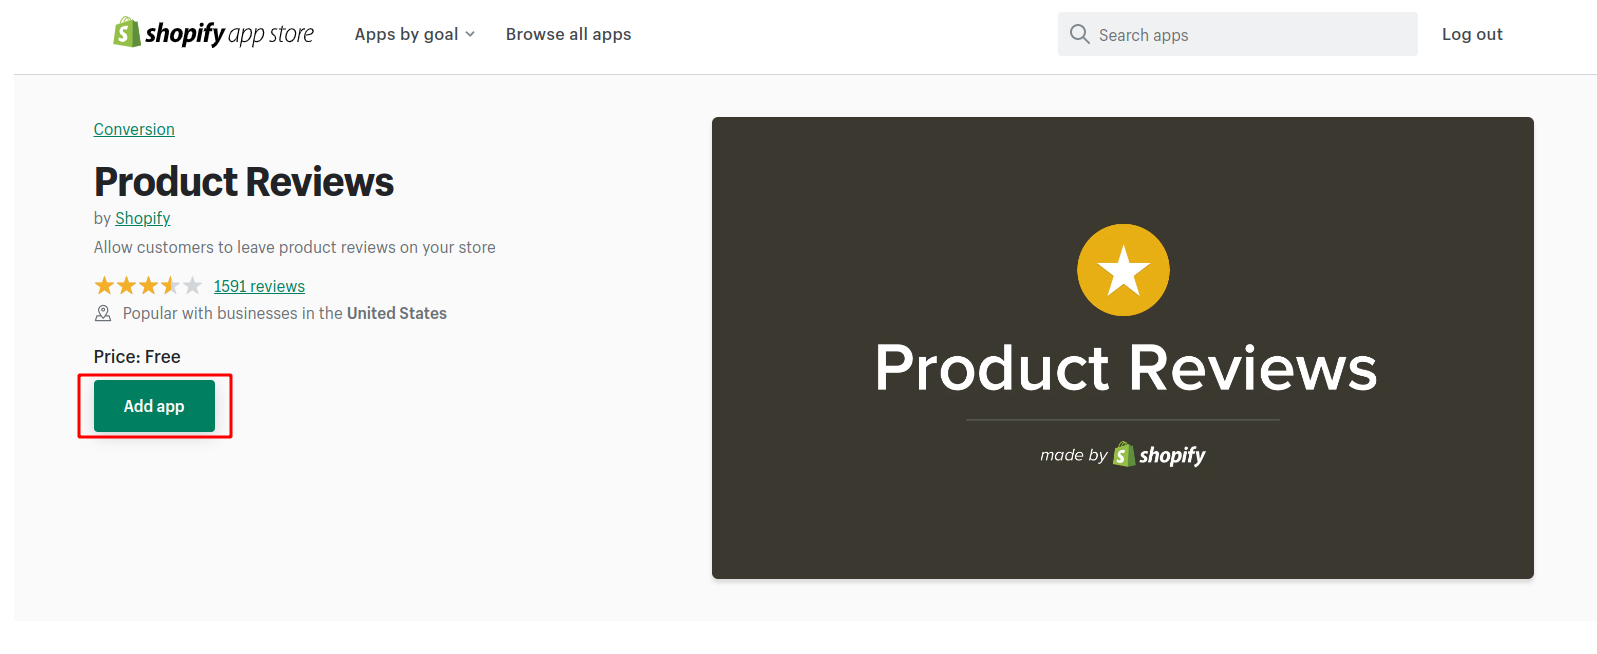
3. Click the “Add App” button to install it.
4. When done, navigate to the APP menu item, choose “Product Reviews → Export”
5. Upload the CSV file to the Cart2Cart Migration Wizard.
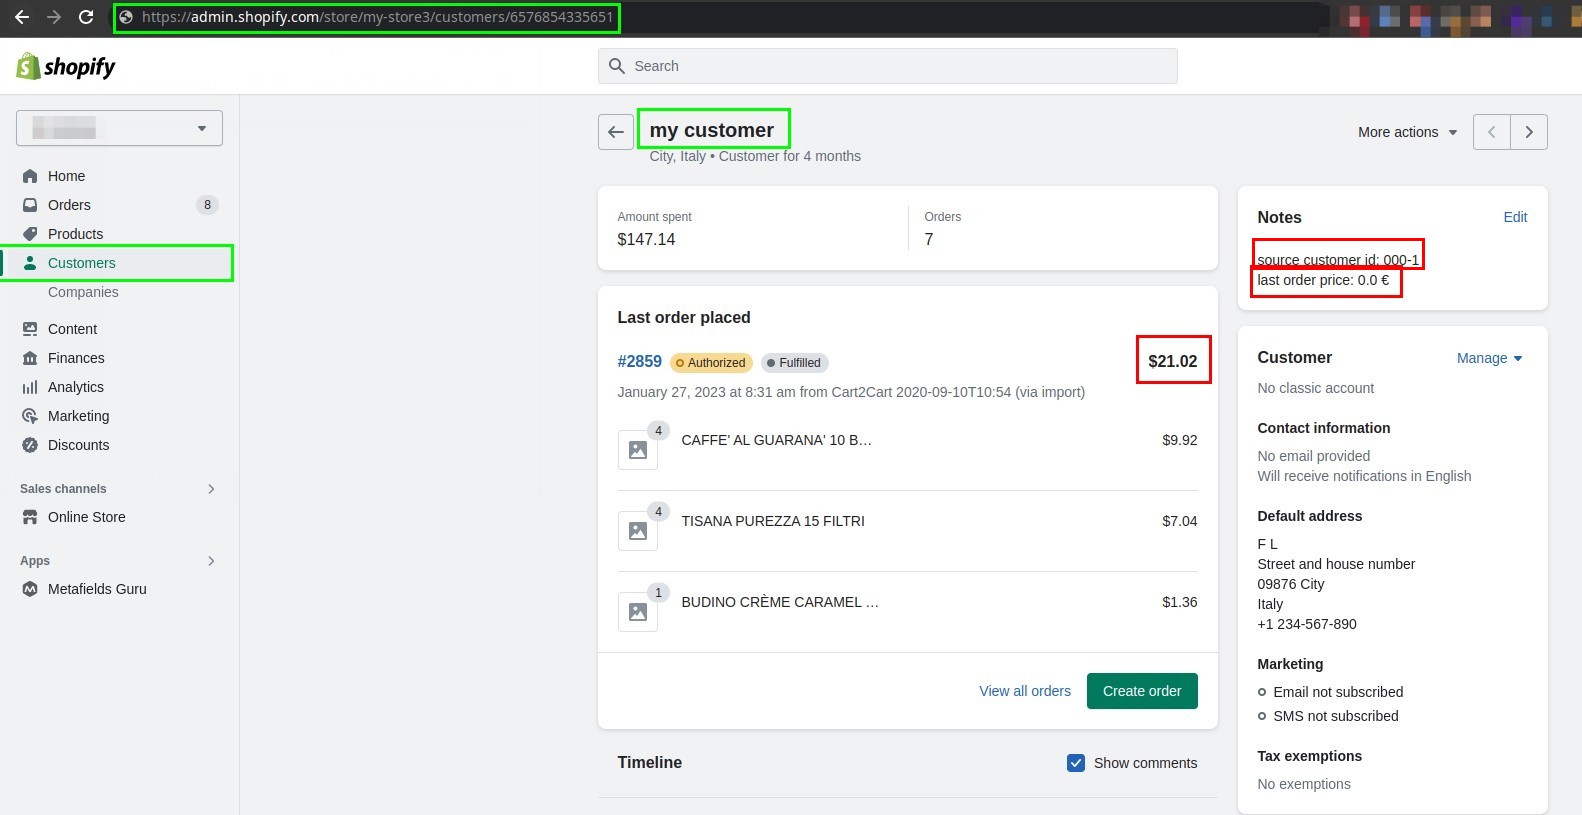
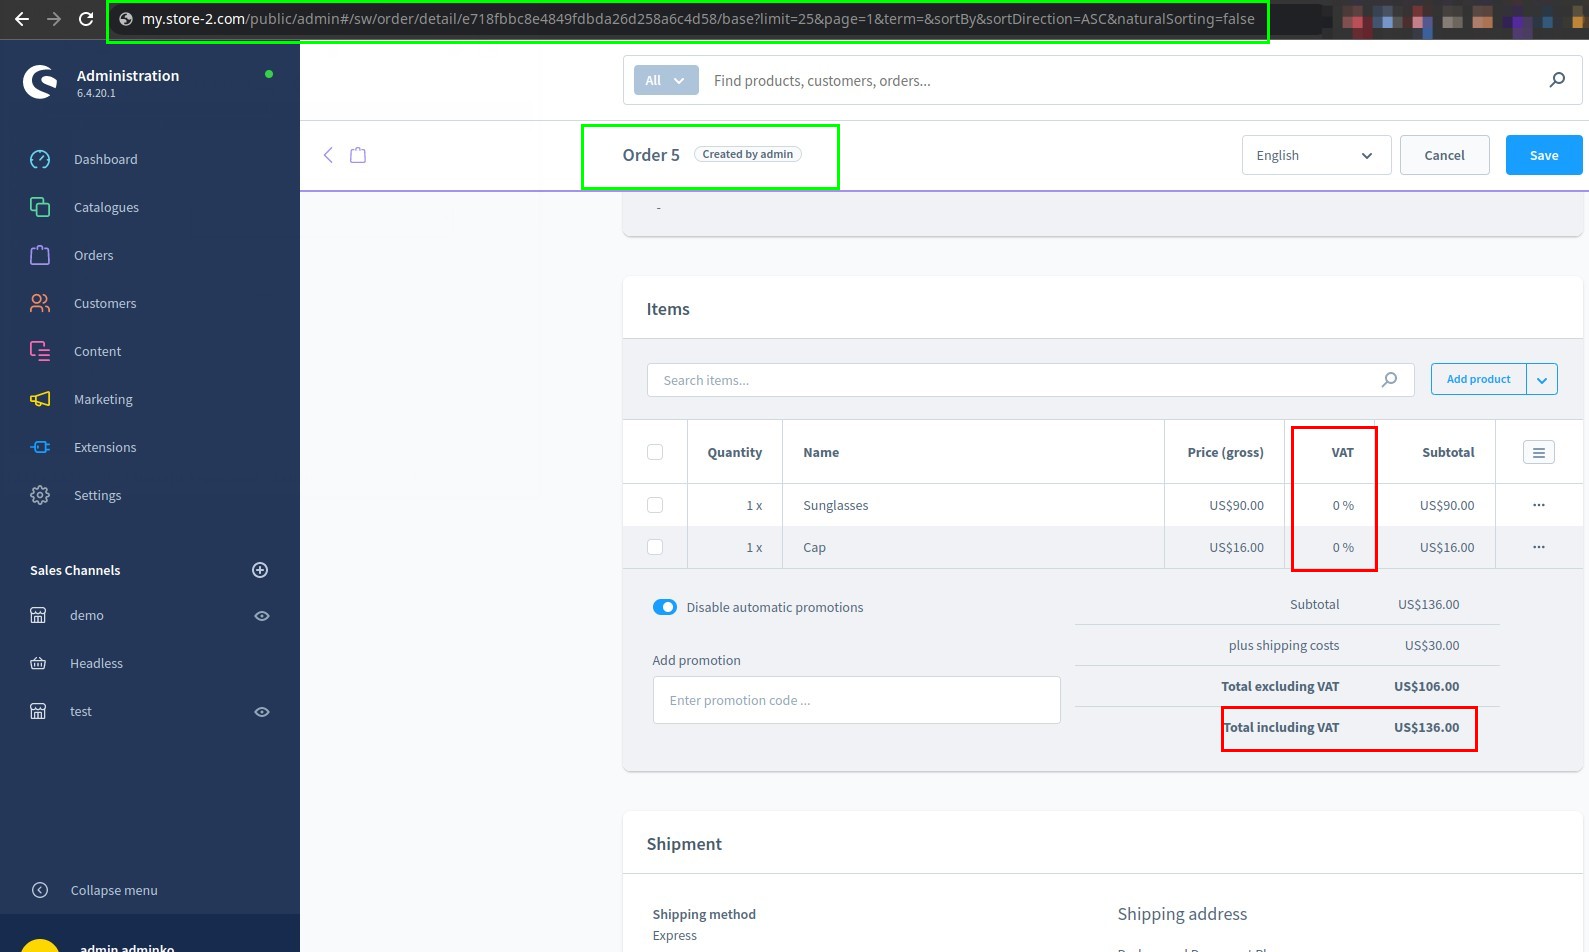
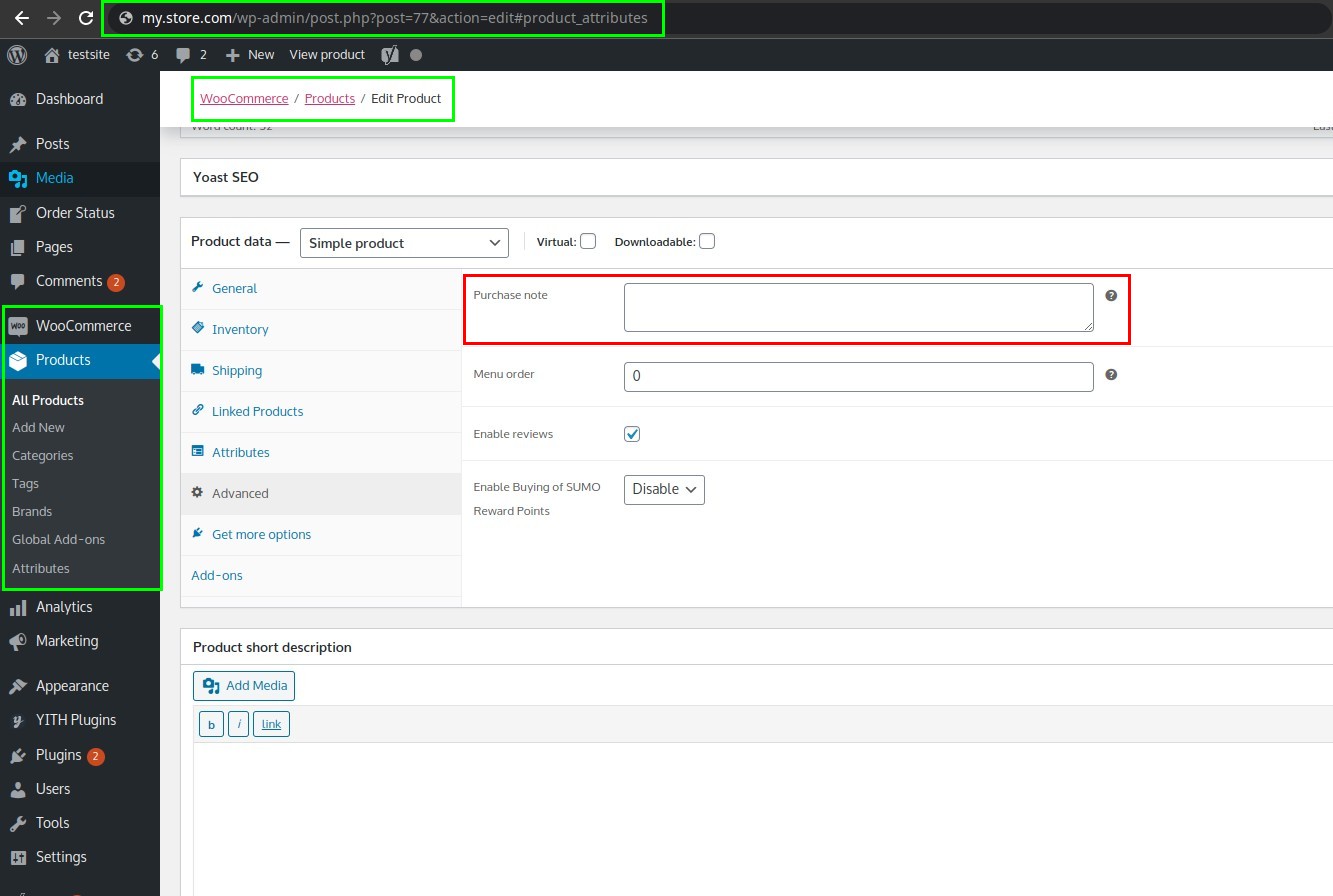
When reporting a problem to the Cart2Cart Technical Engineer, your screenshots should meet the following criteria:
-
- Make sure to capture a full-page screenshot that includes the store URL and the menu items.
- If there’s a problem with the migrated data, please take a few screenshots showing the incorrectly transferred entities or populated fields.
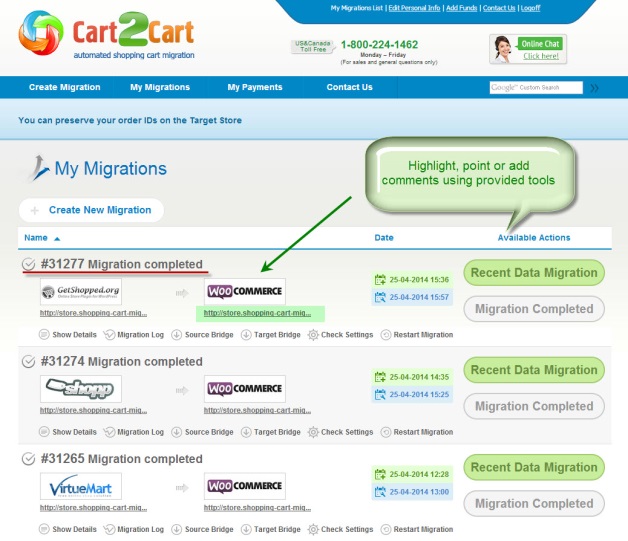
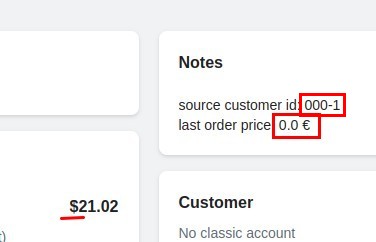
- Here are some great examples of the detail-rich screenshots (they highlight the problem with red color and outline the important points with green):
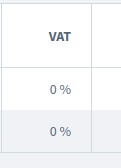
- Below are examples of the screenshots that lack context and give Cart2Cart specialists no understating of how to help you:


Cart2Cart primarily focuses on migrating store data from one e-commerce platform to another, not synchronizing it. While it can efficiently move data, products, customers, and other essential information between platforms, Cart2Cart doesn't perform ongoing synchronization of data between the Source and Target stores.
Note: for synchonizing data after the initial migration, you can explore the Smart Update or Recent Data Migration services to maintain data consistency and real-time updates between your stores. In this case you will pay for actualizing your data between the Source and Target stores only when you need it.
Technical peculiarities of the most shopping cart supported by Cart2Cart impose certain limitations on product variants migration in extremely large amounts. As the results, transfer of products with more than 1000 variants each may be followed by technical hitches down to migration suspension in particular cases.
If you assume there is a chance of facing such an issue or already have faced any difficulties, please contact our Support Team for analysis and searching of possible solutions.
In terms of automated migration Cart2Cart supports a transfer of product attributes, but not product attribute groups. Pay attention that only attributes that are set to products will be migrated. Attributes that are not assigned to products won’t be moved to a target store.
There is still a possibility to migrate product attribute groups with attributes the way they were arranged on your Source cart within Service Packages. To check if they can be moved to the new store in terms of Service Packages, please contact support team.
The time of data migration depends on many outside factors we can’t control. The reasons causing a slow transfer might vary for different types of shopping carts.
The typical issues we face:
- with open source carts there is a large amount of data, firewall limitations (make sure Cart2Cart IPs are all in your whitelist) and a hosting that disallows Cart2Cart to process the requests quickly, or simply blocks them
- with hosted carts - API requests limit
- also, there are some peculiar platforms (open source and hosted ones) that forbid access to their databases/APIs, or give it partially. The only way to get files out of such carts is through CSV export, and if you’re migrating from one of them - the runtime will depend solely on the number of transferable entities.
The rule of thumb is the following: the fewer items you’re moving, the less time it takes. So, if your store is huge - the transfer might take a little longer. Remember, we’re handling your data carefully, without rushing, to avoid any mixing or duplications.
Due to technical peculiarities of certain shopping carts supported by Cart2Cart, you will have to upload .csv /.dat /.xml files which contain transferable entities to the Migration Wizard manually.
Since every shopping cart is unique, the structure of entity files (products, customers, orders, etc.) and the list of mandatory fields within the files may vary. To ensure qualitative and accurate data migration, Cart2Cart requires a definite file structures, the templates of which you can download below.
Please note: Cart2Cart does not check the info within the files and only validate the presence of certain fields mandatory for data migration.
Actinic
CSV File
ekmPowershop
ePages
Etsy
Miva Merchant 5.x - 9.x
Miva Merchant 4.x
nopCommerce
Shopify
Volusion
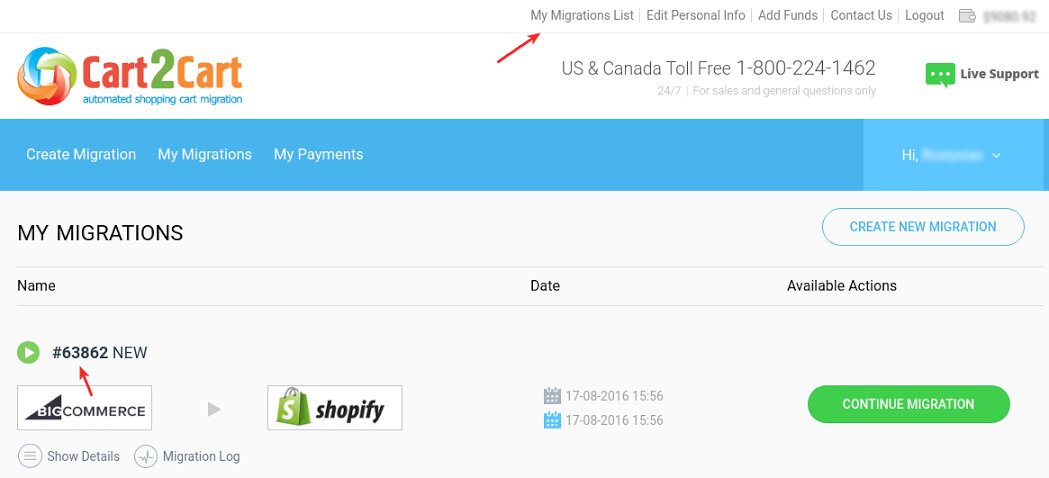
Migration ID can be found in your Migrations List.
Enter Migration List and you’ll see the number above each of your transfers.
How about Ticket ID?
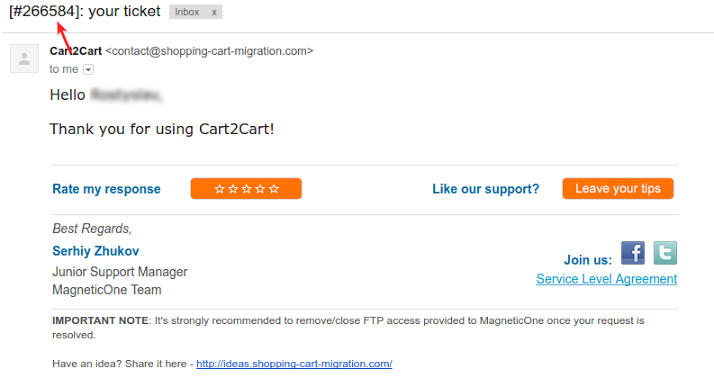
Each time a ticket is created for a new user - one of Cart2Cart Support Managers sends an email response to it - the Ticket ID can be seen in its subject.
Cart2Cart supports migration of Blogs and Blog post from/to the following shopping carts:
- PrestaShop
- WooCommerce
- BigCommerce
- Shopify
After migration with Cart2Cart Blog posts will appear in chronological order.
Blog details, blog categories and Blog Posts are transferable only within default built-in shopping cart blogging engines. Blogs and blog posts created with the help of 3rd-party blogging apps will not be moved.
However, since PrestaShop doesn’t have default blogging engine, an additional paid PrestaBlog (Professional Blog) module is required - more details here.
To perform shopping cart migration with the preservation of your Source Cart’s multiple languages, the corresponding languages need to be added and configured properly in your Target Cart before the data transfer.
For example, if you have English and Spanish languages set up in your Source Cart, they both need to be present as available languages in Target Cart. Moreover, it’s crucially important to ensure each language has identical ISO code on both Source and Target cart.
Here are short guides on adding and editing languages in some of the most popular shopping carts: OpenCart, PrestaShop, Magento 1.x, Magento 2.x.
Adding languages in OpenCart / editing ISO code
-
- Go to OpenCart marketplace and download the necessary language you need for your store. Unzip and upload it to your OpenCart root folder.
- Now, go to OpenCart Admin Panel. Go to System→Localization→ Languages→ “Add New” Button.
- Go to README file that was included in your installation ZIP file to get the language pack info.
- Copy the info from there to fill in all the necessary fields including language name, ISO code, locale, image, directory, etc correctly. Please, make sure that the ISO code of your source and target carts are identical.
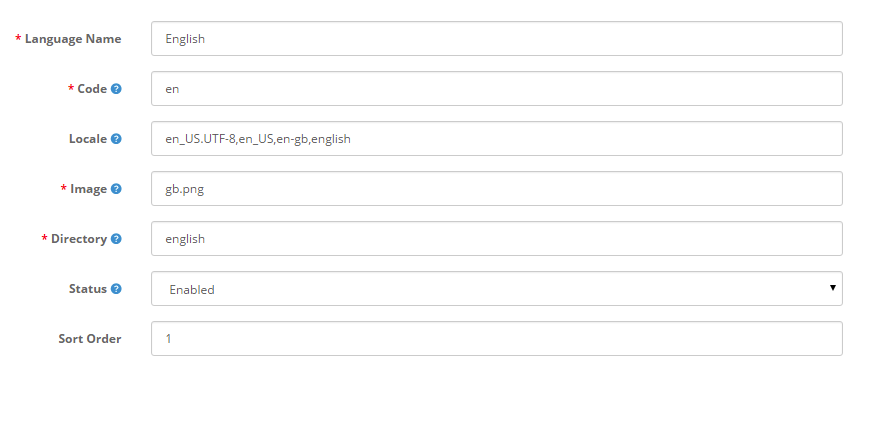
- Now, click “Save” button.
If you don’t need to add a new language but just check or alter the ISO code of an existing one, simply click “Edit” button and do the required changes.
Adding languages in PrestaShop
-
- Log in to PrestaShop Admin Panel. Go to “Improve” section→International →Localization→ Languages. You`ll see only English language that is set up by default.
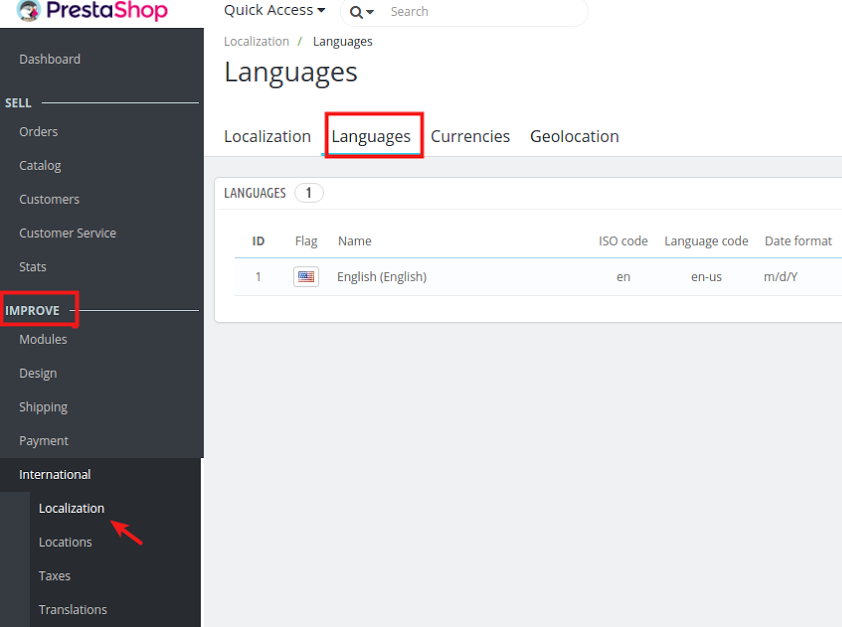
-
- To add more languages, go to International →Translations →Add/Update Language.
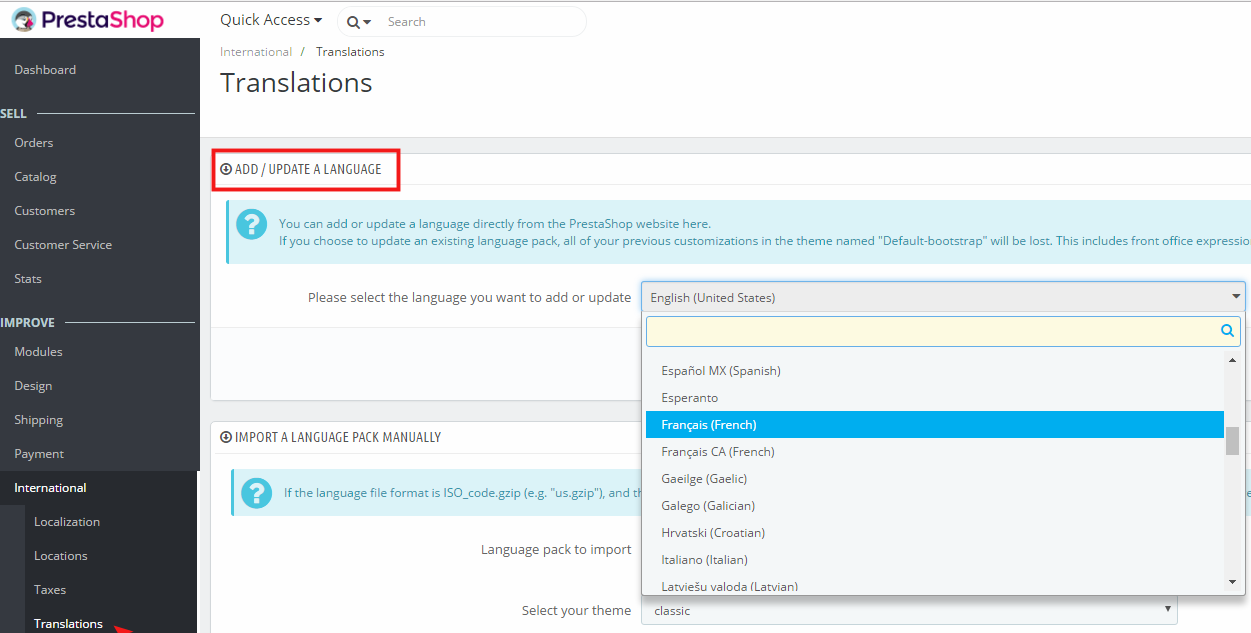
- Add the language corresponding to your Source Cart. The ISO code will be substituted automatically depending on the language you choose.
To check whether the languages ISO codes of the Source Cart correspond to the Target ones, go to Localization→ Languages→ ISO code.
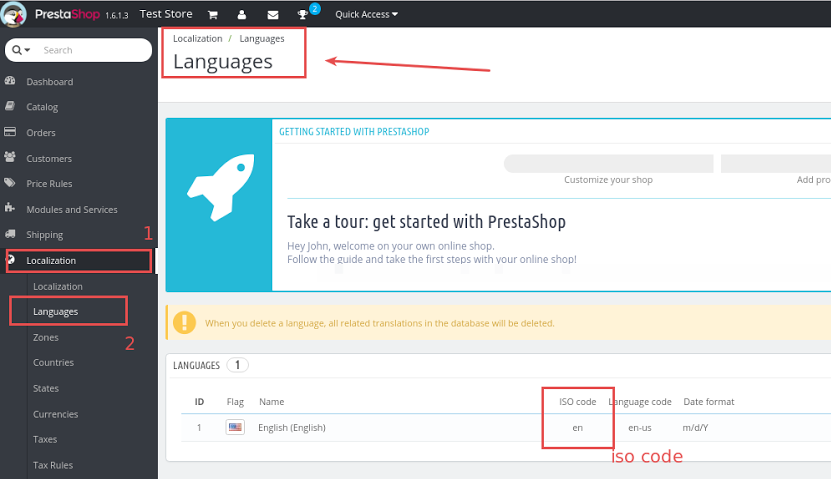
Adding languages in Magento 1.x
- Log in to your Magento Admin Panel.
- Go to Magento Connect and choose the language pack you need to download and click “Install Now”.
- Then, you need to click Get the Extension Key → Select and copy it.
- Go back to your Magento Admin Panel. Choose System → Magento Connect → Magento Connect Manager.
- Now, you need to log in to Magento Connect Manager, insert your extension key in “Install New Extensions” section.
- Press on “Install” and the language pack will appear instantly. The ISO code of the languages will be substituted automatically depending on the chosen language.
- Now click “Proceed”. That`s it! The installation procedure is over and now you can review the changes.
Make sure that the ISO code in your Source and Target carts are identical.
Adding languages in Magneto 2.x
-
- Download the language pack in Magento Marketplace. Follow the instructions provided in each language pack.
- Now, you'll need to add language pack to your Magento store. First, log in to your Magento Admin Panel.
- On the left side of Admin Panel, choose System→Web Setup Wizard.
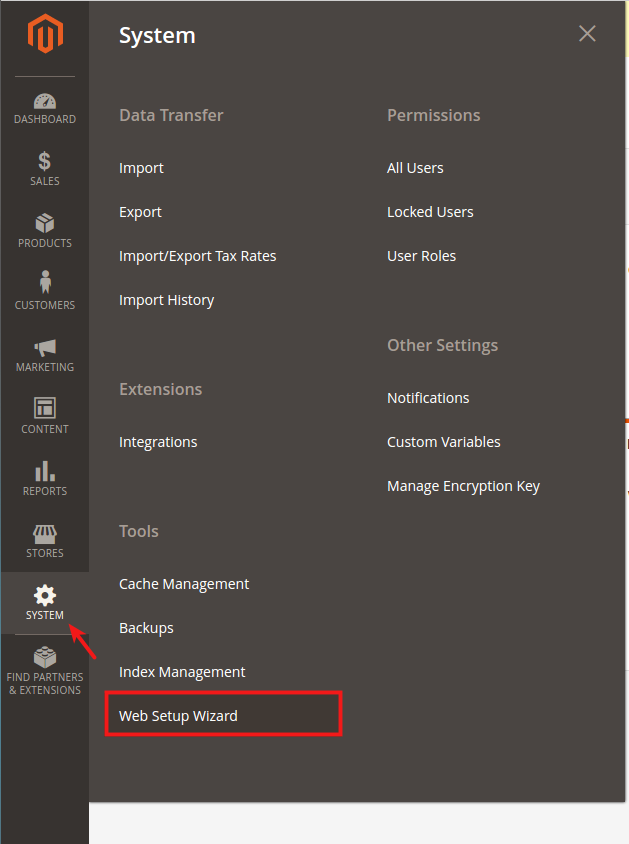
-
- Now, go to Component Manager
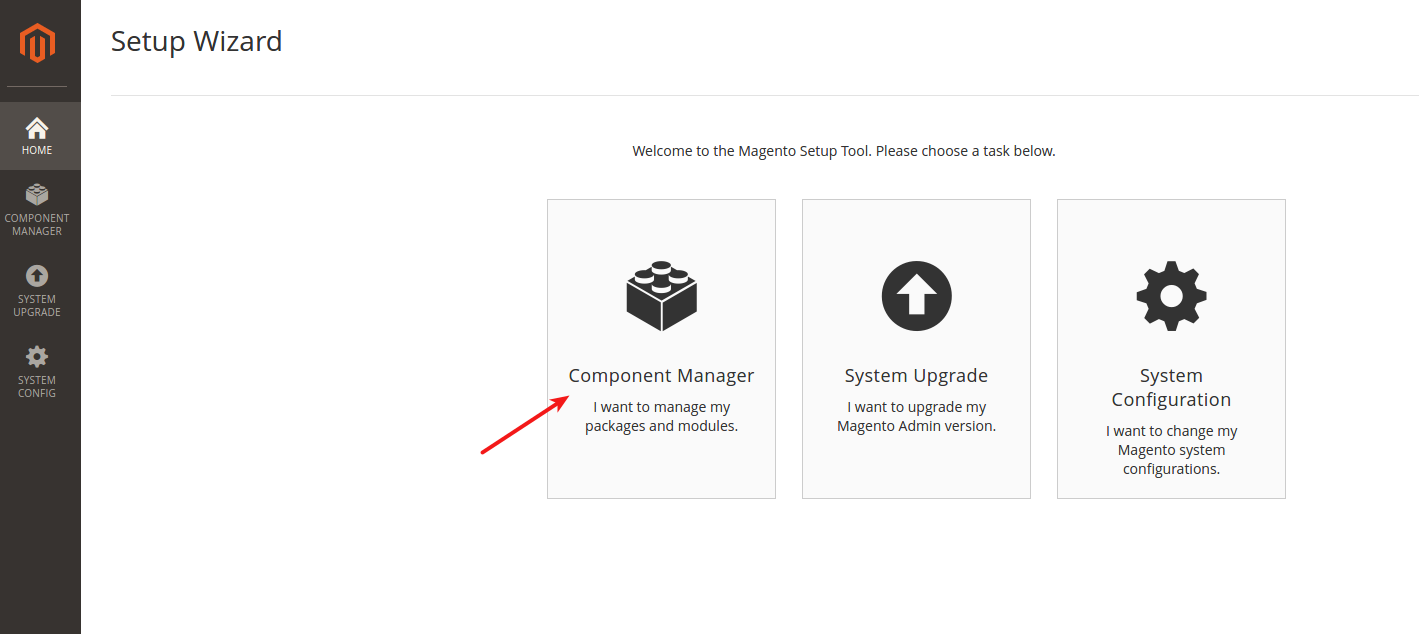
-
- After that, click “Sign in” to your Marketplace account in order to provide Public Access Key and Private Access Key.

-
- To find a key, go to Magento Marketplace → My Profile → Access Keys. Copy them and paste in the necessary fields.
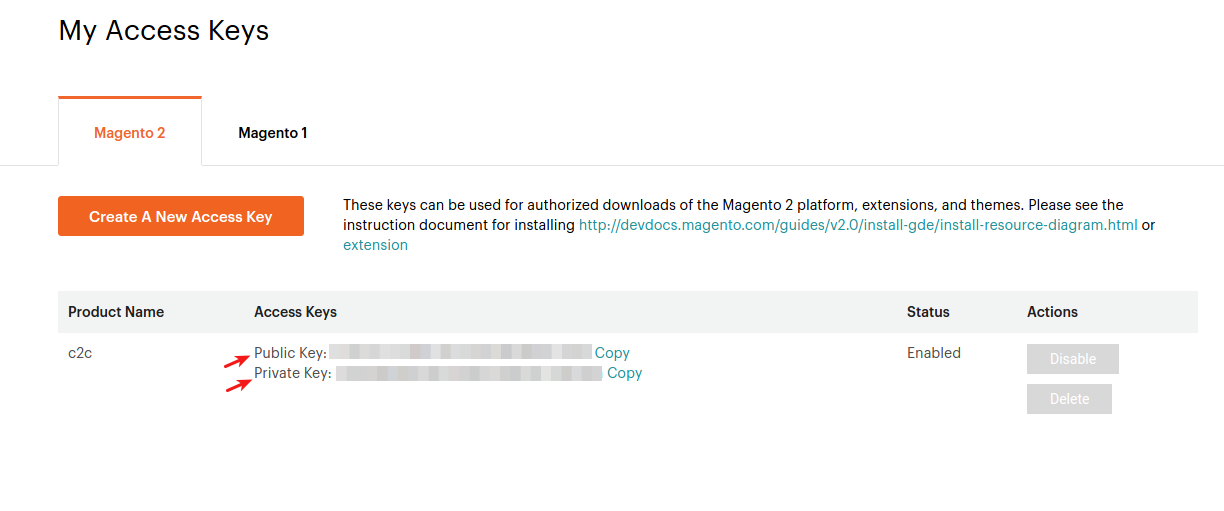
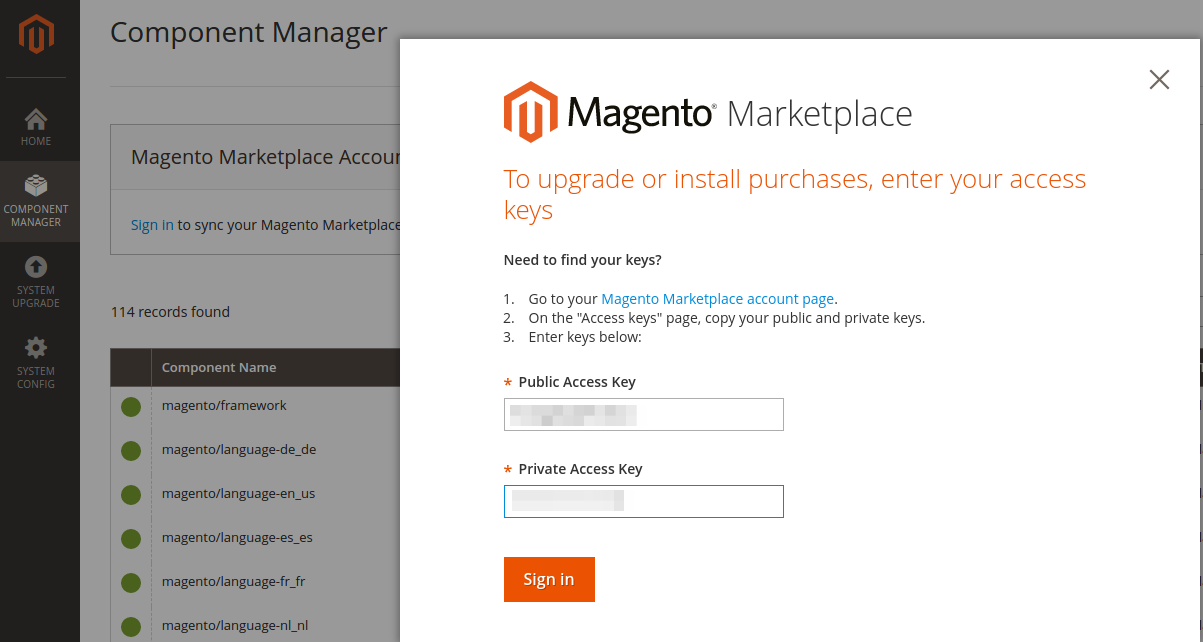
- Now, click “Sync” button in order to synchronize the Component Manager with the Marketplace purchases. Under section New purchases click Install.
- The Extensions Grid will appear. Point out the language package for installation and click Install.
- When the installation is over, it has to be configured for your store according to the developer’s instructions which you can find in Magento Marketplace User Guide.
And of course, ensure the ISO code of the installed language is identical in both Source and Target carts.
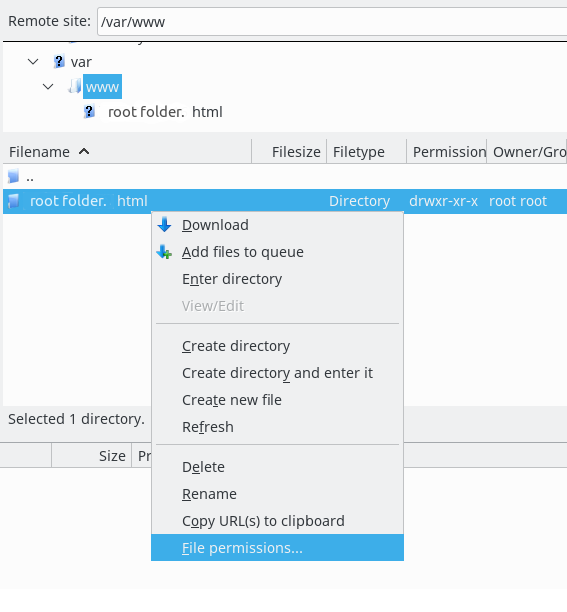
In order to change your current store’s root folder permission to “chmod 755” you need to connect to your server through FTP application, for example Filezilla. After that, find your store’s root folder and click the right button of your mouse on it.
From the given menu pick “File permissions...”
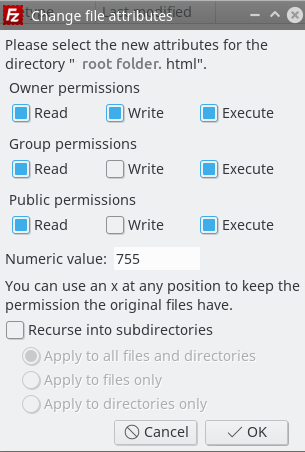
Then, in “Numeric value” field write down “755” and select all the permissions as shown on the screenshot below.
FTP accounts provide access to your online store’s files through a protocol FTP. To create such access follow these steps:
-
- Login into your website cPanel.
- In the Files section, choose FTP Accounts.

-
- To login into your account via FTP, enter “yourdomain.com” as your FTP host, the username and password. Please, note! You should use strong passwords, opt for “Password Generator” to create one.

-
- In the Directory field, an assumed directory based on the FTP username will be auto created. But this is not correct. In this field you should delete everything after your store root folder. This could be public_html, httpdocs, htdocs, html.
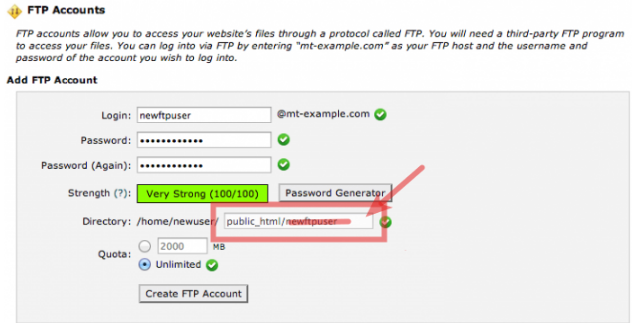
- FTP quota is the maximum amount of bandwidth the FTP user may use. Thus, while creating FTP account for data migration set the “Unlimited” quota to use the total amount of bandwidth for the cPanel account.
- Click “Create FTP Account”.
Cart2Cart doesn’t provide the service of domain switching. The detailed guide below will provide you with the most common scenarios on how to get the job done.
To start with, let us clarify two basic terms:
- DNS (Domain Name System) - A global web system that accumulates different information, typically IP numbers, with domain names. Thus, when you enter a website address into a browser, your computer knocks to DNS, gives it the letters you’ve typed and receives an IP address instead. Then, it connects you to the requested Internet page.
- NS (Name Server) - A server that handles queries from your computer, about the location of domain name’s various services. In most cases, websites have two name servers to which they’re pointed to.
Here are the three most prevailing situations you might find yourself in after the automated migration:
- You have both stores hosted by the same provider, under the same domain. Yet, your target store is in the subdirectory.
- Both of your stores are hosted by the same provider, yet each of them has different domain name.
- You have source and target stores hosted by different providers, under different domain names.
Case 1. The same provider - the same domain
This is one of the easiest ones. Both of your stores are hosted by the same provider, under the same domain, but your target store is in the subdirectory.
Let’s assume the source store is source.com and target - source.com/target-store
-
- Log in to your FTP

-
- Give your source store any other name (source.com -> abcd.com)

-
- Create a new folder and give it the same name your source store folder had.

- Move all data from target-store folder (abcd.com/target-store) to the folder, you’ve just created and renamed - (source.com)
Case 2. The same provider - different domains
- Log in to your FTP.
- Give your source store directory any other name.
- Once your source store name becomes available, rename your target store folder and give it the title of your source store directory.
The switch is over, your target store has received a name of your source store.
Case 3. Different providers - different domains
Please note that in this case after you perform the procedure of domain name switch your target store will be unavailable for the period 24-72 hours.
To switch the domain in the situation when you have different providers and different domains follow the instruction below:
-
- Log in to your hosting provider admin account (or wherever your domain is registered)
- Move to Domains menu. (This menu name might be different within different hosting companies)

-
- Select the necessary domain.

-
- In the domain management menu - select Manage DS Records, below the Name Servers title

-
- Fill in the new name servers into the appropriate fields.

- Click to save the changes.
Here are the three most frequently occurred reasons why your domain name leads to the old online store:
- The info on old DNS hasn’t been deleted from your domain details. To solve this - change your domain details so that they would point to the DNS of your new hosting provider;
- Your source store hosting provider still keeps your domain details in its DNS. To solve this - reach out to your hosting provider support and ask them to remove the data;
- Domain changes have not been spread among the DNS yet. To solve this: remain patient, domain switch is not a single-click procedure and requires time for the changes to be processed. Once after 72 hours period there is no positive result - contact your hosting providers to report the problem.
According to the international regulations, all software service purchases are accompanied by sales taxes. To comply with this requirement, every Cart2Cart refill includes tax collection. More specifically, Paypro, the company handling taxes from Cart2Cart, collects VAT from Canada and EU countries.
For EU-based companies, VAT is charged and due in the EU country where the goods are consumed by the final consumer. In order to check out the VAT rates depending on countries click right here. Every EU country has its specific VAT percentage that can be seen after the country is chosen.
For Canadian residents, the GST/HST is collected and paid to the Government of Canada. However, according to a Canadian law, you can get a compensation from the State by providing GST number of the company receiving the payment, i.e. Cart2Cart. Please, contact our support team to request the GST number.
Note: If you are a business with a valid VAT ID, you do not need to pay VAT. In case you've already paid VAT, you may request its refund - just provide your Order ID and VAT ID in the corresponding fields and our accounting department will refund you the VAT. Private individuals cannot have VAT refunded.
Fixed VAT is collected with each recurring payment. For more detailed information about VAT rates for different countries, please go here. The residences of the countries not included into the list won’t be charged while refilling the Cart2Cart account. After each successful payment, PayPro is sending an invoice to the customers email indicated on the order page.
Yes, we provide FREE Demo Migration for you to see how the service works for your stores.
You can migrate a limited number of data entities (up to 10 products and customers/orders related to them) for free, it takes around 15 minutes.
You can make any changes you need and run DEMO migration again as many times as needed.
Automatic upload is an alternative option, that permits to upload Connection Bridge without actually entering your FTP client.
To use it, provide your FTP details - host, port (If it’s different from “21”), login, password and the path to the folder where your store is. Most times, shops are located right in the “home” folder and then you can skip the last field, but if yours is somewhere deeper, enter the path to it in this fashion - “/path/to/your/store”.
Here’s an example of how the fields should be filled:
- Host: 10.4.5.24
- Port: 72 (or skip the field if your port is 21)
- Login: User
- Password: 555222
- Path: /path/to/your/store (or skip the field is your store is right in the “home” folder)
Note: each hosting has its peculiarities, so if any problems occur with the automatic upload we recommend uploading Connection Bridge manually - it only takes a few seconds. (more…)
Unfortunately, the default currency is not specified. Please log in your source store admin panel and select the default currency.
For example, here’s how to set default currency for VirtueMart:
Admin panel -> SHOP -> Shop -> Currency.
Make sure there’s only one currency on the list; otherwise, it would be impossible to identify the default one.
You can check Cart2Cart Terms of Services Chapter 2.7.12 for detailed information on a Discount Policy:
Discounts are issued in the form of 'percentage off' and are offered to customers via promotional emails, advertisements, on-site banners or third party communications. You can use one discount code per one order. If you have several coupon codes, choose one with the biggest discount. Discount codes may have validity period or may be issued for a specific product list. Cart2Cart reserves the right to cancel or change any discount without notice, at any time. All discounts are provided for the migration price only and do not apply to any additional options and services. If you have a discount coupon code but didn't apply it at the Confirm Migration step then your data migration price won't include a discount and Cart2Cart won't provide a refund in this case.
(more…)Yes the cost of Remigration, as well as Recent Data Migration is calculated as 50% of the migration price for the number of entities during standard migration.
However, the price of additional options remains the same as during standart transfer, in both cases. You can find more detailed information about the two services here. If you have any further questions feel free to contact our Support Team.
(more…)In case your store has a big number of entities, please make sure your hosting plan has enough space to accommodate all the data. Otherwise, Cart2Cart won’t be able to transfer your entities and migration will be interrupted.
(more…)As an exception, you might experience website performance slowdown for one of the following reasons that Cart2Cart is not capable either to control or prevent:
- the amount of products exceeds memory limit of your hosting plan;
- wide range of third-party modules;
- numerous product variants, product images;
- viruses;
- resource consuming template with animations;
- large amount of visitors.
Recent Data Migration service can be used as many times as you need. It will help to transfer the latest entities that were added to your Source store since last performed migration.
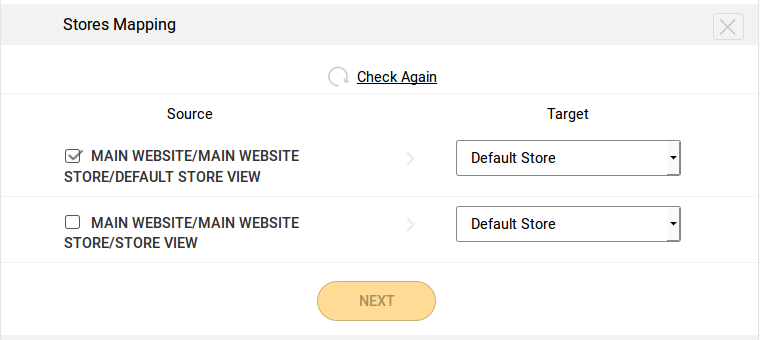
(more…)Unfortunately, it is not possible due to technical reasons. To prevent any possible faults, please, wait until one migration is completed and then proceed with the next one. In case you are moving from one shopping cart that supports multi-store to another, you can perform a single data transfer for all substores by simply mapping them at Stores Mapping section of "Entities Selection" step.
In some cases when Cart2Cart clients ask for additional customizations or fixes for their migration Cart2Cart engineers need a full access to all folders on the FTP. In case you create a unique user for Cart2Cart Team make sure you have granted access to FTP folders for this user. That means Cart2Cart tech staff will be able to:
- Read. The user can download files from the folder.
- Write. The user can upload files to the folder.
- Run. The user can run extensions from the folder.
Usually, store owners set only file or folder permissions as 777 (that means enable all actions above) for users with full access.
But if the user has limited folder access he won't be allowed to do this actions even if folder has 777 access.
In order to prevent inconveniences:
- Send your own login details. It is the most comfortable way that requires minimum efforts.
- Add Cart2Cart user (or every user that is created/granted for Cart2Cart Team) to the group with full access to all folders of the FTP. It can be “Administrator” group, for example.
- Contact your host provider to set access to all folders for Cart2Cart user (or every user that is created/granted for Cart2Cart Team).
Cart2Cart provides the possibility to migrate products, customers and orders from your store database but not your backend. That’s why, no matter what filters or other configurations are set within your admin panel, the migrated data will look exactly as it does in the database, not your store backend.
If you transfer data to the live store, it is recommended to turn on maintenance mode on your target shopping cart before migration. This action will help to avoid possible loss of the orders which could be created during the migration procedure. In maintenance mode your customers will see a temporary page with information about service works.
You can find the information on how to turn on maintenance mode in documentation for your shopping cart.
Here are instructions on how to enable maintenance mode in some of the shopping carts:
- Enabling Maintenance Mode in Magento 2.x
- Enabling Maintenance Mode in Shopify
- Enabling Maintenance Mode in WooCommerce
- Enabling Maintenance Mode in PrestaShop
- Enabling Maintenance Mode in OpenCart
- Enabling Maintenance Mode in Bigcommerce
- Enabling Maintenance Mode in VirtueMart
Unfortunately, the default language is not specified. Please log in your source store admin panel and specify the default language.
The default currency is not specified, or it's not correct. Please specify the default correct currency in your source store settings. (more…)
The path to images in not specified. Please fill in the correct path in your source store settings. (more…)
The language is not specified, or it's incorrect. Please choose the correct language in your source store settings. (more…)
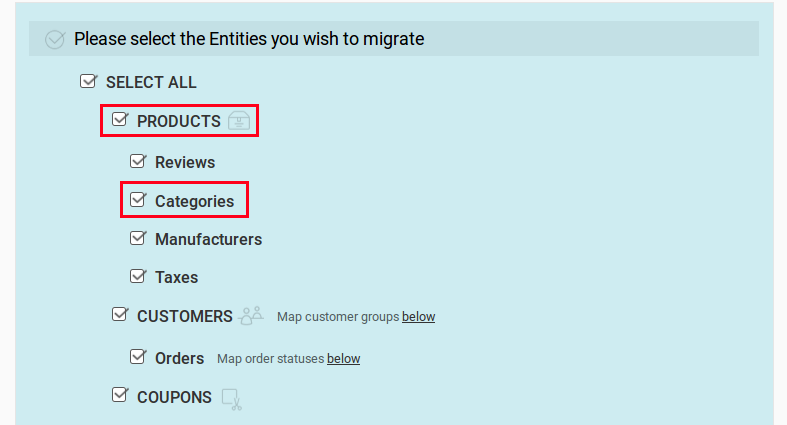
If you manually created categories at your Target store and migrated only products with Cart2Cart then products won’t be assigned to the corresponding categories. However, if you choose to migrate categories as well as products - data will be matched at your Target shop in the same way as it was at your Source store.
While moving your store from a database dump image migration is not provided as a default feature. In order to transfer your pictures, you should grant us with an access to a folder with images. After the migration is finished we will upload them to your store.
(more…)Yes, Cart2Cart supports the data import of multiple languages to WooCommerce, Magento, PrestaShop, OpenCart and Shopware. In case you want to explore the full list of shopping carts where multiple languages import, visit Cart2Cart Multiple Languages Migration page.
Cart2Cart offers a possibility to map (but not migrate) languages that already exist on your source store with those that will be displayed on a target cart. In order to avoid inconveniences, before migration you should to create proper languages on a target store. To do that you have login to your admin panel, enter language section and create new or edit already existing languages.
Here, we'll provide step-by-step instrusctions on how to add languages to the most popular shopping carts:
Here’s how you add a language to Magento:
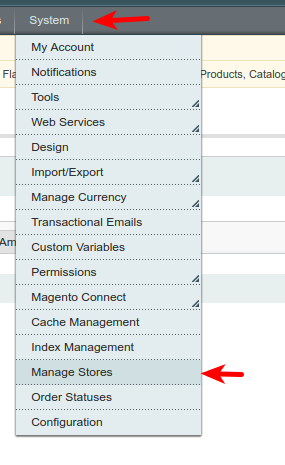
Step to System->Manage Stores
Enter the Store View Name menu

Change Default Store View Name to English and save the changes
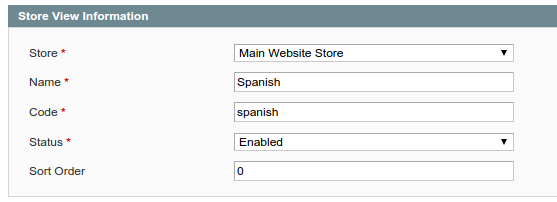
After, create a new store view (let’s say Spanish)

Type Spanish in the Name field, spanish in the Code field and choose Enabled in the Status field.
Save the store view
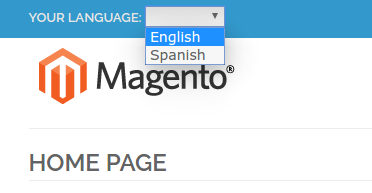
Now, on the frontend you can switch your store language to spanish
Here’s how you add a language to PrestaShop
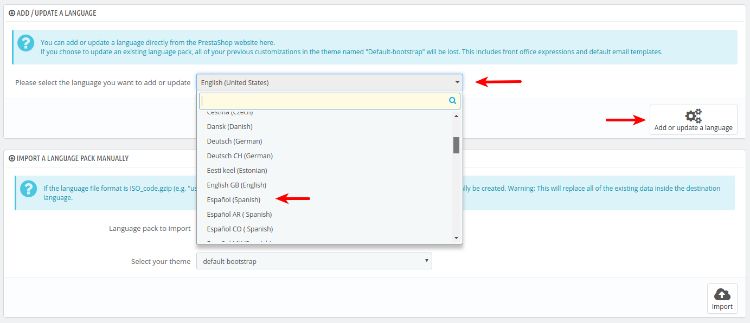
Step to Localization->Translations
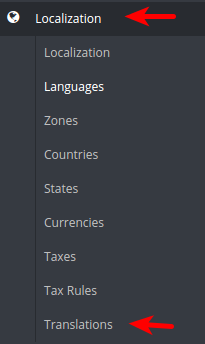
Choose the language you’d like to add (spanish in our example) in the ADD / UPDATE A LANGUAGE section and press add or update a language button
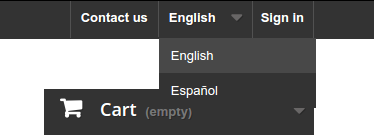
Now, on the frontend you can switch your store language to spanish
Here’s how you add languages to OpenCart
First, download a needed language pack from here
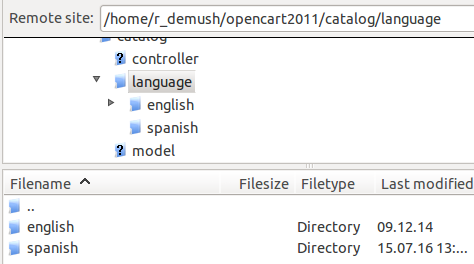
Then, enter your store’s root directory via FTP client, go to catalog->language from there and upload the language pack
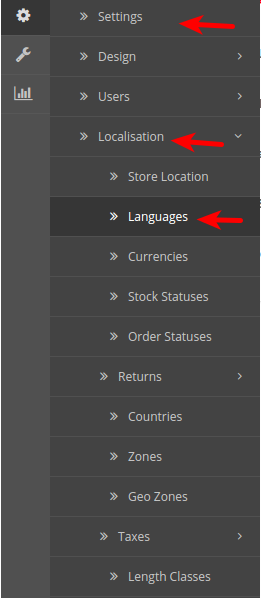
Log in to OpenCart admin panel and go to Settings->Localisation->Languages
Click Add new and provide the needed info (all language details are usually mentioned in the ReadMe file in the archive you download)
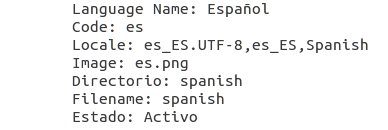
Press Save

Now, on the frontend you can switch your store language to spanish
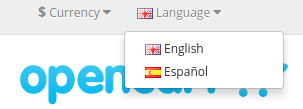 (more…)
If you didn't apply a discount code at the Confirm Migration step then your data migration price won't include a discount and Cart2Cart won't provide a refund. (more…)
Cart2Cart provides an opportunity to calculate an approximate time and cost of migration. You can make this procedure via Migration Estimator. Specify your Source and Target shopping carts. After that fill in the quantity of products, customers and orders you would like to migrate.
Note: Cart2Cart calculates only the quantity of parent products, so, in case your store includes child products (variants), they may not be counted. However, all of them will be migrated.
(more…)In case you start first migration and move products, for example, and then start second migration and move customers with orders - relationship between them will be lost. That’s why it is recommended to move all the data in one migration.
(more…)Sometimes you can see only plain text of Connection Bridge, instead of “BRIDGE_INSTALLED” message. If you aren’t able to proceed next on Migration Wizard, you will need to configure PHP settings for your server.
Unfortunately, there are no unique PHP settings for Cart2Cart Connection Bridge. That means, you will need to go to your shopping cart official website (Magento, WooCommerce, PrestaShop, etc.) and search for “PHP settings” or “PHP configuration” tutorials. Than follow this official guides to enter proper PHP settings for your shopping cart. Find more info about what are the Connection Bridge files and how to install them here.
(more…)Yes, Cart2Cart supports the migration of coupon codes. However, this entity is currently available for migration within Magento, WooCommerce, Bigcommerce, PrestaShop, OpenCart, CS-Cart, VirtueMart, Shopify and Volusion only.
(more…)Yes, Cart2Cart supports migration of Grouped price within a limited number of platforms:
- Magento
- PrestaShop
- OpenCart
- VirtueMart
- CS-Cart
- AspDotNetStorefront (from only)
- WooCommerce (to and from)
Grouped price matching happens during the step of Customer groups mapping.
(more…)Downloadable products are mostly digital items, such as music files, eBooks, software etc., or additional files you attach to the physical products, typically, for guidance or description purposes.
Currently, Cart2Cart supports the transfer of such entities within the following platforms:
- Magento
- WooCommerce
- OpenCart
- 3dcart
- PrestaShop
- CS-Cart
- osCommerce (from only)
- Zen Cart (from only)
- osCmax (from only)
But stay tuned, because we'll expand this list in the nearest future.
Yes, Cart2Cart supports migration of Related products (including upsell and cross-sell products) within a limited number of carts:
- to/from Magento - related products, upsells, cross-sells
- to/from WooCommerce - upsells, cross-sells
- to/from 3dcart - related products, upsells
- to/from Bigcommerce - related products
- to/from Interspire - related products
- to/from PrestaShop - related products
- to/from CS-Cart - related products
- to/from OpenCart - related products
- to/from AceShop - related products
- to/from MijoShop - related products
- to/from MiwoShop - related products
- to/from JooCart - related products
- from AspDotNetStorefront - related products
Yes, Cart2Cart supports migration of reviews. However, since reviews are bounded to products, it is required to perform products migration as well. Otherweis, reviews will migrate to your database, but won’t be displayed on a storefront.
(more…)Even if the platform you’re looking for is not in the list of supported shopping carts, we still can help you. Providing your Source cart allows to export store’s database to files, most probably we will be able to perform the migration on your request. Please, contact our Support for more detailed information.
Yes, Cart2Cart permits users to restart Demo Migrations. In order to achieve it - do the following:
1.Log in to your Cart2Cart account
2.Step to My Migrations List

3.Find the needed migration where the demo is completed, and press "Continue Migration"

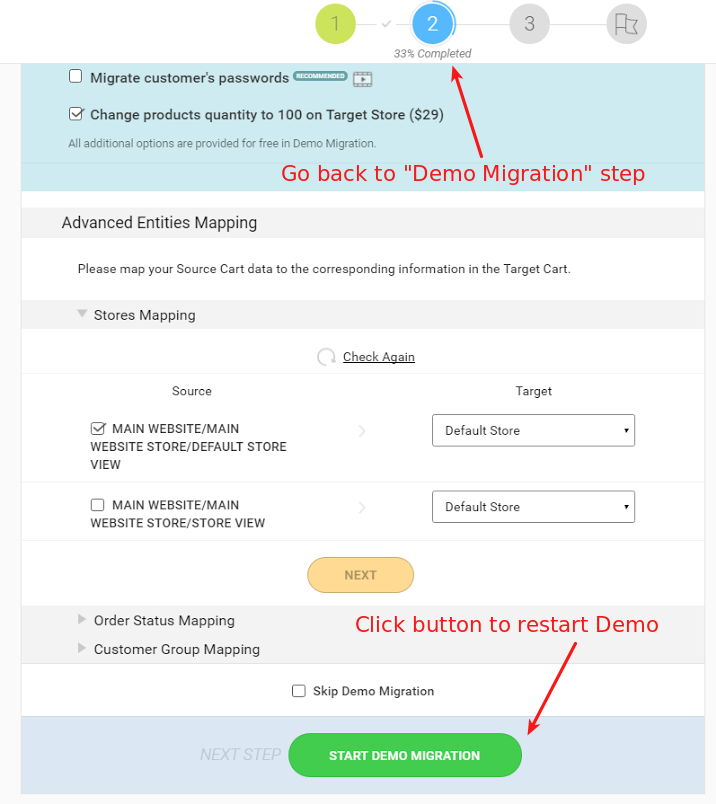
4.After, get back to the second step of the Migration Wizard "Demo Migration" and simply click "Start Demo Migration" button in the bottom. Demo data transfer will start over again.
There are several ways of restoring a MySQL database from an sql dump.
1. By using a commandline
If your MySQL user has a password, then use this command:
mysql -h localhost -u [MySQL user, e.g. root] -p[database password] [name of the database] < [name of your sql dump, e.g. sqldump.sql]
Please note: there’s no space between -p and the password!
If there's no password:
mysql -h localhost -u [MySQL user, e.g. root] [name of the database] < [name of your sql dump, e.g. sqldump.sql]
2. By using phpMyAdmin
1. To restore a database, click the SQL tab
2. On the SQL page, uncheck the Show this query here again
3. Browse to your backup of the database
4. Click Go

3. By using cPanel
1. Login to your cPanel
2. Under the files section, click on Backups

3. Under Restore a MySQL Database, click on Choose File. Next, navigate in the file browser to your database backup you'd like to restore, click on it, then click on Open.

4. You should now see your database backup that you've selected, go ahead and click Upload.

5. Finally you'll see the full backup that got restored.

4. By using Sypex Dumper
Download Sypex Dumper for free.
If you have any questions concerning MySQL database restoring, feel free to contact our Support Team.
(more…)As a migration service, we’re only responsible for transferring data from one store to another.
Thus, we can’t predict or control how the entities are shown on Target Store if its design template is customized.
Our recommendation is to perform transfers to the fresh installation with default design first, and then to customize store’s looks after migration is done.
Cart2Cart Passwords Migration plugins allow you to transfer customer passwords within these pairs of shopping carts. Currently, there are 6 passwords migration plugins. They are free to download and can be activated in a few simple steps. Get the detailed instructions by clicking the links below:
- Cart2Cart Magento 2 Passwords Migration Plugin
- Cart2Cart WooCommerce Passwords Migration Plugin
- Cart2Cart OpenCart Passwords Migration Plugin
- Cart2Cart PrestaShop Passwords Migration Plugin
- Cart2Cart Thirty Bees Passwords Migration Plugin
- Cart2Cart Magento 1 Passwords Migration Plugin"
Yes, we do support the migrations of reward points between a range of shopping carts. Namely shop owners can move:
- Reward points that permit shoppers to buy goods
- Reward points that are given to customers after the purchase
- Reward points that clients already possess
- Reward points that are included in orders details
The details of such transfers vary in each particular case and, currently, e-merchants can move reward points among the following e-Commerce solutions:
- OpenCart
- 3dcart
- PrestaShop
- WooCommerce
- X-Cart 5
- CS-Cart (to only)
In case of migration between OpenCart and 3dcart, these entities will be moved automatically, with no further complications. However, such carts as PrestaShop, WooCommerce and X-Cart 5 require a preliminary installation of appropriate modules in order to make the transfers of reward points possible. (more…)
Yes, Cart2Cart provides a possibility to migrate payment info, but not payment methods. Information about the currency of payment, name of methods of payment and shipping is going to be included in order comment. Cart2Cart performs migration of payment info to such e-Commerce solutions:
- Magento
- PrestaShop
- WooCommerce
- OpenCart
Also, you can move your payment info in case of migration from:
- Magento
- PrestaShop
- osCommerce
- Zen Cart
- Loaded Commerce
- xt:Commerce
- osCMax
In addition, if you perform data transfer from these platforms you can migrate credit card information including credit card number and expiry date.
If you still have some questions feel free to contact our Support Team.
(more…)Cart2Cart does not perform any modifications or deletion of admin account on Target store while migration. Therefore, check all your details carefully to access the administrative panel. (more…)
If you you have technical troubles while setting up the migration it is really important to visualize your thoughts in order to help our Support Team to meet all your demands. Since technical issues can be resolved only via email, it is recommended to add screenshots while submitting a ticket. This will help us to understand what kind of error is occurred and resolve it.
There are several ways to make screenshots:
1. Print Screen button on your keyboard. When you press it, an image of your screen is copied to the Clipboard. To print the screen capture or send it to someone via email, you'll first have to paste it into Paint or some other image-editing program and save it.
2. Make screenshots with software like Jing or Snagit that provides additional editing features. You may highlight any part of image using provided tools and upload picture to the cloud drive like screencast.com. In this case you will simply send the link to a screenshot instead of sending the file. https://www.screencast.com/t/biQgXang Other sharing options are also available.
3. If you don’t want to install additional software, you may also add extension to your browser:
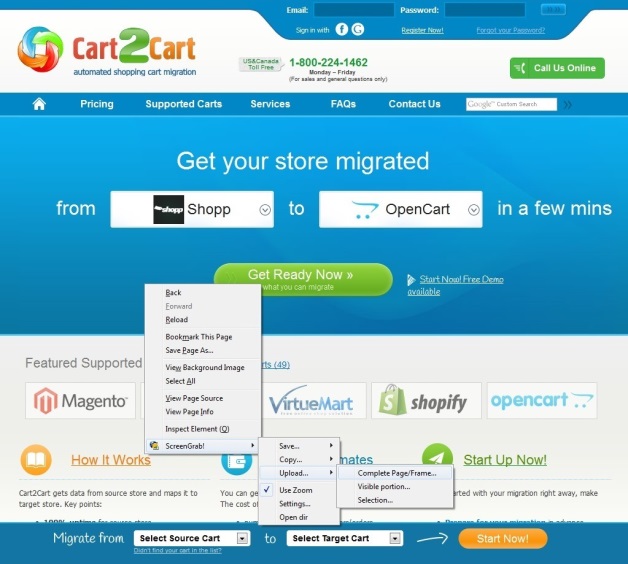
- Mozilla Firefox - ScreenGrab
- Google Chrome - Awesome Screenshot, LightShot (Windows only), Webpage Screenshot
- Opera Browser - Lightshot
This extensions also provide editing and sharing features.
There are some rules for making a screenshots.
- Capture enough screen and highlight the main parts.
- Make easy to understand screenshots and don’t overload them with arrows, frames and so on.
- Text should be added in a frames or dialog windows.
When Demo or Full migration is running, the browser window can be closed. In this case transfer is not going to be interrupted. You will be notified when the switch is done via e-mail notification.
Often, due to template configurations your custom fields may not be visible on the front end. In order to fix that you should change template settings in admin panel.
Due to some shopping carts peculiarities, you will have to export CSV files in order to perform migration. That’s why before migration it is recommended to check if your shopping cart provides a possibility to export files. Here is a list of such carts, and the easiest way to do that:
-
- Volusion (remember, you have to be subscribed to Plus or advanced plan)
- AbleCommerce
- Big Cartel
- Actinic
Unfortunately, during Magento, OpenCart and PrestaShop multi-store migration such additional options are not available:
- Preserve customer IDs on the Target store;
- Preserve order IDs on the Target store;
- Preserve product IDs on the Target store;
- Preserve Category IDs on the Target store.
Nonetheless, during Magento multi-store migration additional option “Preserve order IDs on the Target store” is available. If you still have some questions feel free to contact our Support Team.
Some shopping carts allow to create the same e-mail addresses for different customers. It means that system does not block/stop the registration with the e-mail address that is already in use. As the consequence, users have the same e-mail addresses.
In such situation Cart2Cart will migrate only first customer and another will be skipped. That’s why quantity of customers on Source and Target stores may be different.
In order to estimate the price of automated migration, you will need to know the number of entities on your current shopping cart. To do that, log into your platform admin area and follow the simple instructions below.
Note, that each e-Commerce platform has its peculiarities, so here you will find a detailed guide for:
How to check the number of entities on Magento?
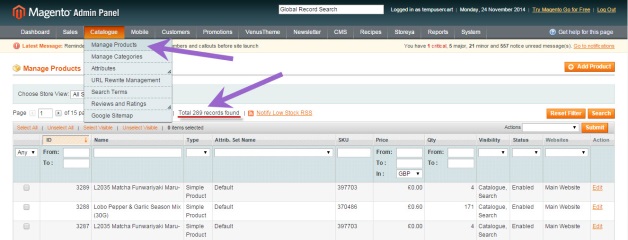
1. To see the number of products, go to Catalog -> Manage Products. In the top of the table you will see the total quantity of products in your shopping cart.
However, there is a peculiarity - Magneto counts each product variant of configurable products as a separate one. Thus, the total number of products in Magento admin panel will be different from the one displayed on Migration Wizard during the transfer.
2. According to the same principle, check the number of:
- customers (Customers -> Manage Customers)
- and orders (Sales -> Orders).
How to check the number of entities on PrestaShop?
1. To get the number of products, go to Catalog -> Products. In the top left of the page you will see the total quantity of products in your shopping cart.
2. According to the same principle, check the number of:
- Customers (Customers -> Customers)
- and Orders (Orders -> Orders).
Note: On PrestaShop, there’s no possibility to see all categories at once, since categories can contain multiple subcategories in them. Same goes for products on all PrestaShop versions up to 1.4.x. 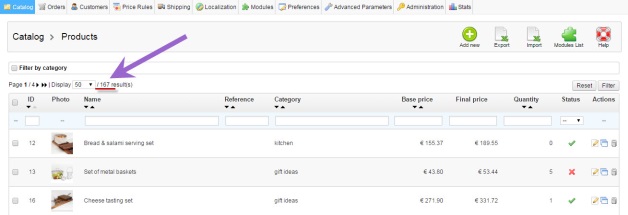
How to check the number of entities on OpenCart?
This shopping cart shows the number of entities in several places of your admin area.
1. Total Orders and Customers are usually shown on in the Overview of the shopping cart on the Dashboard.
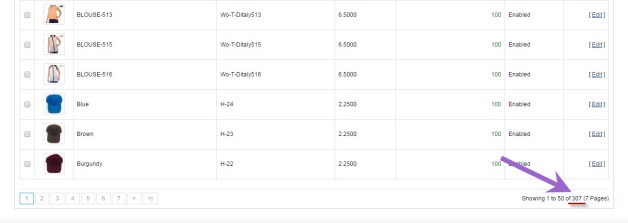
2. But, if you haven’t found the number of entities there, you will have to open Catalog -> Products Tab of the store and scroll down the page. Products quantity will be shown on the right bottom of the page.
3. According to the same principle, check the number of:
- customers (Sales -> Customers -> Customers)
- and orders (Sales -> Orders).
How to check number of entities on VirtueMart?
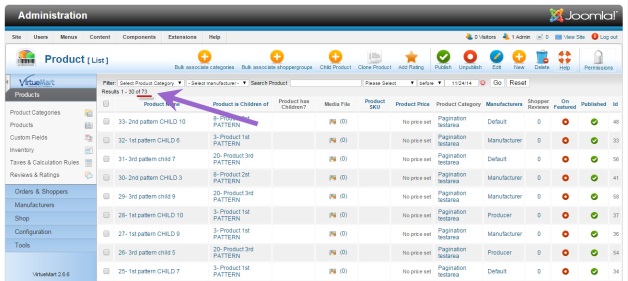
1. To see the number of products, open Joomla! admin panel and go to Components -> VirtueMart -> Products. In the top left of the list you will see the total quantity of products in your shopping cart.
2. According to the same principle, check the number of:
- Customers (Components -> VirtueMart -> Shoppers)
- and Orders (Components -> VirtueMart -> Orders).
How to check number of entities on WooCommerce?
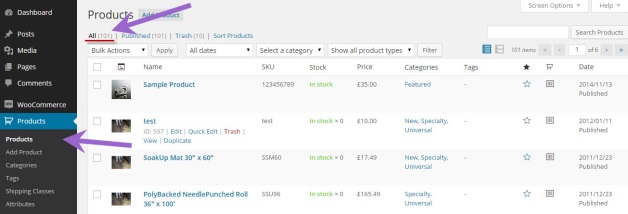
1. To see the number of products, go to Products -> Products Tab in your WordPress admin menu. In the top left of the page you will see the total quantity of products in your shopping cart.
2. According to the same principle, check the number of:
- customers (Users -> All Users)
- and orders (WooCommerce -> Orders).
If you will need help, you are also free to contact our Support Team.
Note: During migrations to and from WooCommerce all the “Draft” products will be transferred as “Disabled” ones. Also, our service doesn’t move customers of a type “Administrators”.
The rest of entities will be moved with no complications.
How to check number of entities on Shopify?
There is no possibility to see Shopify’s entities in its admin panel. To do that merchants need to access store’s API, or use the following method.
1.Type the admin url of your store into the address bar - for example: https://mystore.myshopify.com/admin/;
2.Then, write the entities you’d like to count - products, customers etc., after the slash - https://mystore.myshopify.com/admin/products/;
3.Finally, paste count.json to the end of your link - https://mystore.myshopify.com/admin/collections/count.json

It should be noted too that we only move parent categories from Shopify. All the subcategories will be transferred as product tags to your target store.
Last point - migration of orders. There are archived and non archived orders on Shopify. And if the archivation is on - all of them will be transferred as Archived to your target store.

Archived orders look like this
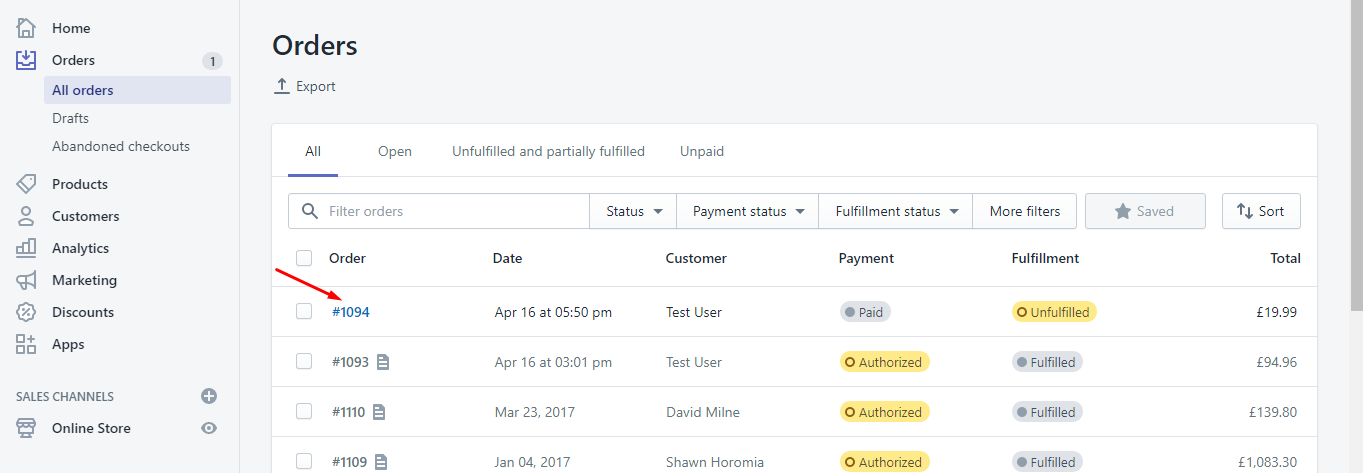
Non archived orders look like this
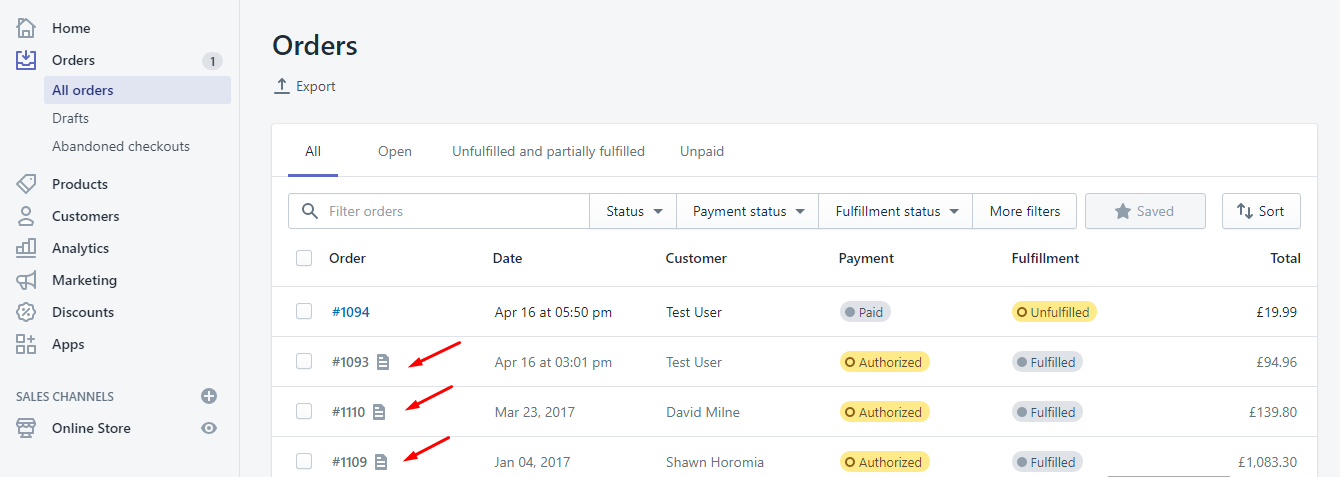
Note that archived orders can’t be counted via count.json.
Yes, Cart2Cart does migrate order status history but only within the limited number of platforms - namely, these ones:
From
- 3dCart
- CubeCart
- VirtueMart 1.x
To and From
- Magento
- OpenCart
- OsCommerce
- PrestaShop
- WooCommerce
- ZenCart
Although Cart2Cart doesn’t migrate currencies, it is possible to assign them from your Source to the Target Store.
In order to do that, create currencies on your Target Cart first. Then, match them during the appropriate Migration Wizard Step, to ensure the proper transfer. Finally, currencies are mapped and will be shown on the Target store in accordance to your set up.
Contact Cart2Cart Support team, in case you have any further questions.
For technical reasons, migration between 2 e-Commerce plugins within 1 CMS is impossible, since Source and Target stores need to have different URLs. Consequently, if you’re willing to perform migration between 2 e-Commerce plugins (WooCommerce stores, for example) installed on the same hosting, you need to have 2 CMS’s (WordPress’s, in our case).
Please note: In case your CMS root folder is different from your server root folder, ensure Connecting Bridge files are in your CMS root folder, e.g. your-store.com/drupal5/, not your-store.com/.
(more…)We strongly recommend to try the DEMO migration before implementing payments or live migrations. You will be able to check the migration performance for limited number of items.
If the Migration does not work for you, please contact our support team. Our technical engineers will investigate the issue and provide you with relevant solutions.
The main reasons of migration interruption can be the following:
- the connection to your store was interrupted or not available;
- the issue occurred with your Source/Target Database;
- you were trying to proceed with two or more migration at the same time for the same stores;
- Bridge.php file was deleted during the migration process.
Yes, it is possible to choose the number of entities you’d like to move, but only within Data Migration Service Packages. Unfortunately, such option isn’t available for automatic migrations.
All the migrations performed on dedicated servers on Amazon's Elastic Cloud (EC2) service. This trend gains vast popularity lately. Cart2Cart tries to keep up with the times and take advantage of new technologies. Now all Cart2Cart users will benefit from the flexibility of Amazon's cloud computing service. It means your migration will no longer have to stay in a queue awaiting its turn - it gives the possibility of simultaneous migration of multiple stores.
Having dedicated server for every migration will greatly reduce time frames of your information transition. Besides, this also guarantees you high level of data security as it will be stored on Amazon's servers. We hope you will appreciate the enhanced speed and overall optimised performance of the service.
Yes, it's possible to migrate within same domain using different folders.
You can have your source store in root - www.mystore.com and target store in some subfolder - www.mystore.com/targetstore/
(more…)Connection Bridge files are used to establish a connection between your shopping carts and make the data exchange possible. They are special access gateways that are completely secured by unique Security Tokens bounded to your personal account and provided by Cart2Cart. To work correctly, Connection Bridge folder needs to be located in your store’s root folder.
After creating a migration you’ll find yourself on the “Setting Up” Migration Wizard Step, where you’ll be asked to provide the URLs of your Source and Target shopping carts, and download the Connection Bridge files (only for self-hosted carts e.g Magento, WooCommerce, PrestaShop, etc. For hosted shopping carts e.g. Shopify and BigCommerce, you'd have to provide additional API info instead).
This video demonstrates the procedure of the Connection Bridge installation for Magento. However, it’s as well applicable for all self-hosted shopping carts.
How to install Connection Bridge files?
The procedure of Bridge installation via FileZilla FTP client is identical for macOS, Windows and Linux users.
There are two ways to set up Connection Bridge - manual and automatic. By default, you’re offered to do it manually.
In case you are setting up the Connection Bridge manually:
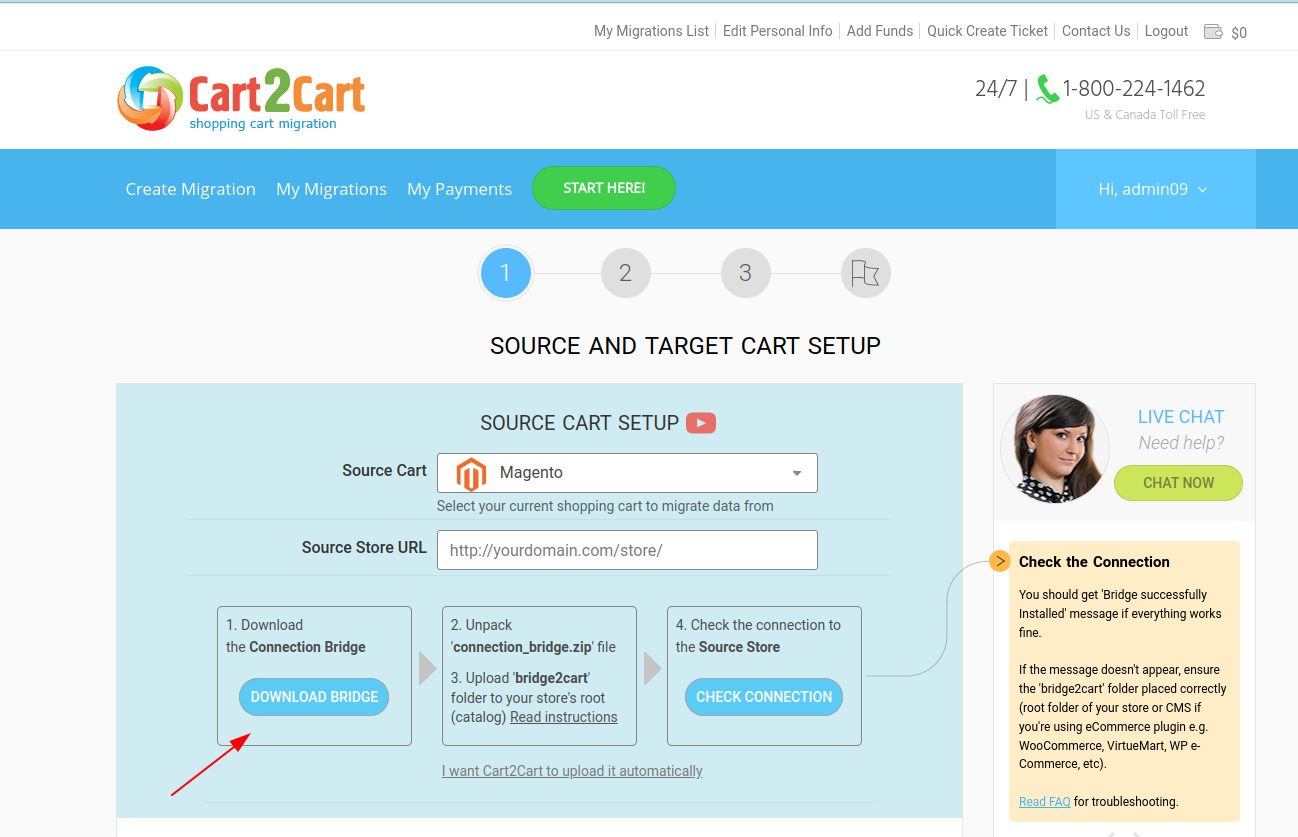
1. Download Connection Bridge files. After you provided your Source / Target store’s URL, download the Connection Bridge. Save the zip file on your hardware and extract it.
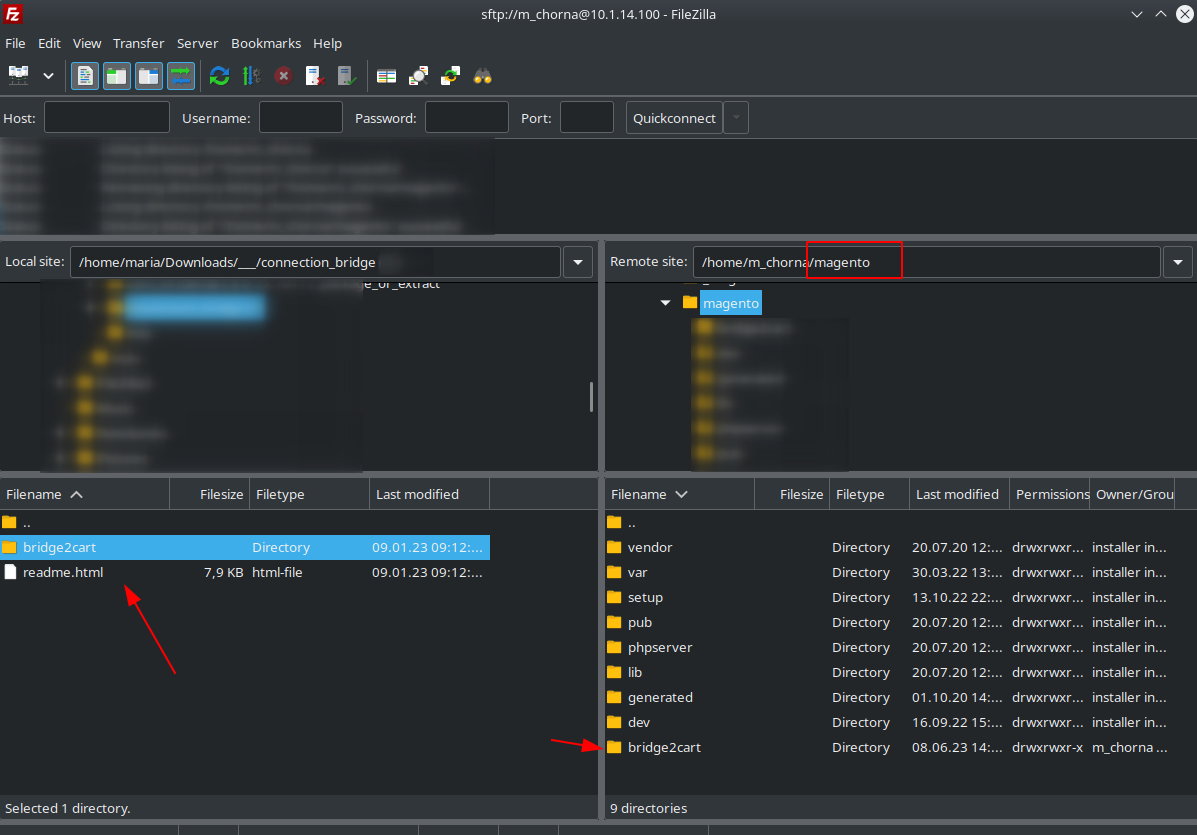
 2. Upload the folder to your Source / Target store via FTP. Whichever FTP client you are using (FileZilla, WinSCP, FileFTP, CuteFTP) enter the root folder of your store and paste the bridge2cart folder you extracted from the zip file previously.
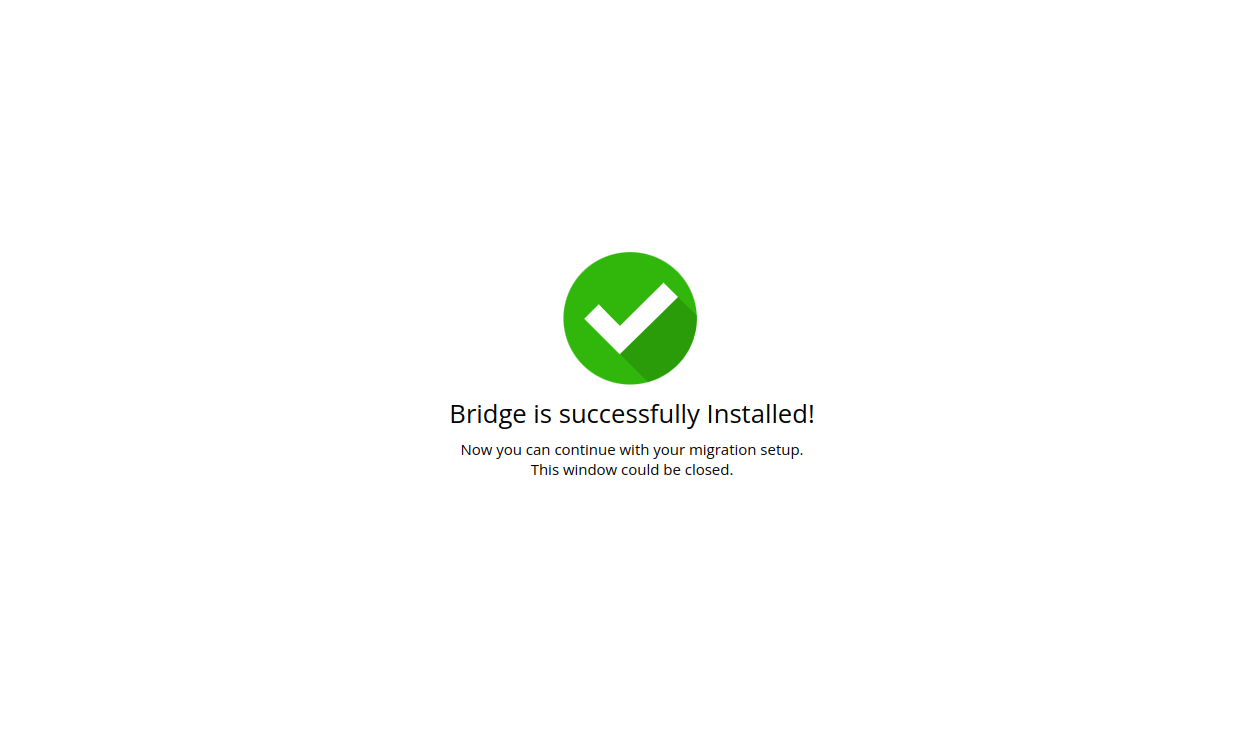
3. Check whether Connection Bridge files have been installed correctly. Click the confirmation link to ensure you’ve set up Connection Bridge properly.
If you see this message “BRIDGE_INSTALLED” - Connection Bridge is working correctly and you can proceed with the next step of Entities Selection.
In case you choose the automatic approach:
Provide your FTP details - host, port (If it’s different from “21”), login, password and the path to the folder where your store is.
Overall, the fields should be filled in a way similar to this:
- Host: 10.4.5.24
- Port: 72 (or skip the field if your port is 21)
- Login: User
- Password: 555222
- Path:/path/to/your/store (or skip the field if your store is right in the “home” folder)
Troubleshooting during the Manual Bridge Setup
Q: I’m clicking on the link but “BRIDGE_INSTALLED” message does not appear. What shall I do?
A: Try re-uploading the Connection Bridge files and setting the following permissions:
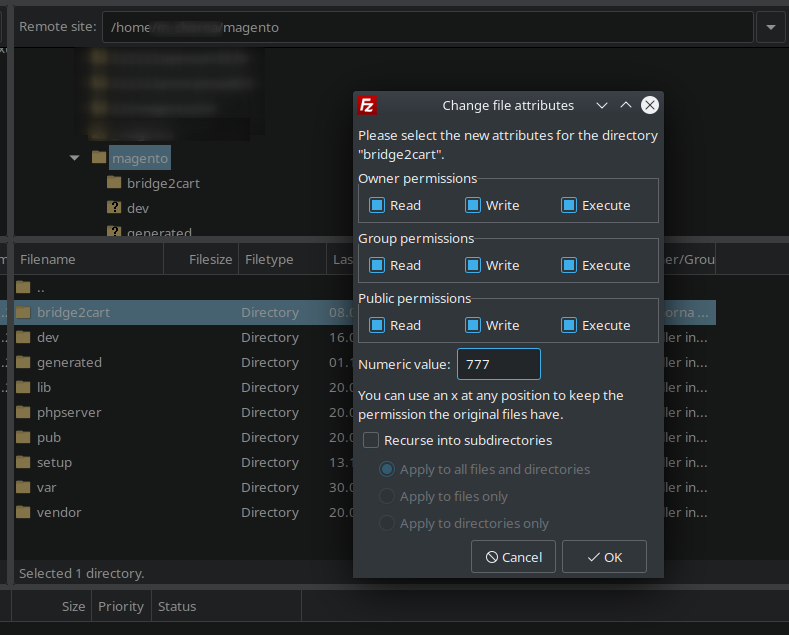
1. 755 or 777 for "/bridge2cart" folder, depending on your server configuration (If you are using the popular FileZilla FTP client this task is easy to complete - enter the root folder of your store, right-click on the bridge2cart directory, select file permissions and set the necessary value)
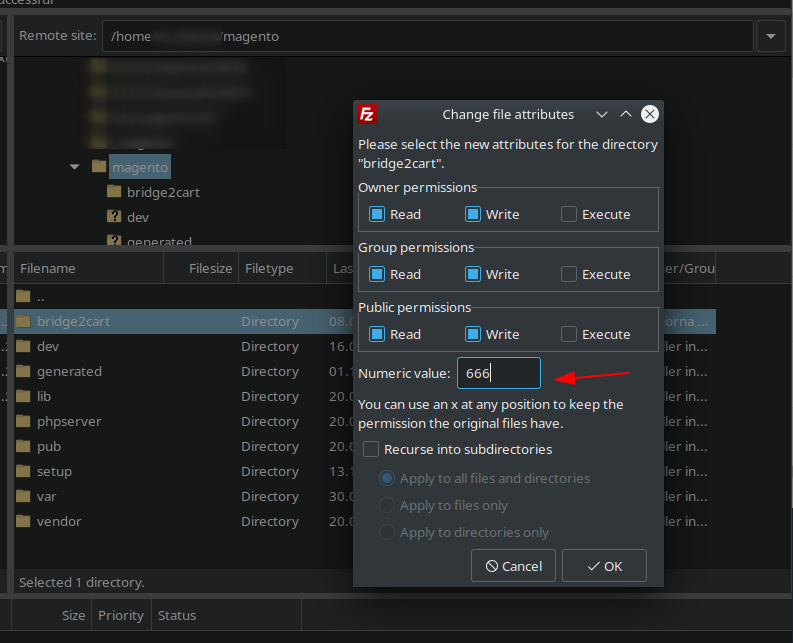
2. 644 (if "/bridge2cart" folder permission is set to 755) or 666 (if "/bridge2cart" folder permission is set to 777) for "bridge.php", depending on your server configuration (open the bridge2cart folder, right-click on bridge.php select file permissions and set the necessary value)
If you are using other FTP client, change permissions in the way that’s appropriate for it. >
Q: Aaugh, it still doesn’t work!
A: No worries, we’re sure your issue is easily resolvable. Please, describe your problem in details and submit a ticket so that our Support Team could give you a hand.
Is it secure?
Connection Bridge exists for one purpose only - making the data exchange possible. By installing it you allow our service to copy, and by no means modify, the data you’d like to move to a target store.
With each Connection Bridge we provide a unique Security Token. Such measure will let no user, except you, access your source store database
Once the migration is done you can delete Connection Bridge.
Note! We strongly recommend to turn off your website redirects to ensure proper functioning of the Connection Bridge files. Go to "http://[yourstore url]/bridge2cart/bridge.php" to check if you need to turn off the redirects. If the link is redirecting you to another location, disable the redirects in your .htaccess file, a hidden file residing in your "shop" folder.
Please, do not remove Connection Bridge files from your FTP during the data transfer process. Otherwise, we can't guarantee proper migration results. You will be able to delete Connection Bridge files right after your store migration is over.
Make sure your ISO code is specified properly.
You may also install the language you need and set it as the default language of the store.
This procedure could be performed via the admin panel of your shopping cart.
(more…)Of course. You can close your browser window any time after shopping cart migration has started. Current migration(s) status is reflected on "My Migrations" page in your account.

We offer secure forms for sending access data. Please choose the most appropriate for you.
Source Store is your current shopping cart you want to migrate from.
Target Store is the shopping cart you want migrate to.
Provide full access to both Source and Target store admin and FTP
Be sure to provide access details!
- Check if FTP accounts you provide have permissions to upload new files.
- Specify the email you have used for Cart2Cart registration and migration ID.
- Reset passwords after migration was successfully completed .
It is a frequent problem that while you are migrating data to a target cart, your source shopping cart is updated with new items. Thus, users need recent data migration.
Recent Data Migration service is available only after Full migration is completed.
Recent Data Migration with Cart2Cart is as easy as it can be:
1. Login to your Cart2Cart account.
2. Find your migration on “My Migrations List” page.
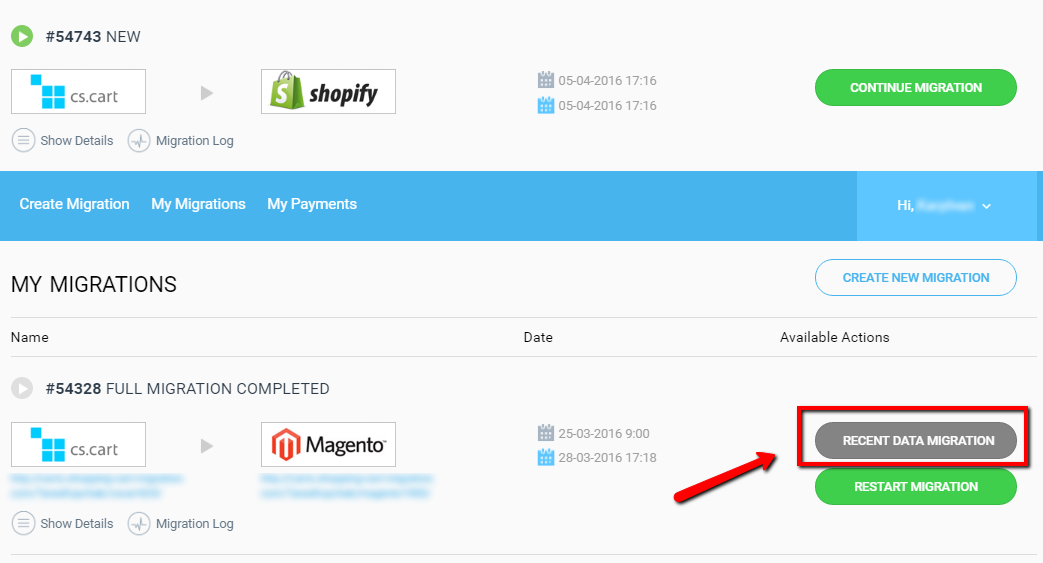
3. Click “Recent Data Migration” button. It will help you transfer the latest entities that were added to your Source store since last performed migration, even if you’ve completed a couple of Recent Data Migrations after the full transfer.
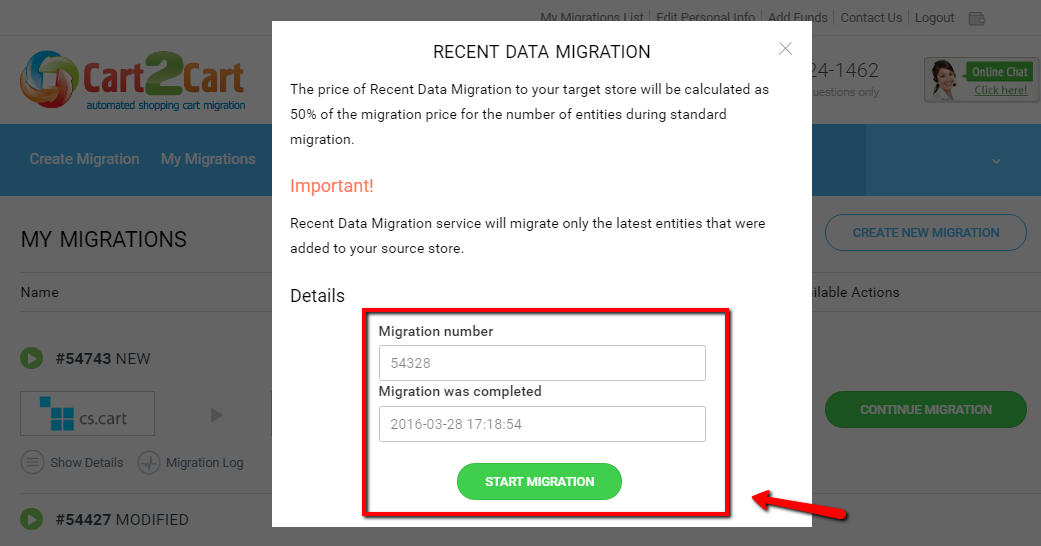
4. Click “Start Migration” button.
5. After that follow the standard migration procedure.
Note: If items were deleted from a source store, Cart2Cart won’t be able to move them.
Remigration service is called for the repeated transfer of the same data amount. Regardless the fact the entities may be modified (e.g. products may have new descriptions, etc.), their quantity should not exceed the initial number by more than 500 entities. If the amount of new entities for the remigration is >500, you'll need to create a new full-price migration.
(more…)BigCommerce
You need to enable the API for a user and API key.
- Log in to store's control panel.
- Click on Users.
- Edit the user for which you wish to enable the API.
- Scroll down to the bottom of the page, and check the box next to Yes, allow this user to use the API.
- After that you will get the API URL and Token for the user.
- Save the result.
MobiCart
You need to retrieve API Key from your MobiCart admin account.
- Sign in to your MobiCart account.
- Go to My Account > Accounts Settings
- Select tab API
- Generate API key or modify exsisted.
Shopify
You need to retrieve API Password from your Shopify admin account.
- Log in and go to Apps -> Manage Apps page.
- Click on the link in the right bottom corner to choose a private application activation.
You may also use the following URL to access this page - http://YOUR-SHOPIFY-STORE-URL/admin/api - You will see your API Password.
- Please note, in case the and API Password do not appear, click on “Generate new application”.
Click here for illustrated instruction
Interested in seamless integration with Shopify API, 3dcart API, BigCommerce API or MobiCart API? Check API2Cart for more details. (more…)
Warnings inform about non-critical issues detected during the migration process. The number of warnings can be seen in the special unit after the Demo or Full migration on the Migration Details page.
Warnings may be caused by:
- mismatch of the migrated data charsets or the existence of special characters that could be displayed incorrectly at the Target store;
- coincidence of the IDs that are to be migrated and those, that exist at the Target store. This happens if the option of “Clear current data on the Target store” was not selected during the migration setup;
- migration of customized shopping carts, modified fields or tables;
- other reasons.
Each shopping cart uses its own way to build URLs for pages (products, categories, static pages, etc.). Unfortunately, Cart2Cart service does not support migration of the URL structure. You can maintain it manually if your Target platform supports flexible URL settings.You can also set up permanent redirect in your .htaccess files to avoid 404 errors on your original URLs.
Note: Nonetheless, Cart2Cart provides a possibility to migrate product and category SEO URLs within a limited number of shopping carts. Find more detailed information here.
Absolutely not. Migration process won't affect your current (source) shopping cart in any way. It will be up and running successfully during the migration process.
Migration Estimator allows to calculate not only the cost, but also the approximate time of migration performance.
We can not provide you the exact estimates of migration time as it depends on each particular migration case. The time of your data migration will depend on:
- your server peculiarities
- type of shopping carts you migrate from and to
- the quantity of items for migration
- type of store data
Migration estimator shows the average time necessary for the quantity of entities you specify, not considering the above mentioned details. So don't expect the migration to complete exactly in the time, previously estimated
Please, be sure that we do everything that depends on us to provide you with the highest speed of migration performance.
(more…)We are definitely interested in extending supported shopping carts list and we're constantly working on adding more carts to it. The priority of adding new carts depends on the number of requests from potential customers.
We plan to support most of major shopping carts. Send us a request and we will try to add your cart to a supported platforms list as soon as possible.
Yes, we offer partial cart customization. Our service works directly with databases. Visual and functional store customization doesn’t affect the migration process. Some database extra fields are supported as well. Customized Migration Service is done on customer’s request.
Some database extra fields are supported as well.
You can use DEMO migration to check how your cart customization will be performed.
Cart2Cart is not complicated even for the first time use. You need to follow Migration Wizard instructions and it will guide you through all migration process. However, the following tips may also be useful.
- Make sure that Source and Target stores are installed properly (please check scripts and database) before using Cart2Cart service. You may skip this step if you’re using hosted stores (SaaS).
Stores should have different URL addresses.
For example, if you need to migrate to a new store on the same domain just install your Target store into subfolder or site subdomain (for example: www.mystore.com is Source URL, and www.mystore.com/newstore/ or newstore.mystore.com are Target URLs).
- Download Connection Bridges and install them to both Source and Target sites as described in https://www.shopping-cart-migration.com/faq/10-general-questions/47-what-are-the-connection-bridge-files-and-how-to-download-them
- Turn off site redirects to ensure that bridge works correctly.There are 3 ways to turn off redirects:
- Web hosting control panel is a web-based interface that allows customers to manage their hosted services including redirects (cPanel, AlternC, Baifox, DirectAdmin, etc.) To remove an existing redirect in cPanel you have to click a cross button corresponding to the redirect you would like to remove. After that you have to confirm your decision by clicking Yes.
- Enter shopping cart maintenance mode and make changes (turn off redirects) in source code if you are an owner of open source cart. In a case, you use hosted platform, ask support to help you.
- Check if there are redirects on your shopping cart with the help of .htaccess file. Usually you just need to rename or add a few lines to your .htaccess file to turn off redirects.
- Check your website and/or server firewall settings (increase number of connections from single IP address if needed) to ensure proper work of Connection Bridges.
- In some cases an increase in server load may occur on Source and/or Target hosting accounts during the migration process.
- Please check the Quick Demo tour https://www.shopping-cart-migration.com/how-cart2cart-works to see the migration steps.
- You can also use free DEMO migration with the limited quantity of products to see how the process is actually performed. If a problem occurs on the free DEMO stage, please contact Cart2Cart support.
If your Demo migration has been completed successfully you can start the FULL migration.
Once the migration has been started you may close your browser window. You can view your migration progress/status on “My Migrations” page. - Please do not modify any store scripts or database information during migration process (do not drop database or restore/reinstall your store etc).
- Note that you could see the results on your Target Store only after migration has been completed.
If you need a help to perform a migration you can use Support Service Package and our professional team will make the migration for you.
(more…)Yes, we can configure the migration for you for very reasonable price. You will simply need to check the results of DEMO migration and start live.
Cart2Cart performs the migration using a separate secure Hetzner server, and the data is not stored after the migration has been finished.
Cart2Cart does not migrate credit card information and passwords.
We use secure HTTPS protocol for all connections and only authorized staff has access to the migration process. Find more info in our Security Policy
Every merchant knows his business requirements and decides what kind of a shopping cart platform best meets their business demands. So it’s hard to recommend a specific ecommerce platform since each of them has its benefits and drawbacks. That’s why you need to define your needs and search for the cart that can satisfy them.
Our service supports 85+ most popular shopping carts which you can choose to migrate to/from. You can find the ecommerce platform reviews and comparisons on our blog, which may help you make the right choice.
Cart2Cart supports passwords export from and import to the particular shopping carts. To check the full list of migration pairs where the option is available follow Cart2Cart Password Migration page.
We can't migrate passwords for all the platforms due to differences in algorithms for encryption in shopping carts. Nonetheless, in case your Source and Target shopping carts use the same encryption algorithms, customers' passwords will be migrated. If not, you will have the possibility to change the hashing algorithm on your Target shopping cart so that they were the same.
Exceptions are hosted shopping carts like 3dcart, Bigcommerce, Volusion, Shopify, CoreCommerce, etc. In such a case, your clients should use the Password Recovery tool on your Target shopping cart to access their accounts. For more detailed information on password recovery read this article.
With any questions unclear, feel free to contact our Support Team.
"After performing full migration I have noticed that product variants weren't transferred. What's the reason for that?" The service doesn't support the migration of product variants due to peculiarities of some shopping cart functionality. Here belong such carts as MijoShop, OpenCart, JooCart, AceShop . Thus, you will not be able to migrate product variants TO and FROM these carts. To find out more details, please contact Cart2Cart Support Team.. Note: To prevent the issue it is strongly recommended to perform free Demo Migration and check the results on your target store. (more…)
"Product variants were migrated correctly, but on the front end there is no differentiation in prices for product variants."
Such shopping carts as Interspire, PrestaShop differ technically from shopping carts like Magento or CS-Cart in setting prices for product options. In Interspire you set the price for each product variant separately, in Magento, CS-Cart the prices of product options are calculated according to basic product price. Due to these technical reasons Cart2Cart doesn't support migration of product variant prices. You should handle this setting on your own after the migration.
Check the following steps to add Cart2Cart IPs to white list and prevent accidental blocking.
Instruction for WHM (Web Host Manager)
1. Login to WHM (Web Host Manager)
2. Go to the bottom of the left menu to the Plugins
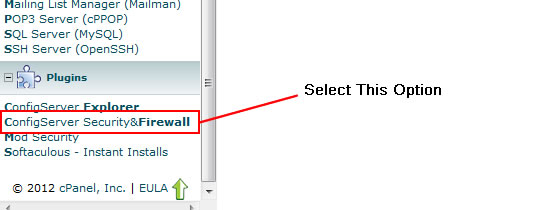
3. Click on the ConfigServer Security&Firewall option.
4. Next to the “Quick Allow” button, type the IP you wish to Allow (Green Box) and press “Quick Allow”.
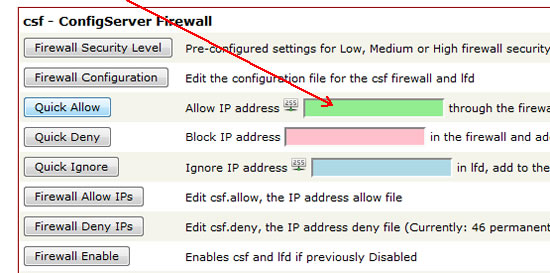
See the following instructions to learn how to whitelist IPs in cPanel
- in inMotion Hosting
- in HostGator
Instruction for Plesk user:
- Login to Plesk.
- Click Websites & Domains tab at the top.
- Click SQL Whitelist Beta icon.
- Click Add IP, select service and type IP; Click OK.
The list of IPs you need to add:
- 5.58.76.130
- 148.251.79.211
- 116.202.82.183
- 154.38.131.10
- 23.19.115.248
- 23.19.116.221
- 31.186.34.167
- 188.116.5.34
- 154.30.33.133
- 31.186.37.115
- 154.3.253.49
- 168.81.41.61
- 168.81.16.90
- 154.13.147.141
- 86.125.93.44
- 5.101.148.187
Note: Make sure you have the following ports opened - 443 if the URL of your store begins with https, and 80 if the store URL starts with http.
(more…)Cart2Cart provides Target Cart Installation Service with default settings, but doesn’t configure admin panel.
Cart2Cart automated migration service guarantees accurate eCommerce data migration, but is not responsible for switching domain names. To change your domain name you should contact your hosting provider and follow the instruction that will be given.
The process of changing webstore domain name requires the accesses and security passwords for the website and, thus, the procedure should be performed by the person who is in charge of the online store.
Use this detailed guide to get better understanding on how the process of domain switch is performed after data migration.
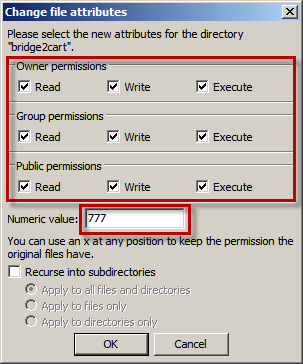
To set the correct permission (chmod 777) to Bridge directory you need to connect to your server through FTP application, for example Filezilla. Then, find Bridge directory and click the right button of your mouse on it.
From the menu choose “File permissions..”.
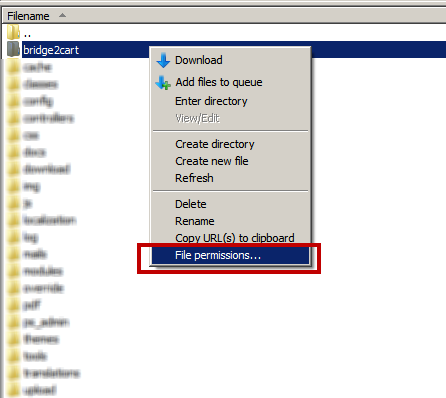
After that write 777 or check all permissions and save changes.
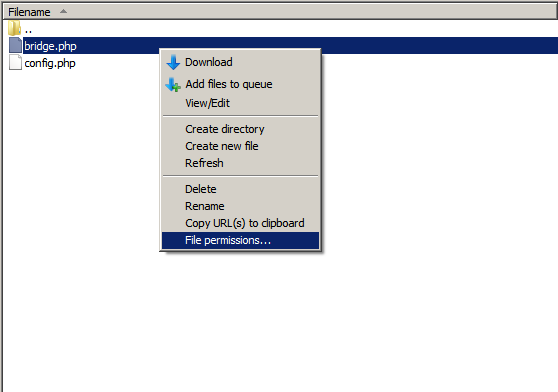
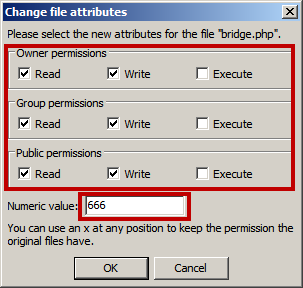
To set the correct permission (chmod 666) to the file bridge.php you need to connect to your server through FTP application, for example Filezilla. Then, find bridge.php in the directory bridge2cart and click the right button of your mouse on it.
From the menu choose “File permissions..”.
After that write 666 or check boxes near Read/Write.
There are two most common reasons why picture migration can be failed:
- You’ve deleted some pictures, but records about them are remained. So, they are not existing on your store anymore that’s why Cart2Cart fail to move them.
- You’ve changed picture folder name or location, and that’s why Cart2Cart can’t find a path.
What is the way out?
Do not move or change picture names on your own. To resolve this type of issue, you should contact Cart2Cart Support Team and provide store access (FTP details for open source carts or API Key and API Password for hosted carts).
Please download a new version and re-upload Connection Bridge at your store. For more information on how to install Connection Bridge visit the following link.
The most common reasons why your images may fail to migrate are:
- wrong names (encoding)
- images are stored in unusual place
- images are absent on the source store
- wrong folder permission (folder with images should have CHMOD 777)
Set the write permissions (chmod -R 777 [images_dir]) to images directory and to ALL sub-folders/files it contains.. - too many connections while images migration can be blocked by the Firewall
- not enough space on Target store
- wrong image type. Cart2Cart supports several image types: .png .gif .jpeg
On the page with migration results you can download CVS file with the list of failed images. You may check all the images that haven't been migrated and, if it is possible, transfer them by yourself.
Otherwise, please contact our Support Team so we can solve the problem.
(more…)In order to investigate issues or to troubleshoot reported problems Cart2Cart support technicians may require access to online shop, web server and database.
We understand that this kind of access information is sensitive and should bу treated respectively - as data that constitutes commercial information of a client. With this in mind, we will only require access to your online store in the cases when it is absolutely inevitable.
We have taken every precaution to ensure that our systems which store access information is highly secure. However, there are additional precautions that we advise our customers take before providing us with access credentials.
In every case when we require access to online shop, we will make it clear to you exactly what access is needed, and why.
Short summary of this FAQ
- When providing a technician with access to your online store, it is always best to change the password of admin account been provided with a random password temporarily, while the issue is being traced by us.
- When your problem has been resolved, you have to change the passwords of all provided accounts as soon as possible.
- In all issues that require access to your online store, the technician will make it clear to you exactly what access we need.
Access to your online store
Depending on the task which needs to be performed, a Cart2Cart technician may require access to your online store. We strongly recommend you to change the password of Admin/FTP accounts being provided with a random password for Cart2Cart support for the duration of the issue, with only the essential permissions to your web store.
- Change the existing password of user/staff account with a random and complex password.
- Please make sure that you change all the passwords right after your issue is resolved.
Access to administrator account
More often than not, we will require access to an administrator account on your online store. Follow the steps outlined in the Access to your online store section of this article.
Access to an FTP or SSH account
In order to detect and investigate the problem, Cart2Cart Support Team may require access to the files of your online store installation. Follow the steps outlined in the Access to your online store section of this article.
Make sure that this account is a user-level account that has access to the directory in which your online shop is installed, unless our technician specifically requests an unrestricted access account (see below).
'Root' (unrestricted access) to your server
If a technician asks for 'root access' to your server (a root account with unrestricted permissions), please do not be alarmed. We will ask for such access only in very rare cases - i.e. when our ability to diagnose and solve your problem absolutely requires it (such as generating or monitoring server logs, or making server configuration changes).
When providing us with root/unrestricted access to your server, it is obligatory to follow the temporary account creation steps outlined in the Access to your online store section of this article.
Firewalls and IP based authentication
If your systems use or are protected by IP address authentication (e.g. if you have a firewall), please let us know and we will provide you with the list of our office IP addresses to allow through.
(more…)There are no universal technical requirements for all the stores as different platforms have different technical peculiarities. However, there are some recommendations you should consider before setting shopping cart migration.
Recommended PHP configurations:
- memory_limit - 128M (512M for Magento)
- post_max_size - 16M
- max_execution_time - 60
If Suhosin module is installed:
- suhosin.post.max_value_length - 16777216
- suhosin.request.max_value_length - 16777216
Also, it is advisable to switch off the limits for the number of requests to server, as well as firewalls and basic authentication.
Cart2Cart is an automated migration service which allows automated data transfer from one platform to another. Currently, the service supports migration from/to all the most popular shopping carts. The most beneficial opportunities for e-merchants include:
- No technical skills required. Since the process is fully automated, even a newbie can handle it. Intuitive Migration Wizard helps to perform a straightforward migration in a few steps.
- Cart2Cart requires no software installation. The migration is performed on a secure dedicated Hetzner server with restricted physical access.
- The service supports migration of products, customers, ordersm reviews, etc. with all the corresponding data between various eCommerce platforms.
- Flexible pricing system allows to pay only for the transferred entities. The migration price can be calculated with the help of the Migration Estimator.
- Free Demo Migration provides a possibility to try how the service works before launching the Full migration. It allows moving a limited number of entities to your target store, and only takes about 30 minutes.
If you have some questions, Support Team is ready to answer them, 24/7, via live chat, phone or ticket.
(more…)It is really easy to start working with Cart2Cart. The whole procedure can be divided into a few simple steps:
- Make sure your current shopping cart is in the list of the supported platforms.
- When done, calculate the price of your specific migration case via the Migration Estimator. Choose the Source & Target carts, enter the number of entities you need to move, and get the final price estimated.
- Find the access details of the Source cart and check if your Target cart is installed properly.
- Go through the Migration Wizard and get ready to start selling on the new shopping cart.
Cart2Cart allows to map (or, in other words, match) order statuses on the source shopping cart with the corresponding ones on the target cart. This is called “order status mapping” and is used to migrate order data properly.
Typical examples of order statuses are: pending payment, delivered, cancelled, refunded etc.
Why order status mapping is necessary?
Each shopping cart platform has its own default order statuses, plus many platforms allow creating custom order statuses. It is likely that order statuses on your Source and Target platform will not be completely identical. In this case, order status mapping lets you indicate how you want to migrate orders with specific statuses.
For example, “Completed” order status on your source cart can be matched to “Delivered” status on the Target platform. This way, when the migration is complete, all orders which had “Completed” status on your source platform will have the “Delivered” status on the target one.
If your target shopping cart lacks certain order statuses, they can be created using the target store Admin panel before moving on with your migration. You can name order statuses on the target shopping cart according to your needs - either exactly corresponding to those within your current cart or in a different way. Whatever variant you choose, order status mapping gives you control over how your orders will be migrated to avoid any confusion after the migration.
How to map order statuses?
1.If needed, create the desired order statuses on your Target store.
2. In the Migration Wizard, make sure you select Customers and Orders to be migrated (this step is available after the connection between your stores has been established).
3.You’ll be prompted to perform data mapping. Click the blue icon next to Order Status Mapping in the Migration Wizard to expand the section.
4.When done, click Next to proceed with your Migration setup.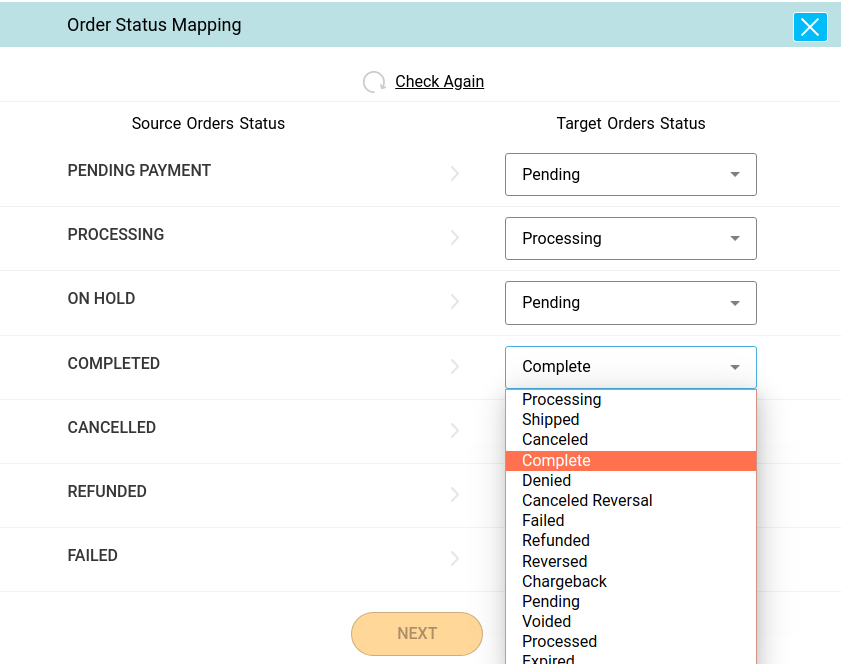
Due to technical peculiarities of some shopping carts the service currently can not migrate prices of product options/variants.
This issue may occur when migration is performed FROM such carts as:
- Interspire
- ChannelAdvisor
- Oxid
- PrestaShop
- Shopify
- Shopp
- Tomatocart
- VirtueMart
- WooCommerce
- WP e-Commerce
- Veyton
and TO such carts as:
- Magento
- Opencart
- CS-Cart
- AceShop
- Oscommerce
- Loaded Commerce
- JooCart
- LiteCommerce
- MijoShop
- osCMax
- Pinnacle
- Squirrel cart
- SunShop
- Volusion
- xtCommerce
Product options/variants are migrated accurately, so you can set the prices manually after the data transfer is complete.
It sometimes happens that the image on the Target store is displayed in a different way than it is on the Source store. It can happen for several reasons:
1. The image in your database and storefront has different sizes, as it was resized from admin panel. Cart2Cart migrates the size of image as it is saved in the database, and not the specific interface settings.
2. Different size of image may be also caused by template settings of your Target shopping cart
In case your image is not displayed properly, please contact us and we will help you with image resolution settings.
WooCommerce, Shopp and WP e-Commerce are all eCommerce plugins for WordPress. Thus, when migrating to and from these shopping carts you should download bridge to the root folder of WordPress, and not the root folder of the plugin.
This also applies to eCommerce plugins for Joomla CMS.
The option of Recent Data Migration allows to migrate new entities that appeared on your Source store during or after data migration. As with the regular migration, performing Recent Data Migration you can choose what entities you would like to migrate - only new customers, orders, products or all new items that appeared on your Source store.
Please note: if you use the option of Recent Data Migration, the data, including stock and order statuses, won't be updated.
After you've provided Source and Target store URLs and performed Demo migration, you can not start new migration with the same store URLs. In Migration Wizard you will receive a notice and will be redirected to the previous migration steps. You will be able to edit current migration settings, or provide new store URLs.
If for some reason you have to perform another migration with the same store URLs after Full migration was completed you have to request for Remigration service. Note that remigration requires clearing all the data that was migrated into your target store during the initial migration. In case you have some new items on your Source store that you want to migrate after Full migration is complete, you can use the option of Recent Data Migration.
Reseller is a company or individual who purchases products or services to resell them to potential customers rather than consume or use them. Resellers can use Cart2Cart to migrate stores for their customers and receive personal 30 % discount for migrations. If you are shopping cart vendor, eCommerce development company, hosting provider or freelance developer, a Reseller program is the right choice for you. You will be able extend the range of provided services offering shopping cart migration to your customers(for example, hosting environment+shopping cart migration). The more migrations you perform from your account, the more is your discount value.
Check Cart2Cart Reseller Program for more information.
Affiliate is a company or individual who promotes a product or service to potential customers, in exchange for a commission on the sale when such occurs. Affiliates don’t perform migrations themselves and only refer customers to Cart2Cart website (for example, via banner or a referral link on their website). Affiliates get 20% commission out of each migration performed by their reference. If you are a blogger or website owners Affiliate program will be most beneficial for you. You can expose information about the automated migration service on your websites and thus generate many leads.
For more information check Cart2Cart Affiliate Program.
When your store migration is complete, you should check the results of data transfer on your newly established store:
- Check your catalog and website data and make sure all the entities has been migrated properly and placed in the appropriate location.
- Take care of your SEO and design settings, as this data is not available for migration with Cart2Cart.
- Check your store availability. Make sure your domain name is active and your links are working properly.
- Test store functionality. Create test product and make test purchase following the standard procedure.
These checks should be done immediately after migration. In case any issues are detected, please contact our Support Team.
After 1-2 days after full migration, ensure that all the links and forms on the website are active. For the next 2-3 weeks, continue website monitoring to be sure that all the data and files were successfully migrated.
This error means that we’ve detected incorrect access details and can not connect to your MySQL database. It may be caused by source files structure customization or any other reasons. In case you see this type of error during migration installation, please, check your MySQL access details and user permissions or contact our Support Team for further instructions.
(more…)Just set up the migration and choose the entities to move – the service will do the rest.
Try It FreeDelegate the job to the highly-skilled migration experts and get the job done.
Choose Package

